
The QuickBooks H202 error can indicate an error in the multi-user mode. This error may get triggered when multiple people try to open the company file from their workstations. Considering what the exact cause is, there can be numerous ways to fix the QuickBooks error H202. One of the ways can include using the QuickBooks Tool Hub or implementing the QuickBooks File Doctor Tool. Such tools can be downloaded and set up on your computer. Afterward, they can easily diagnose the causes of the error and resolve it.
1. What is the QuickBooks Error Code H202?
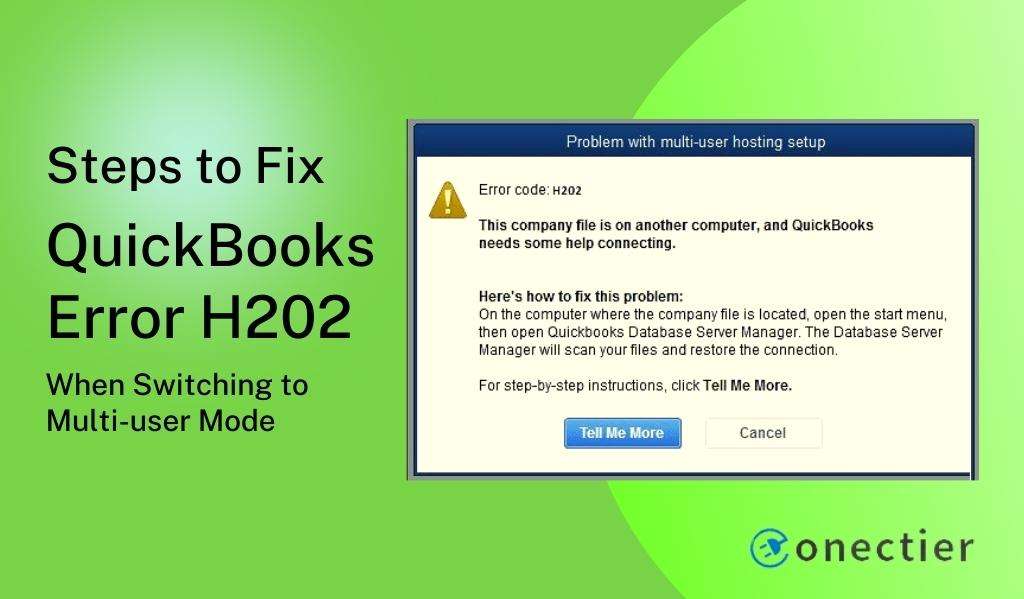
The QuickBooks error H202 mode issue can come up when someone tries to switch the mode from single to multi-user. If you are facing this error, a message may be displayed on the screen mentioning “You are Trying to Work with a Company File that is Located on Another Computer and this Copy of QuickBooks Cannot Reach the Server on that Computer. (H202)”.
2. Causes of QuickBooks Error H202
The QuickBooks error H202 can emerge due to a number of causes. The main cause of this error can be that the server and QuickBooks are unable to exchange the data due to restrictions by the Windows Firewall.
Other causes for the occurrence of QuickBooks error code H202 may include:
- The host setting may not have been correctly configured which may let the error arise.
- It can also happen that the .ND file is either damaged/corrupted.
- Services like QuickBooksDBXX or the QBCFMonitorService may not be running.
- The Database Server Manager of QuickBooks might be facing some problems which may lead to the QuickBooks error H202.
3. How to Fix Error H202 in QuickBooks?
The QuickBooks error H202 can be fixed by downloading the QuickBooks Tool Hub. QuickBooks File Doctor Tool can also be used for this purpose. Verifying the QuickBooks services can provide help in fixing the error when they have stopped working in the correct manner. Additionally, Windows Firewall can be configured to stop seeing the H202 error code.
Along with these, the details of more fixes for this error code can be found below.
Fix 1: Downloading and Installing QuickBooks Tool Hub
There may be situations when you are unable to find the QuickBooks error H202 multi-user mode issue’s cause. Installing the QuickBooks Tool Hub can let the users recognize the issue. You can close down QuickBooks and download the QuickBooks Tool Hub application. Now, store the company at a location where it can be accessed easily. Go to the QuickBooksToolHub.exe file and open it. Use the tool for diagnosing the issue’s cause and then fix it.
More steps to clear the error code via the installation of QuickBooks Tool Hub are given below:
- Shut down the “QuickBooks” software.
- Download “QuickBooks Tool Hub”.
- Store the file in an easily accessible location on your computer.
- Open the “QuickBooksToolHub.exe” file.
- Keep following the instructions as shown on the screen and complete the installation.
- Now, click on “Agree” for the terms and conditions.
- Once the installation process is over, click twice on the “QuickBooks Tool Hub” icon for opening the tool.
Now, run the QuickBooks Database Server Manager from the Desktop. Finish the steps below to do so:
- In “QuickBooks Tool Hub”, choose “Network Issues”.
- Tap on “QuickBooks Database Server Manager”.
- Opt for “Start Scan”.
- After the scanning is over, please hit “Close”.
- Open “QuickBooks”.
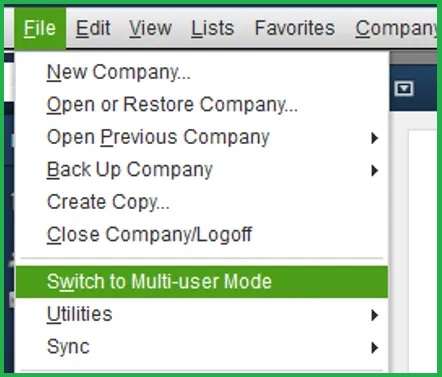
- Move to “File”.
- Click on “Switch to Multi-User Mode”.
- Finally, check for the “QuickBooks Error H202 Switching to Multi-user Mode” message.
The users of this software may also see other errors like OLSU 1013. You can find this error if a network issue has been established between the bank server and the QuickBooks account.
Fix 2: Using QuickBooks File Doctor Tool
QuickBooks File Doctor Tool can scan errors present in the QuickBooks software and help you to solve them. When an error like the QuickBooks error code H202 makes its appearance, the same tool can help in troubleshooting it.
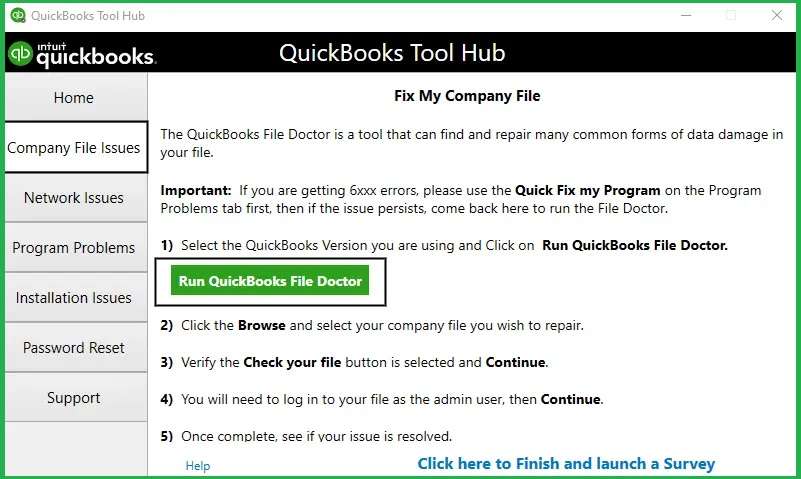
You need to download QuickBooks File Doctor Tool from the internet and then install it on the system. Reach QuickBooks Tool Hub and press the Run QuickBooks File Doctor option. Opt for Company File among the options present in the drop-down to start fixing the error.
Read the remaining steps to eliminate the QuickBooks Error H202 mode through the QuickBooks Doctor Tool:
- Download the “QuickBooks File Doctor Tool” from the internet.
- Once downloaded, install this tool.
- Go to “QuickBooks Tool Hub”.
- Now, click on the “Run QuickBooks File Doctor” tab.
- Among the drop-down options, choose “Company File”.
- You may also tap on “Browse” and then find the file.
- Put a tick against the box of the company file.
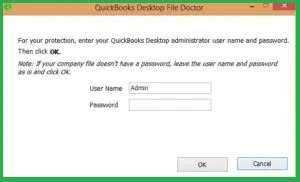
- Fill in the “QuickBooks Admin Password”.
- Opt for “Ok”.
Ensure whether this QuickBooks error H202 fix worked by running the software.
Fix 3: Verifying QuickBooks Services
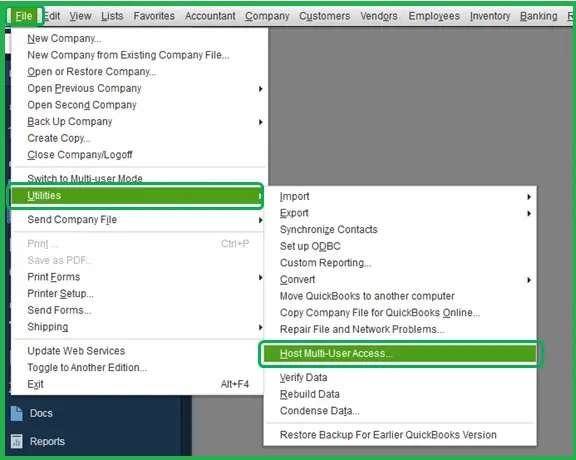
When QuickBooks services are not verified, you might face problems like the QuickBooks H202 error code. The verification of the services may work as a measure to troubleshoot the error. To verify these services, head to the File menu in QuickBooks and press the Utilities option. Then pick the Host Multi-user Access button. Move to Run and fill in Services.msc in the provided box to search. After that, press the Ok tab to go ahead with the verification.
- Move to “QuickBooks”.
- Head to “File”.
- Next, tap on “Utilities”.
- Choose the “Host Multi-User Access” option.
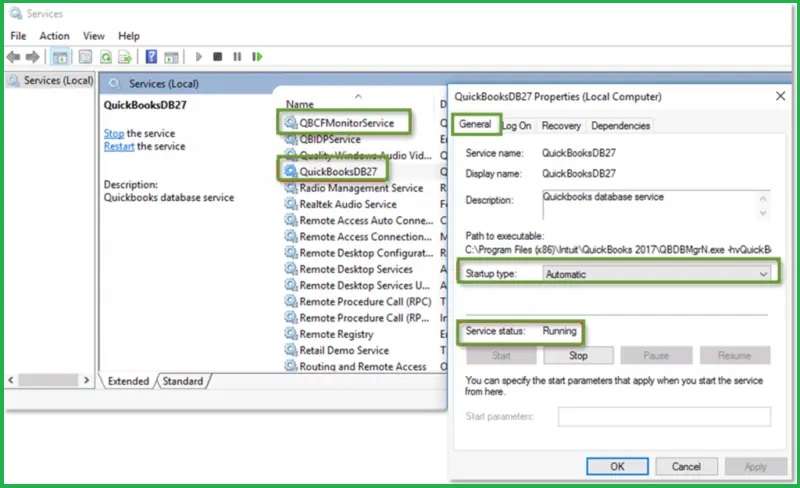
To verify the ongoing status of “QBCFMonitorService” and “QuickBooks DBXX”, keep following these steps:
- Go to “Run”
- Enter “Services.msc”.
- Select “Ok”.

- Now, click on the “QuickBooks DBXX” option.
- Move to “Startup” type and, in case it is not “Automatic”, switch it to “Automatic”.
- Verify the “Service Status”.
- Make sure “Running” is displayed.
- After that, click on “Recovery”.
- Choose the “Restart the Device” option among all the three drop-down bars.
- Press “Apply”.
- Hit the “Ok” tab.
- Re-do the method from steps 5 to 15 for verifying “QBCFMonitorService”.
When both services have been verified, you can start using the software. This QuickBooks H202 error fix should have worked.
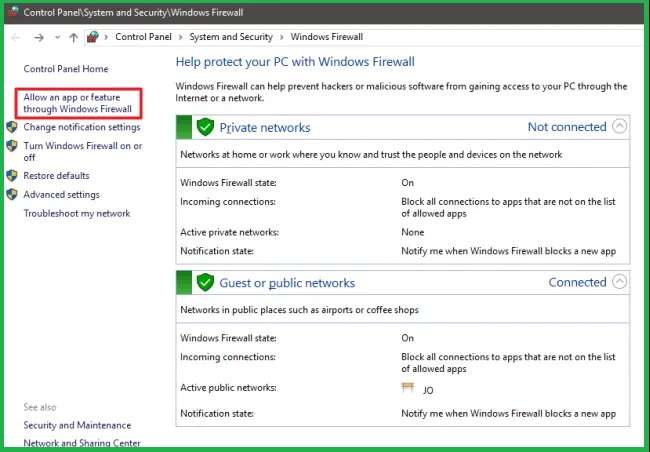
Fix 4: Configuring Windows Firewall
Window Firewall needs to be kept configured as it may block the connection between the server and QuickBooks. This may be the reason why the H202 error may be emerging in the accounting software. For configuration, go to the Windows Firewall settings and make some changes. Visit QuickBooks and tap on File. Choose the Switch to Multi-User option for configuration and get rid of the QuickBooks error H202.
Go through the below-highlighted steps to troubleshoot the error:
- Changes are to be made in the “Windows Firewall” settings.
- Then head to “QuickBooks”.
- Click on the “File” tab.
- Opt for “Switch to Multi-User”.
Please check that the configuration process is complete. Now, you need to open QuickBooks as usual. Use the software for some time. Hopefully, the QuickBooks H202 multi-user mode issue would have been cleared.
Fix 5: Creating a New Folder for the QuickBooks Company File
It may happen that the old folder of the company file may have been corrupted or become damaged. This can create a problem in the software and further result in the H202 error. Creating a new folder of the Company file can act as a QuickBooks H202 error fix. The permissions also need to be edited after the folder has been made. Then tap on the Ctrl and C keys together for copying the QBW file into this folder.
- Create a new folder on your desktop.
- Edit the permissions of this new folder.
- Press the “Ctrl” key and the “C” key together to copy the “.QBW” file.
- Switch the mode to multi-user in QuickBooks .
- Then open the copied file.
- The error code H202 in QuickBooks may disappear once the file opens.
Sometimes after fixing the H202 error, you may find that QuickBooks has stopped working. If users have not updated QuickBooks for many months, then they may have to face this error that stops the software from working. Therefore, while you troubleshoot the H202 error, updating the software can also be ideal.
Fix 6: Changing Location of QuickBooks Company File
The location of your Company File should be changed as a measure for issues like the H202 error in QuickBooks. Via the C: Drive, you can create a new folder in it. Then head to the existing company file folder and pick the company file. After that, select the .TLG file. Then push the Ctrl key and the C key together for copying the company file as well as changing its location.
Follow the instructions mentioned to change the Company File’s location for clearing the H202 QuickBooks error code:
- A new folder needs to be created in the “C: Drive” of the Windows Desktop for storing the company file.
- Move to the folder of the existing company file.
- Opt for the Company File.
- Also, choose the “.TLG” file.
- Tap on the “Ctrl” key and the “C” key together to copy the file.
- Proceed to the new folder of the company file.
- Press the “Ctrl” and “V” keys together for pasting the file.
- Confirm whether the file can be opened in “Multi-user Mode” or not.
In Summation
The error H202 in QuickBooks may appear while you are using the software. We defined the H202 error in our post and also stated the causes responsible for it. Further, we provided a number of methods that may help you in fixing the error. With better knowledge of this error, you should now find it easier to troubleshoot it.