
The Chart of Accounts is a part of QuickBooks running on OS like Windows and Mac. Identified as COA as well, it contains all the accounts used by a company as well as their balances. Users can add several types of accounts to it for categorizing them in a better way. A new account can be added to create a breakdown of the transactions and save time during the creation of a balance sheet. Besides, users can assign numbers to the accounts as well to make their work easier. To do all of this, you need to know how to add to the Chart of Accounts in QuickBooks Online. In addition, understanding the accounts type that can be included will be of use.

What Types of Accounts can be Added to COA?
An asset account can be added to COA for maintaining a record of the assets that have been purchased for your business. Other types of assets are also recorded in the same account.
Along with this, there are three types of accounts that you can add to the Chart of Accounts in QuickBooks.
- You can add a Liability account where the money that is owed by you but has not been paid yet, can be recorded.
- The Income account, when set up, allows you to record the details of the transactions and the revenue that is generated from the business.
- Alternate to the Income account, you will find an Expenses account for recording the expenses made for the business such as advertising, promotions, and so on.
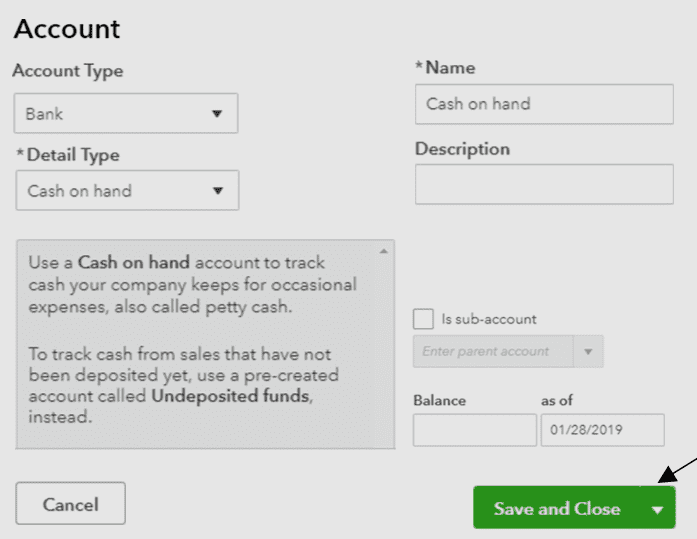
How Do I Add New Accounts to the Chart of Account in QuickBooks Online?
Due to certain instances or professional purposes, you may want to add up a new account to COA in QuickBooks Online. On reaching it, you need to press the New option and proceed further to the Account Type pull-down menu. From here, you will have to opt for the type of account. After that make a move for confirming the Detail Type.
- The “Gear” icon is to be clicked in “QBO”.
- Press “Chart of Accounts”.

- Tap on “New”.

- Choose the “Account Type” drop-down for picking one option.
- After that, opt for “Detail Type” for specifying the type of account that is to be added.
- Now, move to the field of “Name”.
- Here, mention the account’s name.
- Details of the account can also be filled in the field of “Description”.
- The amount can be entered in the field of “Balance” as well.
- Now, select the “Save and Close” button.
How to add to the Chart of Accounts in QuickBooks Online for a new account will be completely understood with this step. The usage of the new account can be initiated afterward.
Can you Add an Account to the Chart of Accounts in QuickBooks Desktop?
For purposes like tracking the transactions more deeply, you may add another or a new account in COA in the QBDT software. They can be added on the Windows operating system as well as on Mac. On both, the methods require the Lists tab for finding this option.
Methods for understanding how to add the Chart of Accounts in QuickBooks Desktop on any of the operating systems you work upon are described below:
Method 1: For Windows
The Windows operating system offers the QBDT users to add a new account in COA by making use of the Lists option. The Chart of Accounts button is to be pressed. Head towards the Account drop-down and opt for New among the options. How to add a new Chart of Accounts in QuickBooks Desktop on Windows can be progressed by specifying the type and then saving the information.
- Visit “QBDT” on your “Windows” system.
- Head to the “Lists” option.
- Next, push the “Chart of Accounts” button.
- Among the various options in the drop-down of “Account”, go for “New”.
- Then choose the “Account Type”.
- Press the “Save and Close” tab.
Method 2: For Mac
You may already find an account in COA on your Mac computer. For another one, you can add to the Chart of Accounts in QuickBooks Desktop by tapping on Create. The option will ask you to define the type of the other account. Its information has to be added for going ahead.
- Open “QuickBooks Desktop” on “Mac”.
- Select the “Lists” button.
- Click on “Chart of Accounts”.
- Pick the “Create +” tab.
- In the visible drop-down of “Type”, the account type is to be chosen.
- Provide the information of the account.
- Hit “Ok”.
Wait for the time being until your other account is added on Mac. Then you can use both of them for varied purposes.
Note: These methods for including an additional account can be processed on QuickBooks Enterprise Suite as well.
How to Add Account Numbers to the Chart of Accounts in QuickBooks Online?
If you find that the data of the COA is extensive, you may try numbering the accounts. Understanding the data in less complex ways can be easier. Also, this measure can turn out to be beneficial while searching for a particular account. The Account Numbers feature in QBO has to be turned on before performing any other function. After it is turned on, you can move ahead to allotting the numbers and including them in the chart.
Option 1: Turning on Account Numbers
To add account numbers to the chart of accounts in QuickBooks Online, you will have to turn on the feature for this. In this procedure, the Edit button will serve as an important tab. The Settings option on the software’s window is to be clicked to reach the button. Then you need to go to the Account and Settings tab. From here, head to the Advanced option and go to the section of COA.
- Run your “QuickBooks Online” account.
- Click on “Settings”.
- Then tap on “Account and Settings”.
- Choose the “Advanced” option.
- From the section of “Chart of Accounts” or “COA”, look for “Edit”.
- Push the “Enable Account Numbers” button.
- In case you want the account numbers to be displayed on the reports and transactions, opt for “Show Account Numbers”.
- Hit “Save” here.
- Now, press the “Done” tab.
Now, the account numbers option will get turned on in QBO and hence be included in the chart.
Option 2: Assigning Account Numbers
To enjoy the ease of searching the transaction through numbering, you should know how to add account numbers to the Chart of Accounts in QuickBooks Online. Tap on the Accounting option. Then head to the chart. From the Action column, pick the Batch Edit tab and then you may assign.
- Select the “Accounting” tab on the “QBO” menu.
- Then go to “Chart of Accounts”.
- In the column of “Action”, choose “Batch Edit”.
- Next, account Numbers are to be added in the column of “Number”.
- Click on the “Save” option.
Summing Up
Adding up a new account for categorizing the transactions can become helpful for a user. After adding it, you may also assign numbers if you feel that the data has become extensive. Through the post, the details about the types of accounts were explained along with the methods for adding them in QBO and QBDT on different OS. Alternatively, steps were outlined for learning how to add numbers to a Chart of Accounts in QuickBooks Online for better organization of your data.