
Usually, when a user of the QuickBooks program does not require a file, he or she may delete it. A company file can be deleted on most versions of the program on both Windows and Mac. It can be removed by making use of the Close Company option. To clear your company file in QBO, you may utilize Settings. Certain users may want to delete files in the software that are stored in an account older than 60 days. With the methods that we have found, deleting such files is also possible.

How Do I Delete a Company File From QuickBooks Desktop and Online Versions?
Company file deletion requirements may occur when owners mistakenly create multiple of them. Even when relevant files have been made but not put to use, the need may be observed. To remove a company or its file, flexibility can be found in QuickBooks as well as its Online and Desktop versions. Commonly, you may close the company, wipe your data, or cancel the subscription in these versions.
Steps to Delete a Company File in QuickBooks
For deleting a company file in QB, you need to go to the Chart of Accounts. After that, click on the File option. Press the Close Company feature. Now, you may tap on Edit from the dropdown. Choose the file which you do not want to keep and put a tick mark on it. Once all of this is over, select Ok.
- Login to your account on “QuickBooks”.
- Click on the option of “Chart of Accounts”.
- Press “File”.
- Tap on “Close Company”.
- From the visible drop-down option, hit “Edit”.
- Select the file that you do not need.
- Put a checkmark on the selected file.
- Once done, you can choose “Ok”.
The QuickBooks delete company file method can assist be used when you wish to remove a batch. Thus, for removing more files, you can repeat it.
Delete a Company File in QuickBooks Desktop
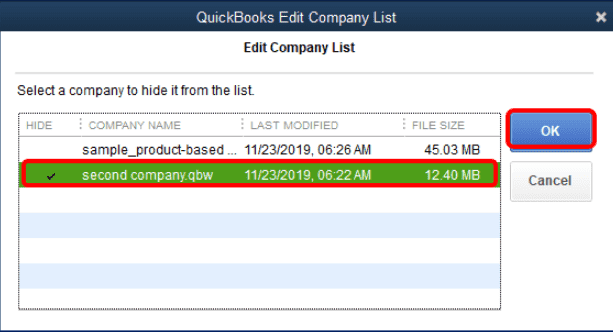
Through the option of Edit List, a user of QBDT can remove his or her company file. Start by moving to the File tab. Tap on the option of Close Company. Press the Edit List button. You then need to put a checkmark on only that company file that you wish to delete. After this, click on the Ok button.
- “QuickBooks Desktop” has to be opened.
- Navigate to the “File” menu.
- Click on “Close Company”.
- Select the “Edit List” button.
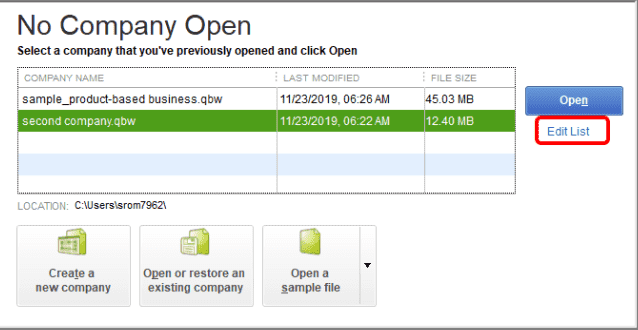
- Tick mark your company file. Ensure that this is the file that you have to remove.
- Tap on “Ok”.
Delete a Company File in QuickBooks Online
We have found a procedure for deleting a company file by using the Settings option of QuickBooks Online. There is also a method for removing an account’s file that is not older than 60 days. In case your company file has been kept in an account that now exists for greater than 60 days, then also you can erase it.
In QuickBooks Online, to delete company files by following these methods, please read ahead.
1: Delete via Settings
Commonly, the settings of a software carry several options that help in purposes like the deletion of files. The same is true for QuickBooks Online as well. You can open QBO and search for the Gear icon. Opt for the Account & Settings option. Now, you have to tap on Billing & Subscription. Start to check for the Subscription Status. Afterward, tap on the Cancel link.
Keep on following the instructions and this QuickBooks Online delete company file method will reach completion:
Note: In this method, you will also have to remove your company from QBO.
- See to it that you have selected the right company you want to delete.
- Open up “QuickBooks Online”.
- Look for the “Gear” icon located in the window.
- Select “Account & Settings” option.
- Then go to “Billing & Subscription” in the fifth step.
- Check for the “Subscription Status”.
- You need to click on the “Cancel” link next to the feature of “Subscription Status”.
- Once you press the cancel link, a prompt will come up. The prompt will be asking if you want to cancel or change the plan. You can decide what has to be done.
- Tap on “Continue” to delete it.
2: Delete for an Account Not Older than 60 Days
It is easier to remove a company file that has been added to an account made less than 60 days ago. Initially, you can change the URL and include “/purge company” in it. Have a look at the summary of the deleted items after this. Now, you have to press the Yes option. Also, mark the changes if you want the system to add accounts or work with an empty Chart of Accounts. Tap on Wipe Data. At the end of the procedure, you will be navigated back to the homepage.
- Sign in to your “QuickBooks Online” account.
- Change the “URL” so that it includes “/purge company”.
- Ensure whether the URL shows the following:
- “https://qbo.intuit.com/c28/app/homepage”
- On confirming the same, change the “URL” to:
- “https://qbo.intuit.com/c28/app/purgecompany”
- The next screen will show you the summary of the deleted items. Wait for it.
- Enter “Yes” or select “Ok” to confirm the data which is to be removed/deleted.
- Click and mark the changes. State whether you want the system to add accounts based on your industry or get the work started with a clear “Chart of Accounts”.
- Once done, tap on “Wipe Data”.
- You will be headed back to the homepage after the deletion is complete.
After executing this QuickBooks delete company file procedure for the Online version, if the homepage does not open, then ensure that all the steps were performed.
3: Delete for an Account Older than 60 Days
For deleting an account’s company file that is older than 60 days, rush to your QBO account. Click on the Gear button. Then select Account & Settings which you will find below the Your Company tab. You need to tap on Billing & Subscriptions. Finally, you have to press Cancel at Subscribed.
- View your “QuickBooks Online” account.
- Select the “Gear” button.
- Click on “Account and Settings”. This option will be below the “Your Company” tab.
- Pick “Billing & Subscriptions” available on left.
- Press “Cancel” at “Subscribed”.
Delete company file on QuickBooks Enterprise, Pro, Premier on Windows
A common method can be used when you have to clear a company file from QuickBooks Enterprise/Pro/Premier on your Windows PC. In the accounting software, you can use File and then move to Open or Restore Company. After this, opt for Open a Company File. Later, you will have to access the information of your file. In these versions of QuickBooks, to delete company files, this information will be required. Afterward, you can tap on Edit List and the file will get deleted.
- The basic step is to launch “QuickBooks Enterprise/Pro/Premier” on your Windows system.
- Click on “File”.
- Opt for “Open or Restore Company”.
- Tap on “Open a Company File”.
- Push the button for “Next”.
- Make a selection for the file which you want to delete and then use “Open”.
- Hit the “F2” key.
- Go through “File Information”.
- Close the window after this.
- Now the tab “File” has to be selected again.
- Click on “Exit” to shut the program.
- Once this is done, go to the location of your company where the file is located.
- You need to tap on the file which is to be deleted.
- You have to open “QuickBooks” again.
- Choose the “Edit List” button.
- Make sure to look over the “Hide” box on the file that you have just removed.
Note: The file will now be deleted from your account. Along with this, it will be hidden from the page of “No Company Open”.
Conclusion
QuickBooks provides its users with a great feature such as the deletion of a company file. You can easily delete the file irrespective of the version of QuickBooks that you are using. We shared with you the methods to clear them. While you carry out these methods, be careful in choosing the right file for deletion or else you may lose your important data.
We also recommend you to view our other blog on how to transfer undeposited funds to banks in QuickBooks. Also, to find out how to delete a payment from a deposit in QuickBooks.