
Setting up pay bills in QuickBooks allows users to pay multiple bills at once. It offers an automatic method that reduces the workload associated with paying different bills. However, before making payments, you must first enter the bills into the accounting software. Once entered, using the pay bills button in QuickBooks is essential to execute the payment process. In this article, we will guide you on how to pay bills in quickbooks online and Desktop.
How to Pay Bills in QuickBooks Desktop?
You can use the Bills to Pay window to pay bills in QuickBooks Desktop.
- Record outstanding vendor bills in QuickBooks Desktop.
- Settle payables in the Bill to Pay window.
- Apply any vendor credits or discounts to reduce the amount owed.
Note: To ensure accurate financial reports, avoid writing checks when paying bills.
Follow these steps to pay bills properly:
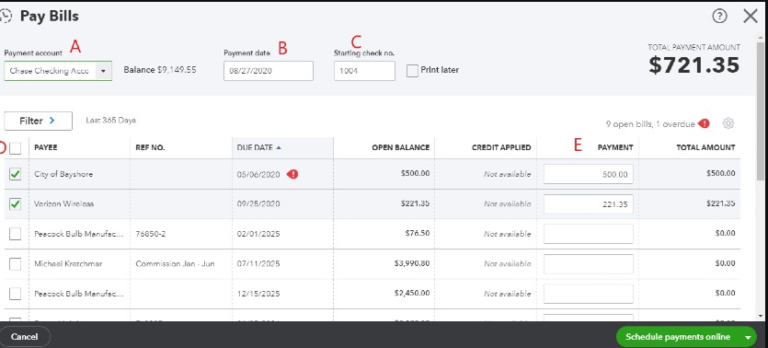
- Open the Vendors menu and select Pay Bills.
- Select the appropriate accounts to be paid.
- Check the boxes next to the bills you want to pay on the table.
Note: To select or deselect all bills in the list, pick to select all bills or pick to wipe the selection
- Apply any discounts or credits received to bills
- Choose the Discount option if the vendor has given a discount
- Choose the Credit option if credit is received from the vendor and applied to the bill amount
Once you’ve selected the bills for payment, type the date paid. Then, indicate the payment method you used.
- Check payments: choose to Assign a check number or To be Printed
- Credit card payments: print payment stub
- QuickBooks supports direct Online Bill Payment for accurate record-keeping
- Online Bank Payment: include a reference number
- Other payment methods can be recorded as check payments.
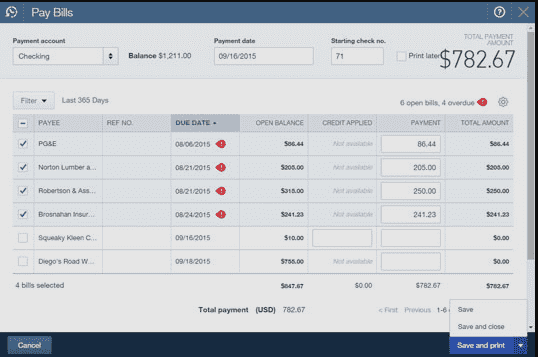
- Click on “Pay Selected Bills” to pay the selected bills.
- Click on “Done” if you’re finished paying bills.
- Click on “Pay More Bills” if you have more bills to pay.
Note: In QuickBooks Desktop, paying bills is a standard component of your accounts payable workflow.
How to Pay Bills in QuickBooks Online?
To enter and pay bills in QuickBooks Online, record future payments as bills and already paid expenses as expenses. Bills can be entered individually or for multiple vendors at once, while expenses record all the necessary transaction details.
To manually enter the bill in QuickBooks Online follow the procedure below:
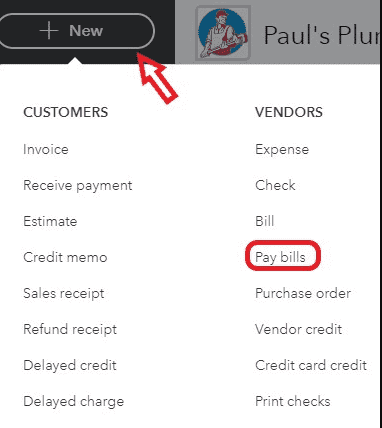
- Click on (plus) New.
- Choose Bill.
- Select the vendor from the Vendor drop-down.
- Choose the bill’s terms from the Terms drop-down.
- Type the relevant details such as Bill date, Due date, and Bill no.
- Type the expense details in the Category details section, including the expense account and description.
- Add item details to itemize the bill.
- Type the Amount and tax.
- Pick the Billable checkbox if you plan to bill a customer for the expense.
- Tap Save and exit when finished.
Note: Manually added bills appear in the Unpaid tab and don’t require review since you entered them.
To upload the bills to pay from the computer follow the procedure below:
- Go to Get Pay or Paid and select the Bills tab.
- Click on Add bill and choose Upload from system or computer.
- Drag and drop the files or browse for files and upload them.
- Match the files to existing bills or create new bills for them.
Note: QuickBooks supports the following image formats: pdf files, jpeg files, jpg files, gif, and png files.
You can find the bill you added in the on button that says review, where you can authenticate the data and decide when to pay it.
To pay bills in QuickBooks Online follow the procedure below:
- Navigate to Get Pay & Paid, and pick the Bills option.
- Pick the Unpaid button and locate the bill you want to pay.
- Click on Schedule Payment and follow the on-screen instructions to make the payment using Online Bill Pay.
How to Apply Credits in QuickBooks When Paying Bills?
You have two choices when it comes to applying credits to your bills. To apply credits in QuickBooks when paying bills the first procedure is as follows:
- Open the write checks window by clicking on it from the Home Page.
- Select the account you want for paying bills.
- Type the vendor’s name in the appropriate field.
- Tap the Go to Pay Bills button on the Check for Bills pop-up.
- Pick the bills you wish to pay that add up to the credit amount on the Pay Bills pop-up.
- Tap on the Pay Selected Bills button.
- Once you’ve reviewed the Payment Summary, select Done.
The second method is:
- Open the Pay Bills screen by clicking Pay Bills in the menu bar.
- Enter the vendor’s name and select the bill you want to apply the credit to.
- Click Set Credits.
- Choose the corresponding credit.
- Click Done.
- Repeat steps 3-5 for all applicable credits.
- Click Pay Selected Bills to complete the transaction.
Note: Please be aware that this procedure must be done individually for each bill.
How do I pay a credit card bill in QuickBooks?
There are two methods when you want to pay credit card bills in QuickBooks. One is before reconciliation and the other one is after reconciliation.
Before Reconciliation:
- Go to the menu where it says banking
- Pick on where it mentions write checks
- Choose the account that you want from the dropdown list
- Select the payment date
- Choose the credit card company name from the Pay to the order of dropdown
- Enter the payment amount
- Switch to the Expenses tab
- Select your credit card account from the Account dropdown menu.
Note: For sub-accounts, add a separate line for each and ensure that the total payment amount equals the parent account total.
- Tap to save and exit
After Reconciliation
Once you have finished reconciling the credit card account, there are two ways to pay partial bills in QuickBooks outstanding balance.
- You can either write a check to settle expenses that require immediate payment,
- you can create a bill for vendor bills that need to be paid at a later date.
Setting up pay bills in QuickBooks, at one time to all the payees, can save a lot of time for a company. The post showcased the process for paying bills in the accounting program. In addition, the methods for how to pay bills in QuickBooks Online and Desktop were described to help every user of the software.
Frequently Asked Questions
Click on the plus sign icon > pay bills.
Go to the Vendors menu > Pay Bills.
Yes, you can pay bills with a credit card in QuickBooks.
Go to the Gear icon > Account and Settings > Payments > Add payment method.
Yes, you can make multiple bill payments at once in QuickBooks.
Go to the Vendors menu > Pay Bills > select the bills you want to pay > click on Pay Selected Bills.
Yes, you can schedule bill payments in QuickBooks.
Go to the Vendors menu > Pay Bills > select the bills you want to pay > click on Schedule Payments.
Yes, you can set up recurring bill payments in QuickBooks.
Go to the Vendors menu > Enter Bills > select Make Recurring.
Yes, you can pay bills with a check in QuickBooks.
Go to the Vendors menu > Pay Bills > select the bills you want to pay > click on Pay Selected Bills with a Check.
Yes, you can set up bill pay in QuickBooks Desktop.