
The QuickBooks Audit Trail provides transparency and accountability in financial record-keeping and can help businesses maintain compliance with regulatory requirements. One of the features of QuickBooks is the Audit Trail, which is a log that records all the changes made to transactions within the software. Audit Log in QuickBooks feature is useful for businesses that need to keep track of who has made changes to financial data and when they were made.
In this way, the Audit Trail is an essential tool for businesses that want to ensure the integrity of their financial data.
- How Does Audit Trail QuickBooks Work?
- What is the Procedure to Access QuickBooks Audit Trail?
- How Does QuickBooks Create Users for QuickBooks Desktop Audit Trail?
- What are the Reasons Behind Unable to Recognize a User in QuickBooks Audit Trail?
- How to View Transaction Changes in the QuickBooks Audit Trail History?
- How to Delete Audit Log in QuickBooks Online?
- How to Delete Audit Trails QuickBooks Desktop?
How Does Audit Trail QuickBooks Work?
In QuickBooks Online, your chart of accounts is used to keep track of all your financial transactions. Additionally, the audit trail QuickBooks maintains a record of all the activities performed in your account, which includes user logins, modifications made to QuickBooks settings, any alterations made to your customers, vendors, employees, and submissions related to payroll.
The audit trail in QuickBooks Online contains a record of all these activities.
- The date on which an alteration was made to your books
- The name of the user responsible for the change
- The type of event or change that happened
- The name of any client or merchant associated with the change
- The original transaction date and amount (if applicable)
The QB audit log stores events for a period of two years.
Note: It’s worth noting that sign-outs are only registered in the audit log if you specifically select the “Sign out” option. If you close your browser, navigate to a different website, or QuickBooks automatically logs you out due to inactivity, those sign-outs won’t be recorded in the audit log.
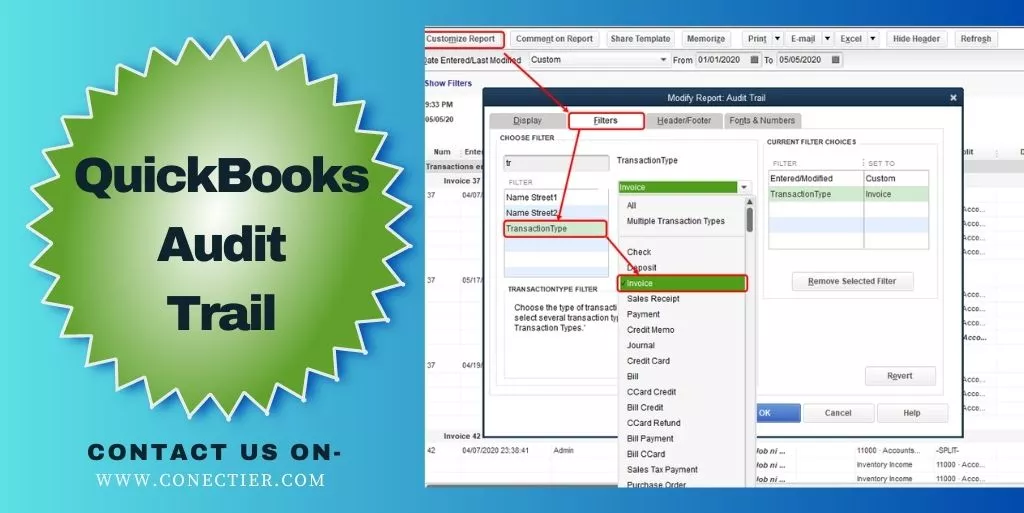
What is the Procedure to Access QuickBooks Audit Trail?
To access the QuickBooks audit log, you must first log in as an administrator. If you’re unable to locate the audit log, reach out to your primary administrator for assistance. audit By regularly reviewing the audit log, you can ensure that your books are accurate and identify any potential issues or errors promptly.
- Access the QuickBooks audit log by clicking on the “Settings” icon and selecting “Audit Log.”
- Click on the “Filter” option.
- Utilize the fields located on the Filter panel to specify the desired criteria for narrowing down the results, such as the User, Date, or Events filter.
- After selecting the appropriate filters, click on “Apply” to see the filtered results.
The audit log QuickBooks Desktop displays a maximum of 150 records per page. If you wish to view the audit history for a specific transaction or event, you can select “View” in the History column. Doing so will provide you with information about who made the changes and the nature of those modifications. This feature helps maintain the accuracy and integrity of your financial records.
The QuickBooks audit trail may display a term called an “indirect edit.” This term refers to changes made to a transaction that was already recorded in your financial records. For instance, if a completed reconciliation is modified, it would be considered an indirect edit. QuickBooks records these indirect edits to provide a complete audit trail and to ensure that any changes made to your financial transactions are fully documented.
Note: It is not possible to disable the audit log feature in QuickBooks due to security and audit purposes.
How Does QuickBooks Create Users for QuickBooks Desktop Audit Trail?
QuickBooks Desktop audit trail by the user is a feature in the application that automatically generates user profiles to track specific actions in the audit log. This ensures that every activity performed within the software is assigned to a specific user, allowing for greater accountability and transparency in your financial records.
What are the Reasons Behind Unable to Recognize a User in QuickBooks Audit Trail?
If you notice a user listed in the QuickBooks audit log that you do not recognize, it is likely one of the pre-existing user profiles that QuickBooks Desktop creates listed below.
- Online Banking Administration is a feature offered by QuickBooks Online that allows users to view any changes made to their linked bank accounts automatically created by the application.
- The “Support Representative” feature in QuickBooks Online displays any modifications made by a support consultant from the QuickBooks Online support team.
- The “System Administration” feature in QuickBooks Online displays any modifications made automatically by the software such as:
- If you make changes to a record in QuickBooks that affect another record, such as modifying a payment and linking it to a different invoice, the audit log may display a “System Administration” event that reflects the change made to the original invoice.
- Whenever you link an app from a third party to QuickBooks, any info sent to QuickBooks or modifications made to existing data by the third-party app will be displayed in the audit log in QuickBooks as a “System Administration” event.
- When a recurring transaction like a recurring expense is automatically added to your books, QuickBooks logs a System Administration event in the audit log.
- When you configure events to occur automatically even when you are not logged in, a System Administration event may appear in the audit log, such as when an update is made to your bank feeds.
- Import Administration: Displays an automatic modification associated with the transfer of your data from the QuickBooks Desktop edition.
How to View Transaction Changes in the QuickBooks Audit Trail History?
The QuickBooks audit trail acts as a documentation of every modification performed on a particular transaction. Within the Audit trail, you can locate the subsequent details:
- The identity of the person who executed the changes.
- The time when the changes were made.
- The nature of the modifications that were carried out.
Users who have full access rights will only be allowed to the QuickBooks Audit history. They can so by the following method:
- Open the transaction you want to investigate.
- Click on More.
- Choose Audit History to view the audit trail.
- If you want an expanded view, click on Show all. Alternatively, you can choose- Compare for a side-by-side comparison.
How to Delete Audit Log in QuickBooks Online?
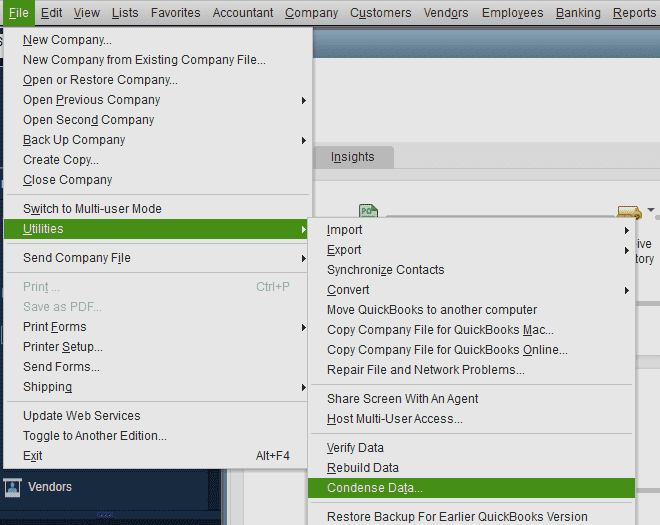
The removal of the audit log in QuickBooks can be done with the use of the utility tab. The File menu has to be pressed. Then head to the Utility option. Click on the button where it says condense Data. After that go to the window of What Transaction or records do you want to erase and pick an option. Now, head to the Next tab in the accounting program.
The process below can help you understand how to delete audit log QuickBooks Online:
- Tap on “File” in “QuickBooks”.
- Select the “Utilities” button.
- Press “Condense Data”.
Note: In case you are using a QuickBooks version above 2000, you need to pick the “Clean Up Company Data” option.
- On the window of “What Transaction Do You Want to Remove”, choose an option.
- You may also opt for removing any transaction or choose all the transactions to be cleared at once.
- Push the “Next” tab.
- Pick the option for removing the details of the entire audit trail.
- If only one audit trail has to be cleared, then you need to select only that one and unmark the rest.
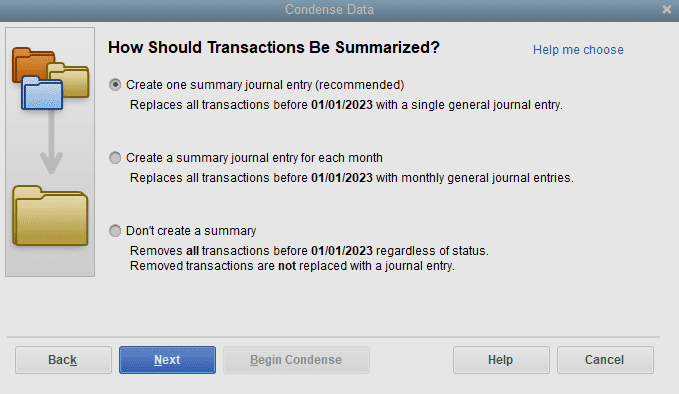
- Hit on the “Don’t Create a Summary” button.
- Click on the “Begin Condense” option.
Post selecting this option, the QuickBooks audit trail report file should get cleared.
How to Delete Audit Trails QuickBooks Desktop?
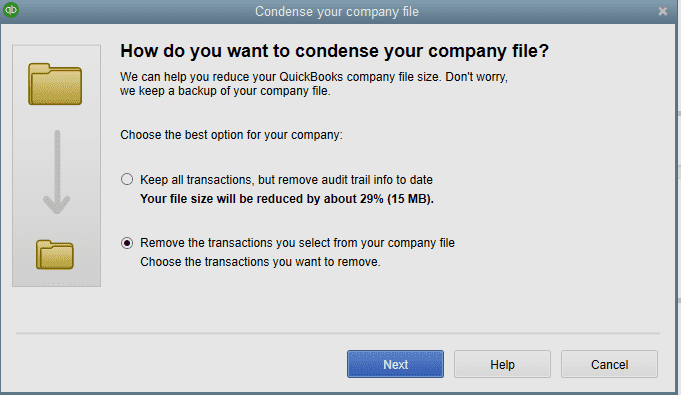
To delete the audit trail QuickBooks Desktop, you may use the Condense Data tab. Select the File option and choose Utilities. The Condense Data option has to be clicked. Move to the Condense your Company File page in QBDT. Then tap on the option of Remove the Transactions You Select from the Company File.
Complete the steps and learn how to delete audit trail QuickBooks 2017 by reading further:
- Launch “QuickBooks Desktop”.
- Click on “File”.
- Select the “Utilities” button.
- Choose “Condense Data”.
- In the window of “Condense your Company File”, press on the “Remove the Transactions You Select from the Company File” option.
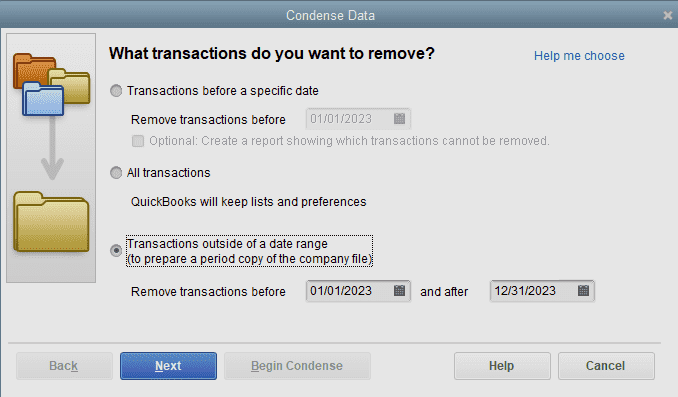
- Tap on “Next”.
- Now, opt for the “Transactions Outside of a Data Range (to Prepare a Period Copy of the Company File)” button.
- Opt for a date span.
- Hit “Next”.
- Then pick “Create One Summary Journal Entry (Recommended)”.
- Move to “Next”.
- Continue following the prompts.
- Now, head to “Begin Condense”.
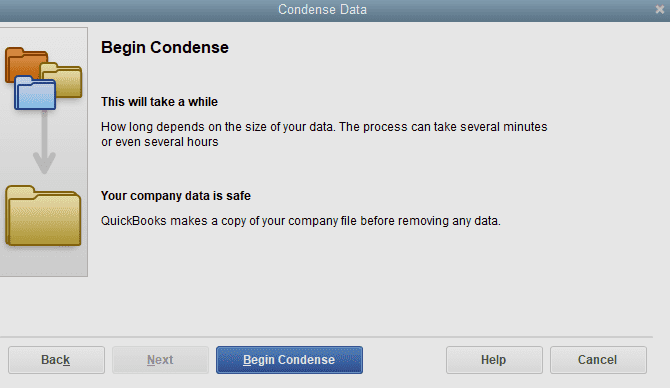
After tapping on the Begin Condense option, your chosen QBDT audit trail will get cleared.
Final Note
QuickBooks audit trail files can help a user in preventing fraud by recording the changes made in the application. It can be necessary to delete the file as it can create deterioration in the working of the accounting software or may not be required any longer. The post provided you with a comprehensive guide explaining all about the audit trail in QuickBooks and how to clear the audit logs if the file becomes heavy.
Frequently Asked Questions
An audit trail QuickBooks is a statement of all changes made to transactions, showing who made the change and when it was made.
Go to the Edit menu, select Preferences, click on Accounting, and then choose the Company Preferences tab. Check the box for “Use audit trail” and click OK.
No, the audit trail tracks all changes made to transactions and cannot be customized.
QuickBooks audit logs are available for up to 2 years.
Yes, you can view the audit trail for a specific transaction by opening the transaction and then clicking on the History button.
If you delete a transaction in QuickBooks, it will still appear in the audit trail with a note indicating that it was deleted.
By reviewing the audit trail, you can see if any unauthorized changes have been made to transactions or if there are any discrepancies between the original transaction and the changes made.
The audit trail is accessible to users with access to the company file.
Yes, you can export the audit trail to a file format such as Microsoft Excel.
You can go to the Reports menu, select Accountant & Taxes, and then choose Audit Trail.
The audit trail provides a record of all changes made to transactions, which can help ensure compliance with regulations and audit requirements.
If you find a mistake in the audit trail, you should examine the issue and correct any mistakes or unauthorized changes.
Yes, the audit trail can track changes made to inventory items, such as adjustments or transfers.
You can ensure the accuracy of the audit trail by reviewing it regularly and by having strong internal controls in place to prevent unauthorized changes.
The transaction log records all transactions made in QuickBooks, while the audit trail records all changes made to transactions.
To delete the audit trail in QuickBooks desktop you can use the utility tab. Here you can select the information to condense and eliminate.
The process to delete audit logs in QuickBooks online is by going to the utility section. Then you can choose condense data, After that, you can choose what transactions or records you want to remove.