
Users prefer the IIF formatted files to export transactions to QuickBooks. It is useful to know that IIF files are supported by most versions of QB. You can even perform QuickBooks IIF export using these files. Whether you are using QuickBooks on Windows or Mac, the files can be preferred for the export of your data. For exporting them on QB for Windows, you may think of using the Utilities option. To import the IIF files on QuickBooks for Mac, you may benefit from the Export button. We will be mentioning more about the ways and steps to export the IIF files from QB as well as on QuickBooks Desktop on systems having different operating software. Then you will also get to know the method to open the exported files. Lastly, the users will be suggested some of the points that they need to remember before starting with the ways or steps.

How to Export IIF Files from QuickBooks?
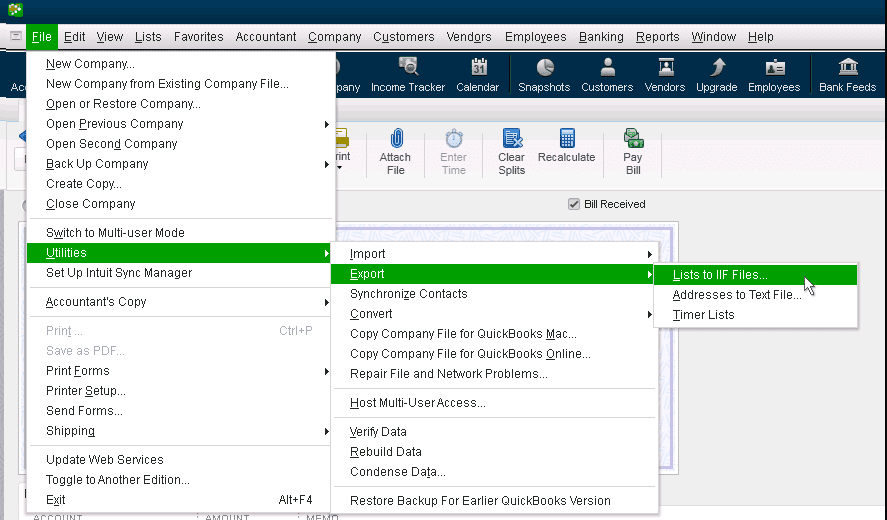
There is an option called Utilities in QuickBooks. This option can help you directly access the Export button in the software. To use this button, you need to deliver a list of IIF files. Then you can proceed with this method in QuickBooks to export transactions to IIF. While you proceed, you may also ensure that you have signed in to the Company File as the Admin and that you are using the account in Single User Mode.
Go through the following set of steps to complete this procedure:
- Log in to the “Company File” in “QB” as “Admin”.
- Make sure that you are using “Single User Mode”.
- Click on “Utilities” from the menu.
- Pick “Export”.
- Provide a list of the “IIF” files.
- Next, put a tick against every item of the list that you will be exporting.
- Press the “Ok” tab.
- From the “Export” page, select “Save in” through the displayed drop-down list.
- Next, opt for the location on your computer where you want the “IIF” file to be saved.
Tip: Saving your IIF files on the Desktop of your computer can be ideal when you wish to quickly find it.
- Then you need to clear the “*” sign. You will be able to find it below the “File Applications”.
- Afterward, you may type in a name in the field provided for it.
- Under the “Type” option, select “IIF” files.
- Hit “Save”.
Now, this procedure will come to an end and the export of IIF files from QuickBooks will be over.
Tip: Certain users may want to check the IIF files that they have exported. To view them, you need to move to the location of the IIF file. Then right-tap on the exported file. Select “Open” and after that choose “MS Office Excel Sheet”. This allows the wizard to convert the file into a text one. Further, press “Next” and again tap on the same. In the end, go through your files.
How to Export IIF Files from QuickBooks Desktop on Windows and Mac?
You can export your invoices from QuickBooks Desktop via the IIF file format on both Windows and Mac. For carrying out the process on QBDT for Windows, you need to move to the File option. If you want to execute the procedure on your Mac system, then go to the Lists to IIF file option. The procedures to export invoices from QuickBooks to IIF for the Desktop version will be followed by several prompts. Keep following them to complete the procedures.
Method 1: Exporting on Windows
If you want to export the invoices from QBDT in your Windows computer system, then reach the Utilities button. To go there, log in as the administrator of your QBDT account. Next, click on the File menu for starting the QuickBooks export IIF procedure on the Desktop version. Then move to the Utilities tab. Press the Export option after this to keep continuing.
- Using your credentials, sign in to the account made on “QBDT” on Windows.
Tip: See to it that while you sign in, the administrative rights are used by you.
- Also, switch the mode to “Single-User”.
- Select “File”.
- Tap on the “Utilities” option.
- Then press the button given for “Export”.
- Pick “Lists to IIF Files”.
- Choose the lists to be exported.
- Once chosen, press “Ok”.
- From the drop-down menu named “Save In”, rush to the location where the file should be saved.
- After filling in a name, click on the “Save” option.
Method 2: Export on Mac
You can easily export an IIF file from QuickBooks Desktop on Mac through the File menu. To begin the process, you need to log in to the Company File. Then head to the said menu and click on the option of Export. Once you reach here, choose the Lists to IIF File option. Next, look for the list that is to be exported. Then you can go to the Where drop-down menu.
The given directions will further help you know how to export IIF files from QuickBooks Desktop on Mac computers:
- First, ensure that, on your Mac, “QuickBooks Desktop” is running.
- Log in to the QuickBooks Desktop’s “Company File” as the admin.
- Visit “File” in the third step.
- Click on the option labeled “Export”.
- Opt for “Lists to IIF File”.
- Also, pick the lists that you want to export.
- You will find a “Where” drop-down menu. Please access this menu.
- From here, you need to choose a location where you wish to save the “IIF File”.
- After doing this, tap on “Save”.
Also, read other articles on How to Import an IIF File into QuickBooks.
How to Open QuickBooks Export File IIF in Excel?
For opening the export file in Lists, go to the exported file. Visit Microsoft Excel and click on the File button. Select Open and then tap on the location of the saved IIF file. After changing the File Type to All Files, pick the IIF file. Next, press Open for letting QuickBooks export transactions to IIF. Carry on with the procedure to finish the exports.
- Move to the “IIF” File exported from the Company File.
- Now, go to “Microsoft Excel”.
- Tap on the “File” option from the menu.
- Click on “Open”.
- Select the location where the saved “IIF File” is.
- Switch the “File Type”. You need to set it to “All Files”.
- Opt for your “IIF” File.
- Press “Open”.
- After this step, visit “Next”.
- Again, hit “Next”.
- From the “Text Import” wizard, pick “Finish”.
- You will see the “IIF” file has opened up in Excel. Now, go through it.
Tip: Sometimes, an IIF file may get exported to QuickBooks Desktop. At a later point, it may require changes. Users can be able to edit the changes as they wish. For this, the file can be used in Excel.
Things to Know Before You Export IIF Files from QuickBooks
Invoices, transactions, and other such data can be moved from QuickBooks to the desired software. However, moving or exporting every type of data may not be possible. There are certain limitations that you need to know before you export an IIF file to QuickBooks or QuickBooks Desktop. Some of them are discussed here:
- In QB, if the price levels are set up on a per-item basis, then you may not be able to export them.
- IIF Files can only be utilized to export the payroll data through Intuit Full Service or Online Payroll to QBDT.
- The files cannot be imported from one country’s version to another country’s version in QuickBooks.
Intuit lets its users export the IIF formatted files to QuickBooks. Only the correct way to export them is to be known. We talked about the process to export these IIF files to the software, giving you a number of ways to choose from. Further, we highlighted the methods to export the same to QBDT on Windows as well as Mac. In the end, we shared some limitations that you should keep in mind before you export the files.