
Importing IIF files to QuickBooks is an uncomplicated process. Users can import various data including bank transactions, general journal entries, and so on, in the software with an IIF file. They can import the IIF file into QuickBooks when they opt for the Utilities button. It is one such option that you will find in most of the methods applicable for different software versions. It is interesting to know that the IIF file import on QuickBooks Desktop can take place on both Windows and Mac. Also, if you want to import the file to QBO, then you need to convert the file to either the CSV or XLSX format.

We will be providing you the methods to import IIF file to Quickbooks and QuickBooks 2019. You will also learn about the import procedure on both Windows and Mac. The details of doing the same on QuickBooks Online will also be shared in our post.
Which Data can be Imported to QuickBooks?
There are several items that you can use for IIF File import to QuickBooks Desktop/Online. Transactions of banks, general journal entries,(Import Journal Entries into QuickBooks), etc., are a few examples of these items. Other than these, the following items can also be imported:
- “Accountant’s Changes”
- “Batch Transactions”
- Various “Lists” including
- “Chart of Accounts”
- “Vendor Lists”
- “Items”
- “Customer”
- Several “Transactions” which comprise:
- “Checks”
- “Invoices”
- “Deposits”
- “Opening Balances”
- “Purchase Orders”
- “Customer’s Cash Refund”
How to Import an IIF File into QuickBooks?
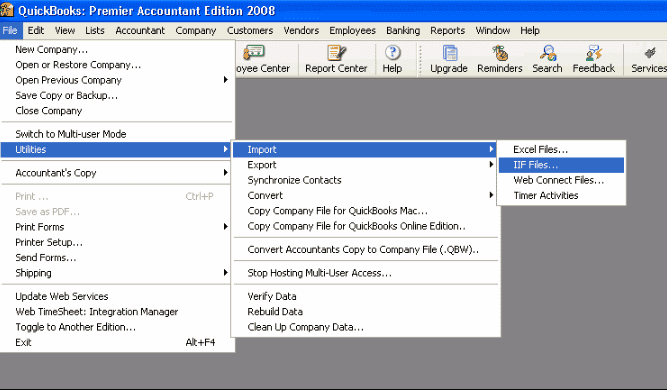
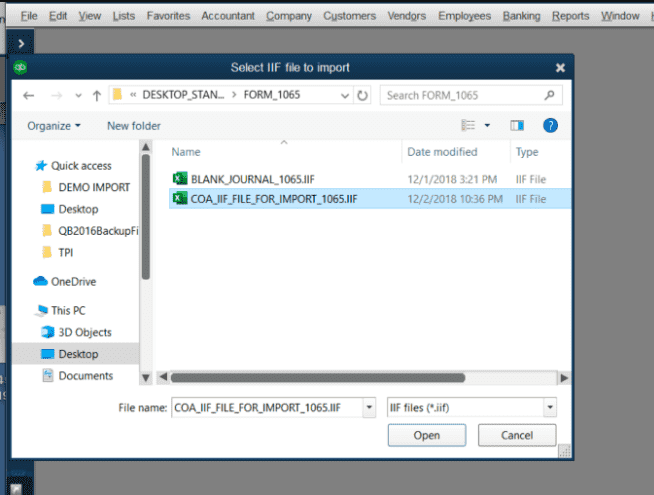
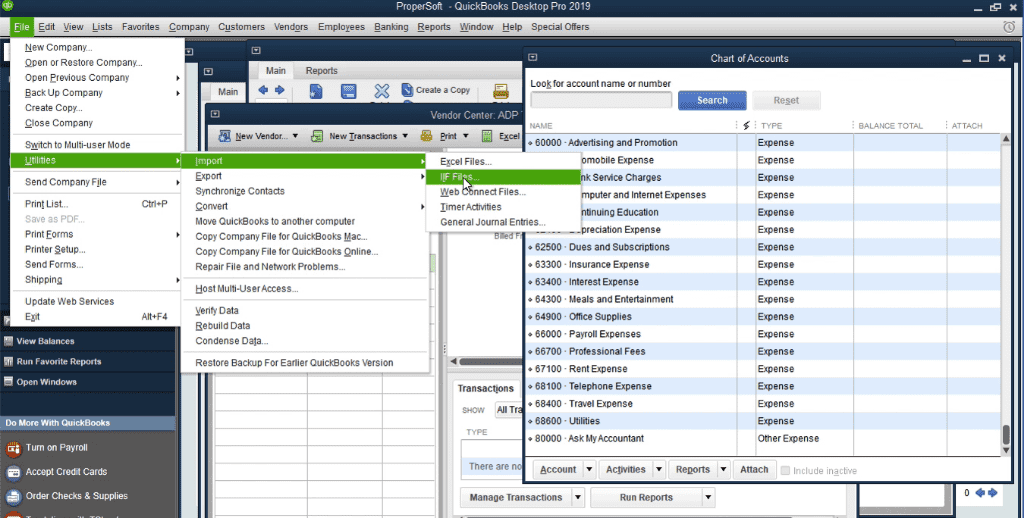
You can import the IIF File to the accounting software by using the Utilities Option. To start with the process of import, you will have to sign into the Company File of QB as the Admin. Do not forget to check whether or not you are in the Single-user mode. Then head to the File tab to import an IIF File into QuickBooks. Next, tap on the Utilities button and then move to Import Heading.
The rest of the procedure is described below.
- You need to login to the “Company File” as “Admin”.
- Do make sure you are working in “Single-user” mode.
- Go to the “File” button available in the menu.
- Tap on “Utilities”.
- Press the “Import Heading” option.
- Choose the “IIF File” tab.
- Move to the “IIF File” location. Also, make it bold.
- Select “Open” in this step.
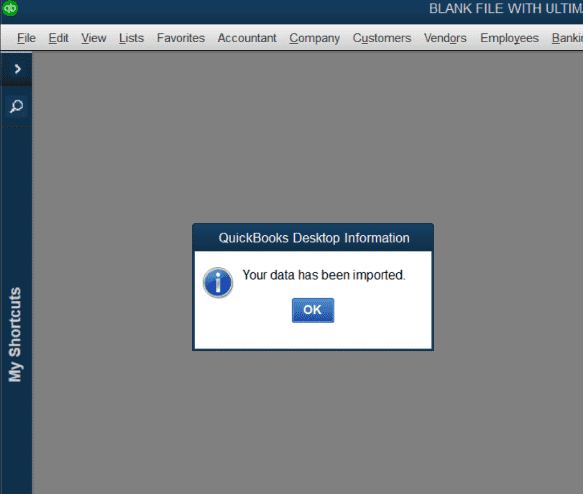
- You will see a confirmation message appearing on the screen. Confirm it and hit “Ok”.
How to Import IIF Files into QuickBooks Desktop 2019?
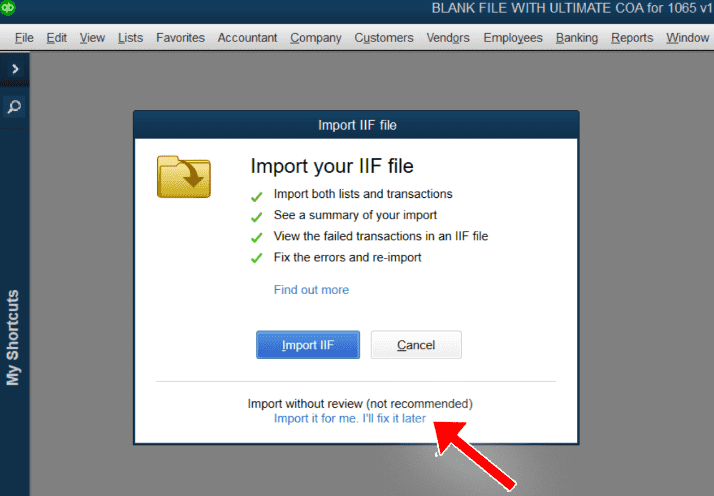
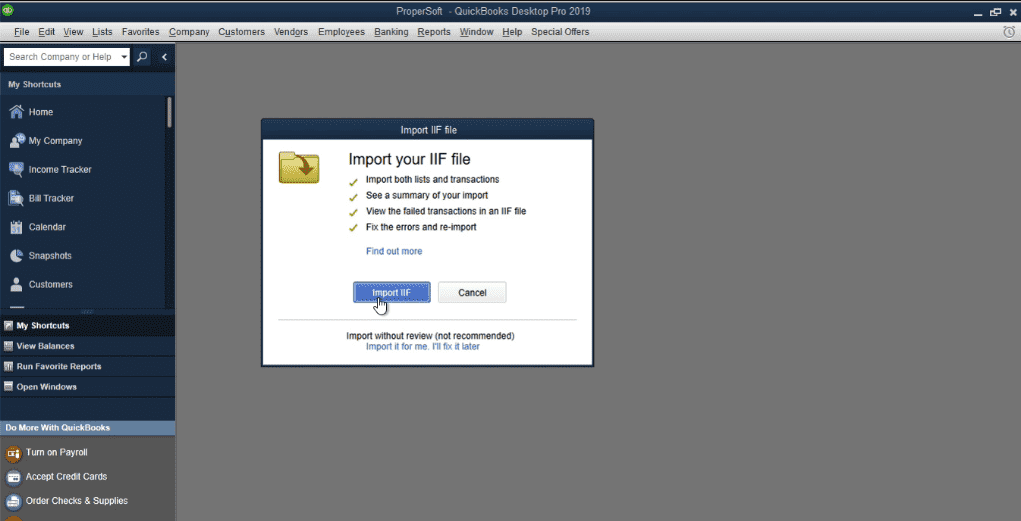
Users can easily import the IIF files to QBDT 2019 by utilizing the Files menu. First, go to the Company File that you want to import. Then click on Files and head to Utilities in QuickBooks Desktop 2019. Select Import and choose the IIF Files option. After doing this, pick the button that says Import it for Me. I’ll Fix it Later.
Go through the remaining steps for importing IIF files into QuickBooks 2019 for the Desktop version:
- Visit the QBDT 2019 “Company File” that is to be imported.
- Move to “Files”.
- Tap on the “Utilities” option.
- Go to “Import”.
- Then, you need to select “IIF Files”.
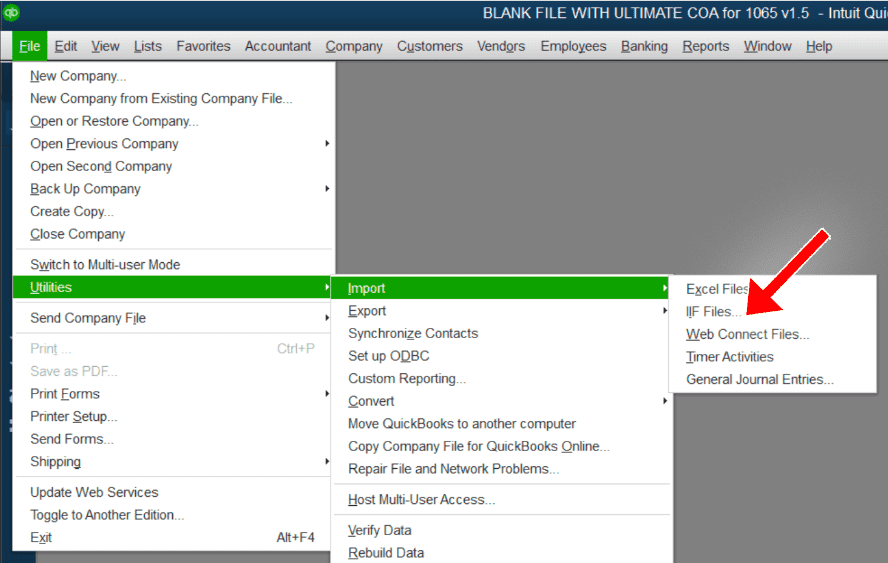
- Three options will appear on the screen naming:
- “Import IIF”
- “Cancel”
- “Import it for Me. I’ll Fix it Later”
- Choose the last one among the options.
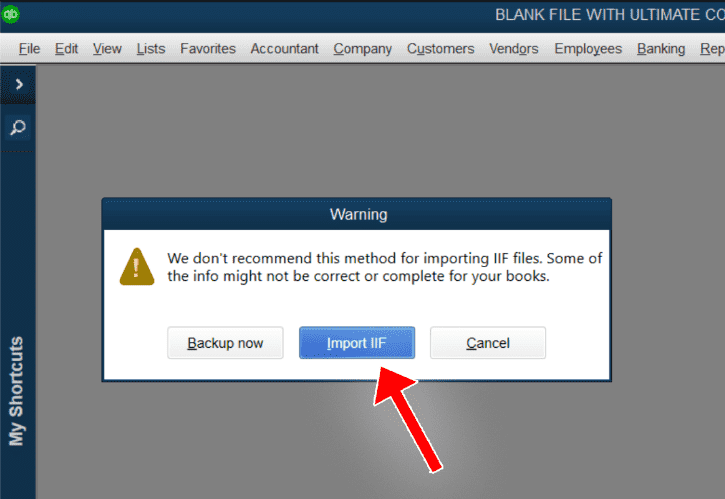
- After this step, a backup recommendation panel will open up. View it.
- You are advised to backup your data before going for the import of your file.
- Click on “Import IIF” from the dialog box appearing on the screen.
- Then you will be directed back to the desktop to find the “IIF” file that is to be imported. Wait till the desktop is visible.
- Choose the file once you get it.
- Next, press “Open”.
- Wait for a box to appear on the screen stating “Your Data has been Imported”.
- Hit “Ok”.
Tip: The method discussed above is also suitable for the QuickBooks Desktop 2020 and 2021 versions, respectively.
How Do I Import an IIF File into QuickBooks Desktop?
A user can import an IIF file into QuickBooks Desktop on Windows by reaching for the Utilities option. If performing the program on Mac, then you have to go to the File menu present in the QBDT window. Both methods will provide you with the Import option to continue.
How to import an IIF file into QuickBooks Desktop can be undergone with the mentioned methods.
Method 1: On Windows
To import the IIF file on your QBDT for Windows, find the Utilities button. Then proceed with the method by logging in to the Company File and switching the mode to Single-user. After this, visit the File bar in the QuickBooks Desktop program. Accompanying this, go to the Utilities menu present.
You may proceed with these steps to know how to import IIF files into QuickBooks Desktop on Windows.
- Log in to the “Company File” as “Admin”.
- Ensure that the software is using the “Single-user” mode.
- Select “File” in the QBDT menu.
- Opt for “Utilities”.
- Press “Import”.
- Then choose “IIF Files”.
- Once done, pick “Import IIF”.
- Opt for the file that you have to import.
- Hit “Open”.
- Click on “Ok” for the import confirmation.
Method 2: On Mac
Mac users can also go ahead with the import process on their QBDT by moving to the Company File. From this, they can open the menu for File in QuickBooks Desktop to import IIF. Further, proceed to the Import option available. Also, opt for the IIF file that you are willing to import. Then import the selected file.
Know more about the procedure to import an IIF file into QuickBooks Desktop on Mac by reading below:
- Signing in as “Admin” to the “Company File” is required.
- On your Mac, tap on “File”.
- Next, click on “Import”.
- Choose the “IIF” file you need to import.
- Then import the file to complete the process.
How can You Import IIF Files into QuickBooks Online?
It is possible to directly import an IIF file to QuickBooks Online by converting the extension to CSV or XLSX, as preferred. Initially, you may visit and open the IIF file on Excel. Then right-click on your file’s name and convert the file extension to either CSV or Excel. Select Yes given on the prompts. The file extension will be changed now. Next, move to the Settings of QBO and tap on Import Data.
Keep scrolling down the method for the import to finish:
- You are required to go to the IIF file and open it on “Microsoft Excel”.
- Switch the extension of the file from “IIF” to “CSV” or “XLSX” by right-clicking on its name.
- When the prompts appear, click on “Yes”.
- Your “IIF” file will get converted to “XLSX” or “CSV”.
- Proceed with the imports by selecting the “Settings” option on the QBO window.
- Press “Import Data”.
- Then tap on “Bank Data”.
- Hit the “Browse” tab.
- Now, select the “Excel” or “CSV” formatted file that you want to import.
- Pick “Open”.
- Click on the “Next” option.
- Choose your QBO account.
- The fields of the selected file are to be mapped with the QBO fields.
- Press “Next”.
- You also need to review the data that is being imported.
- Move to the “Next” button.
- Select “Yes” for the process to finish.
Restrictions Found during IIF File Import
There are certain constraints faced by the users during QuickBooks IIF file import. The users should know them earlier so that they can take precautions for the problems beforehand. The limitations of an IIF file import in this software are highlighted below:
- No links are created between the transactions of the IIF files that are imported.
- If you import a bill or an invoice with the payment, it would not get linked after the import process.
- The database cannot be imported into the custom fields to the items.
- You may not be able to import the payroll data to other products from the accounting files of QBDT.
- You can only import the data to a Canadian version of QuickBooks.
- No technical services may be provided by Intuit to import the data.
Users can easily import an IIF file into QuickBooks, just as we saw on this page. They can even import it in the older version as well as on the newest versions including QuickBooks 2019. The blog mainly focused on the import of the IIF file but We also shared the list of the items that can be moved. In the end, you are advised to keep a note of the limitations of the import before executing any method.