
QuickBooks has offered its users to adjust the sales tax rate in accordance to the ongoing market conditions. The users can easily edit the new transactions according to the new tax rate. When a user is willing to change or adjust the tax rate in QB, he/she needs to utilize the Customize Report option. In QuickBooks Desktop, you can make a selection for editing the sales tax rate or deactivating and creating a new one. Editing this rate in QBO can be processed via its computer software or Apple/Android mobile application.
How to adjust the sales tax rate in QuickBooks is what this post pays attention to. Along with this, adjusting the sales tax payable will also be seen here. The methods added will be best for the users of QuickBooks Desktop and Online.
- Why Adjust Sales Tax in QuickBooks?
- How to Adjust Sales Tax Rate in QuickBooks?
- How to Adjust Sales Tax in QuickBooks Desktop?
- Method 1: By Editing the Tax Rate
- Methods for Sales Tax Adjustment in QuickBooks Online
- How to Adjust Sales Tax Payable in QuickBooks?
- What are the Effects of Sales Tax Adjustment in QuickBooks?
Why Adjust Sales Tax in QuickBooks?
A company may have set a sales tax rate in QuickBooks and also applied it to its services or products. The sales tax rate can keep changing as per the market conditions. So, the company may want to change the earlier set tax rate in their QB account with the change of the rate in the market. For performing so, the users are provided with the feature of QuickBooks adjust sales tax.
How to Adjust Sales Tax Rate in QuickBooks?
Users can change the sales tax rate in their QB account by availing of the Customize Report option. To begin with, make a move to QuickBooks and click on the Reports button. Among the Report drop-down options, choose Item List. You will find a list of the items appearing on the screen. Go through it to proceed.
How to adjust sales tax in QuickBooks has been further shared below:
- Enter the “QuickBooks” window.
- A drop-down menu will appear when you Tap on the “Reports” button. View it.
- Pick “List” from the “Report” drop-down.
- Choose the “Item List” option from the other drop-down.
Note: The list of items will get displayed on the screen. You can also edit them if needed.
- For editing the sales tax, reach “Customize Report”.
- Then, pick “Filter”.
- Hit “Account”.
- You have to choose “All Liabilities” among the drop-down options.
- Press on the “Ok” tab to get the tax.
- Next, you may also take a printout of the list by turning to the “Print” button.
- Via the list, you need to choose “Report”.
- Opt for the printer once a new page opens.
- After opting for the printer, tap on “Print”.
- Move to the “List” menu on the homepage after you have checked the rate of the tax.
- Pick “Item List” on the drop-down bar.
- Right-click on “City” or “Country”.
- Then select “Make them Inactive”. This will mark the old rates of the city/country as inactive.
How to Adjust Sales Tax in QuickBooks Desktop?
Intuit QuickBooks Desktop users can edit the rate of the tax by changing the old rate. Alternatively, they can go for deactivating the old tax rate and creating a new one. To edit a tax rate, you need to opt for the Sales Tax Item button. For deactivating the tax rate, use the Lists tab. Then, to enter a new rate, utilize the Preferences option.
The methods shared below will help you to learn about sales tax adjustment in QuickBooks Desktop:
Method 1: By Editing the Tax Rate
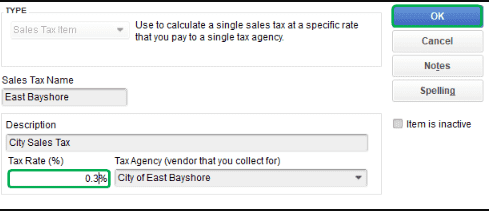
By choosing the Sales Tax Item option in QuickBooks Desktop, the existing rate can be edited. To start the method, search for the List button in the QBDT window. Then choose Item List among the options carried by the drop-down menu. Also, look for the Sales Tax Return option and right-click on this. Next, you have to hit Edit Item.
Keep following the remaining steps to successfully edit the sales tax rate in the software:
- Open “QBDT” and find the “List” tab.
- From the drop-down, select the option “Item List”.
- Then you need to search for the “Sales Tax Item”. Right-click on it.
- Press the “Edit” option.
- Type the new rate in the area of “Tax Rate %”.
- Tap on “Ok”. The tax rate will now be edited.
Method 2: Deactivate and Generate a New Sales Tax Rate
Users of QuickBooks Desktop can deactivate the old sales tax rate and after that prepare another one. For deactivating the account, look for the List option. Then select Item Lists. After that, opt for the Sales Tax Item button. Along with this, place a tick against the Item is Inactive check-box.
Read the rest of the steps given to know how to make sales tax adjustments in QuickBooks Desktop:
- To make the tax rate inactive, select the “Lists” option from the menu in “QBDT”.
- Then tap on “Item Lists”.
- Choose “Sales Tax Item”.
- Put a tick beside the “Item is Inactive” box.
- Press “Ok”.
This step will deactivate the old tax rate for sales. Then create a new one. To do so:
- Head to the QuickBooks Desktop “Homepage”.
- Opt for “Edit”.
- Click on “Preferences”.
- Hit the option that says “Sales Tax”.
- Reach the “Company Preferences” bar.
- In this step, select “Yes” given on the “Do you charge Sales Tax” option.
- Move to “Add Sales Tax Item”.
- Type a name and a new rate for the tax.
- You can even mention a short description.
- Enter the Tax Agency’s name, if needed.
- Tap on “Ok”.
- Next, fill in the “Sales Tax Code” to keep a record of the non-taxable and taxable sales.
- Choose “Tax Basis” in-between:
- “Accrual”
- “Cash”
- Pick a “Tax Period” among the given options:
- “Quarterly”
- “Monthly”
- “Annually”
- Select “Ok” to finish the procedure.
Methods for Sales Tax Adjustment in QuickBooks Online
You can edit/adjust the sales tax on your QuickBooks Online computer application. To do so, you can pick the Edit Rates option. Moreover, you can do the Sales Tax adjustment in QuickBooks Online on your mobile application too. The app will be supportive of Android devices or iPad/iPhone.
Let us read more about these methods below:
Method 1: On the Computer Application
You can effortlessly avail of the sales tax adjustment feature for your QBO computer application by benefiting from the Edit Rate button. To start the process, tap on Taxes. Pick the right Tax Agency and then begin the editing. Then search for the Edit drop-down. Further, select the Edit Rates button for Sales Tax adjustment in QuickBooks Online.
- Launch “QuickBooks Online” on your computer.
- Press “Taxes”.
- Ensure to choose the right tax agency before heading to the procedure.
- Look for the drop-down named “Edit”.
- Tap on the “Edit Rates” option.
- You will see a “Rate Table” appearing on the page.
- Choose the tax rate that you want to adjust.
- Pick “Edit”.
- On the “Edit Tax Rate” page, fill in a new name and tax rate.
- Mention the “Effective Date”.
- Once done, the new tax rate will be applied.
- Select “Save”.
Method 2: For iPhone/ iPad
For knowing how to adjust sales tax in QuickBooks Online, utilize the Settings icon. Launch the QBO app on your iPhone/iPad. Then reach the Menu tab. Tap on the Settings option and after that head towards the Tax Rate tab. Next, look for the items of the Sales Tax for editing or adjusting.
The remaining steps are highlighted below to finish the procedure.
- Run your “QBO Application” on “iPhone”/“iPad”.
- Press the “Menu” button.
- Select “Settings”.
- Head to the “Tax Rate” option.
- Search for the item of the “Sales Tax” that is to be edited.
- Hit the “Edit” tab.
- Customize the changes accordingly.
- Also, save the edited changes.
Tip: Only tax rates for sales and the name of the components can be changed in this app on your Apple device. The tax agencies’ names that are associated with the tax rates cannot be edited.
Method 3: In the Android App
Users can seamlessly edit the tax rates for a sale in the QBO app for their Android devices by taking the help of the Edit button. You are required to open the app and then choose the transaction that needs to be edited. After that, tap on the Edit tab and pick the Tax Entry for performing the adjustment.
Finish reading these instructions to understand how you can adjust sales tax in QuickBooks Online:
- Visit the QuickBooks Online mobile application for an “Android” device.
- Find the transaction that needs to be edited.
- Select the “Edit” button.
- Also, choose the “Tax Entry” for the editing or adjustment.
- Type the new “Tax Rate” and “Amount” in the fields given.
- Wait for some time and the tax rate will get edited.
Tip: You will have to grant access to the QuickBooks Online app on your Android smartphone or device by utilizing QuickBooks Online Web to avail of the adjustment feature.
How to Adjust Sales Tax Payable in QuickBooks?
QuickBooks users must make use of the Manage Sales Tax button for changing or editing the sales tax payable. Begin by pushing the Sales Tax button. Then click on the Manage Sales Tax option and hit Adjust Tax Owing. Next, choose the Adjustment Date and fill in the Entry No. in the required field. Gradually, the adjustment of the payable will reach completion.
The directions outlined below will explain further how to adjust sales tax payable in QuickBooks:
- Move to your QuickBooks account.
- Tap on the “Sales Tax” option in the second step.
- Clicking on “Manage Sales Tax” is now required.
- Then press the “Adjust Tax Owing” button.
- Pick the “Adjustment Date”.
- In the ending step, type “Entry No.” in the field you can see.
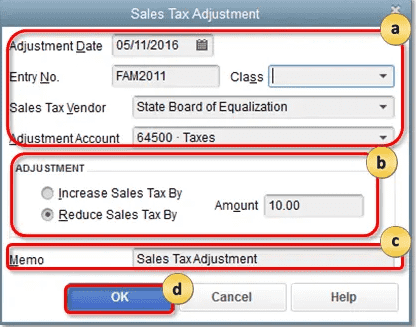
- Select the “Tax Agency” drop-down menu.
- Also, you are required to pick “Agency” where “Adjustments” can be applied.
- Next, head to the “Sales Tax Item” drop-down bar.
- Opt for “Sales Tax Item” to adjust “Return Line”.
- By tapping on the field named “Adjustment Account”, a drop-down menu will appear. Go through it.
- From here, choose “Account for Adjustment”.
- Fill in the amount that is to be adjusted in the field of “Amount”.
- Hit the “Ok” tab.
- Go for “Done”.
What are the Effects of Sales Tax Adjustment in QuickBooks?
Adjusting the Tax Rate of the Sales in QuickBooks can result in several effects. These effects may be observed only on the new transactions or records. The older ones may not receive any impact. Let us look at these effects in more detail below:
- In the recurring invoice template, the fresh transactions that will be processed will make use of the adjusted tax rates and will not affect the previous transactions.
- You can also edit the transactions that were recorded earlier to adjust sales tax in QuickBooks.
- The latest transactions will always avail of the edited tax rate despite using the date before the changes were made.
- If you enter the outstanding transactions for the date before you had changed the sales tax rate, then just adjust those transactions.
A company may need to keep changing the sales tax rate in QB to keep up with the market conditions. This blog gave you the methods to adjust sales tax in QuickBooks. We also talked about the procedure for the adjustment of the same in QBDT and Online. You got to know the method to perform the editing for sales tax payable as well.
Read our other blog to know about QuickBooks memorized transactions. Also, go through our post where we shared methods for IIF file import to QuickBooks.