
QuickBooks memorized transactions assist you to get reminded about recurring payments. They also work as templates for entering your data. You can create, edit, and even export a memorized transaction in this accounting software. Due to certain reasons, you may also delete the transactions if required. Also, you can carry out these operations on both Windows and Mac. It should be noted that such transactions can be made, edited, etc., on QuickBooks Online and Desktop.

- What Does Memorized Transactions Mean in QuickBooks?
- How to Create QuickBooks Memorized Transactions?
- Method 1: Recurring Transactions in QBO
- Method 2: QuickBooks Desktop on Windows
- Method 3: Make in QBDT on Mac
- How to Edit a Memorized Transaction in QuickBooks Desktop?
- How Do I Delete a Memorized Transaction in QuickBooks Desktop?
- Process to Export QuickBooks Memorized Transactions
What Does Memorized Transactions Mean in QuickBooks?
Memorized transactions are one of the features provided in QuickBooks. This feature helps a company by giving reminders of the business transactions that are recurring or can be quickly entered using a template. As they work like templates, companies can quickly make the entries of their transactions.
How to Create QuickBooks Memorized Transactions?
You can create a memorized transaction in QuickBooks by recording it as a recurring transaction. This works especially when you are using QuickBooks Online. When you are running QuickBooks Desktop on Windows, you can utilize the Memorized Transactions option in Lists. For the same version on Mac, the Memorize option in the Edit menu will be helpful.
See more information on how to create memorized transactions in QuickBooks Online and Desktop by scrolling below.
Method 1: Recurring Transactions in QBO
For creating a memorized transaction in QBO as a recurring one, you need to open the homepage. Then you have to select the Gear icon. After this, tap on Recurring Transactions. Now, click on the New option. Decide the type of transaction to be made and press Ok. Enter the Template Name and then specify the type. Enter the information needed and then save the template to create the transaction.
- Run the “QuickBooks Online” software.
- Select the “Gear” icon.
- Click on the “Recurring Transactions” option.
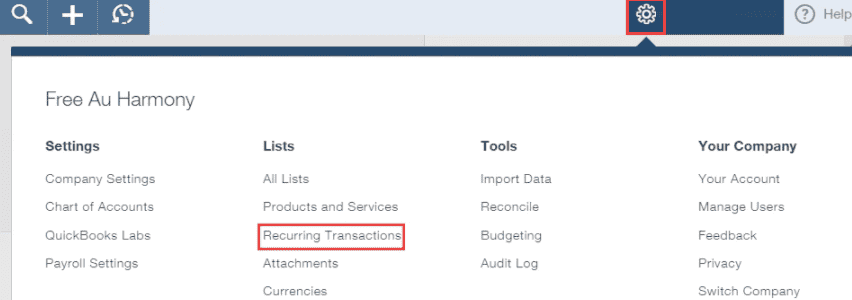
- Press the “New” option.
- Pick the type of transaction you want to create.
- Click on the “Ok” button.
- Fill in a “Template Name”.
- Opt for “Type” among “Scheduled”, “Unscheduled”, and “Reminder”.
- Write the required information.
- Click on the “Save Template” option.
Method 2: QuickBooks Desktop on Windows
On Windows, QuickBooks Desktop users get the option of making memorized transactions. This is mainly done through the software’s Memorized Transactions option. On opening QuickBooks Desktop, search for Lists. Tap on Memorized Transactions given in this menu. Now, enter the information as required. In the Edit menu, select the option of Memorize. Enter a name afterward. Choose among the three options visible and fill in all the information. Gradually, you will understand how to enter memorized transactions in QuickBooks Desktop on Windows.
- Ensure that “QBDT” is running.
- View “Homepage”.
- You need to opt for “Lists”.
- Click on the option of “Memorized Transactions”.
- Type in the transaction accordingly but do not save it.
- Through the “Edit” menu, choose “Memorize”.
- Mention a name.
- Among the three options, choose the way you want “QuickBooks Desktop” to handle the transaction.
- Enter all the information as requested.
- Tap on “Ok”.
- Press one of the following:
- “Save and Close”
- “Save and Next”
Method 3: Make in QBDT on Mac
To add memorized transactions in QuickBooks Desktop, while using Mac, you need to initially view the Homepage. Then you may open or create a transaction in the accounting software. Go to the Edit menu of QBDT. Now, you can select Memorize. After this, enter the details of your transactions which are to be memorized. Following the step, under the Lists menu, you need to pick Memorized Transactions.
The following are the remaining steps to create memorized transactions in QBDT on Mac:
- Go to the QuickBooks Desktop “Homepage” on “Mac”.
- Open/Create the transaction that you want to be memorized.
- Tap on “Edit”.
- Pick the option that says “Memorize”.
- Now, you need to set up the following details for your transactions to be memorized:
- “How Often”
- “Remind Me”
- “Automatically Enter”
- “Next Date”
- “Number Remaining”
- “Days in Advance to Enter”
- “With Transactions in Group and Group Name”
- “Show in Calendar”
- Navigate through the “Lists” menu.
- Tap on “Memorized Transactions”.
- Choose the memorized transaction.
- Click on “Settings”.
- In this step, you need to select “Use”.
- After this, customize the changes as you like.
- Press “Save” in the end.
Throughout the process, please ensure that all the information and values provided by you are correct.
How to Edit a Memorized Transaction in QuickBooks Desktop?
You may want to edit a memorized transaction on QuickBooks Desktop running on Windows. The software’s Lists option provides you with the flexibility to do so. Even when you are running QBDT on Mac, the same option can be opted for. Then you can make changes to the memorized transactions and save them.
Method 1: Edit on Windows
We suggest that the readers view the Lists option when they want to edit their memorized transactions specifically on QBDT on Windows. Once you have signed in to your QBDT account on Windows, find Lists. Double-click on the memorized transaction which is to be modified or customized. Choose Memorize from the top. Now, you can tap on Replace to update the transaction. Click on the Save button in QuickBooks Desktop and close it once you are done.
The method to edit memorized transactions in QuickBooks Desktop is:
- Go to the “QBDT” window.
- Click on the “Lists” menu.
- To modify, double-click on the memorized transaction.
- Customize the transaction as you require.
- From the top, choose “Memorize”.
- For updating the transaction, you have to push “Replace”.
- To create one new memorized transaction, select the “Add” option.
- Use “Save and Close”. Alternatively, you may hit “Save and Next”.
Method 2: Editing on Mac
For editing QuickBooks Desktop memorized transactions on Mac, you first need to opt for Lists. After that go to the Edit menu. Then select Edit Memorized Transaction. This option enables you to customize the transaction details. Once all the edits or customizations have been made, tap on Save.
- Open “QuickBooks Desktop” on Mac.
- Find the “Lists” menu and select it.
- Click on the option that states “Memorized Transactions”.
- Navigate yourself to the “Edit” menu.
- Then choose the option of “Edit Memorized Transaction”.
- Customize the transaction details. Ensure that the details are error-free.
- Press “Save”.
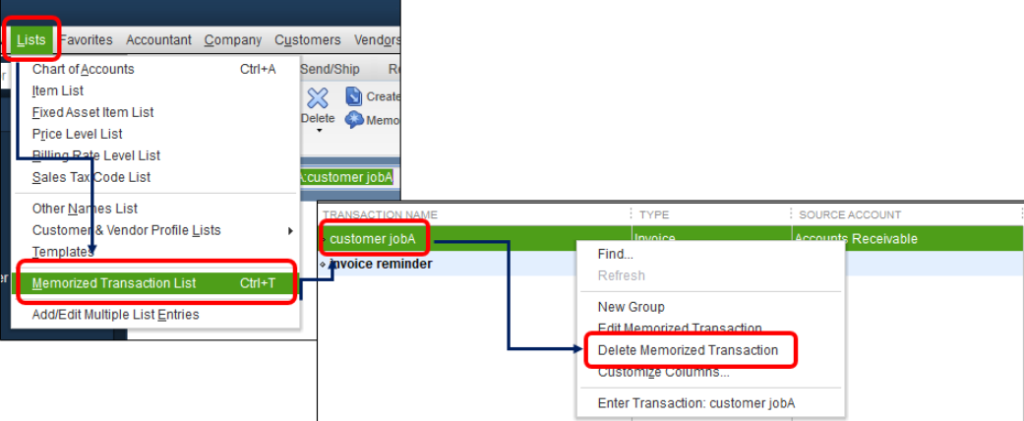
How Do I Delete a Memorized Transaction in QuickBooks Desktop?
Memorized transactions can easily be deleted in QuickBooks Desktop on both Windows and Mac when you can access Lists. This is a useful menu with various options available, including the option of deleting the transaction. While you perform the process, we suggest that you be careful in deciding the right transaction for deletion.
Let us now look at the ways to delete memorized transactions in QuickBooks Desktop on different operating systems.
Method 1: Deleting on Windows
For removing a memorized transaction in QBDT on Windows, you have to open the Lists menu. Click on the Memorized Transaction List given in this menu. After doing this, choose the transaction that is to be deleted. Pick Delete Memorized Transaction below the Memorized Transaction drop-down. At last, select Ok. Soon, you will be able to remove the memorized transactions in QuickBooks Desktop.
- Initially, “QuickBooks Desktop” has to be opened.
- Tap on the “Lists” menu.
- Opt for “Memorized Transaction List”.
- Choose the transaction to be deleted.
- Under the “Memorized Transaction” drop-down, press “Delete Memorized Transaction”.
- Hit the “Ok” button.
Method 2: Delete on Mac
Mac users who run QBDT may want to remove a few memorized transactions as they may no longer require their use. To delete the transaction, you can see Memorized Transactions available in the menu of Lists. The option will have an Edit menu. This is the menu that will assist you in completing your purpose.
- Go to “QuickBooks Desktop” on your “Mac”.
- Search for the “Lists” menu and view it.
- Select “Memorized Transactions”.
- Navigate to the “Edit” menu.
- To delete, press the “Delete Memorized Transaction” option.
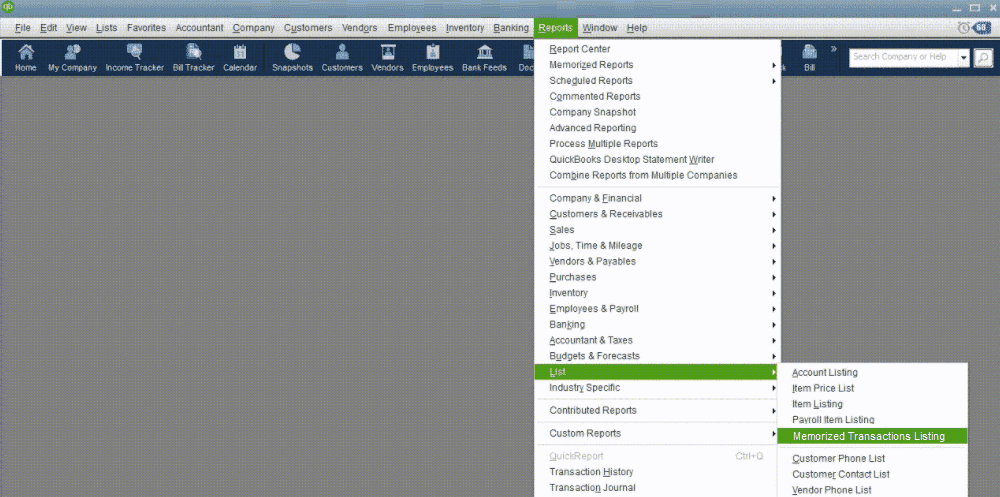
Process to Export QuickBooks Memorized Transactions
You can effortlessly export memorized transaction lists in QuickBooks for using them as you want to. To start the process, go to the QB window. Now, you have to select Reports. Accompanied by this, tap on List. The user has to click on the Memorized Transactions Listing option. Create a new sheet by using the drop-down below the Excel icon on the report. Then you can quickly export the transactions.
- Access your account on “QuickBooks”.
- Go through the “Homepage”.
- Head to the option of “Reports”.
- Select “List”.
- Tap on “Memorized Transactions Listing”.
- By using the drop-down below the “Excel” on the report, create a new sheet.
Once the sheet gets prepared, you can export it to any required software. The final process for exporting Quickbooks Memorized Transactions may take a while.
At the End
By using memorized transactions in QuickBooks, you can get reminders for your recurring transactions. That is why you should know how to make them. Additionally, processes such as the deletion or editing of these transactions should also be known. We shared the methods for creating, editing, exporting, and deleting a memorized transaction in QuickBooks and its available versions. For any queries regarding these methods, please connect with us.
Let us learn about QuickBooks Google apps integration as well. Do read our other blog also on how to enter credit card cashback rewards in QuickBooks.
wow! nice. useful post.