
To get numerous features and advantages, users integrate their Expensify and QB accounts. Expensify integration with QuickBooks Online and QuickBooks Desktop can be started in various ways. Among all, the usual way is by downloading the Expensify app. As convenient as this, the settings of the expense-managing tool can also assist you to sync your accounts. Whether you have a Google or Apple ID, you can easily connect QB to Expensify.

How Expensify Integrate with QuickBooks?
Expensify QuickBooks integration refers to the synchronization of your accounts on both. You can get a range of features on the integrated platform. These features can be of use for business organizations by reducing manual work.
You need access to both Expensify and QuickBooks platforms for starting their integration. Initially, you can open Expensify’s website, that is, www.expensify.com. Then you can sign in or sign up for the expense management tool. Accompanied by choosing the Control/Collect plan, you can sync your QB and Expensify accounts.
- You need to open the given link on your browser:
- “www.expensify.com”
- Sign in to your account using one of the following options:
- “Google”
- “Apple”
- Or, you may create an account on “Expensify”.
- Choose either “Control” or “Collect” based on your budget.
- View the “Group Section” option.
- Then tap on the name of your business organization.
- Go through the extra settings visible.
- Click on the option of “Connections”.
- Now, opt for the “QuickBooks” application.
- A link will be available for “Connect to QuickBooks”. Click on it.
- The link will take you to “QuickBooks Login Page”. On this page, you need to mention:
- your username.
- your password.
- Start connecting your “QB” and “Expensify” accounts.
- Certain prompts will get displayed. On following them, the Expensify QuickBooks integration procedure will start.
- Now, you need to push the “Save” button.
- Run “QuickBooks” by Intuit.
- Access your company’s account on the software.
- Head to the “Overview” section.
- Check whether your accounts on “Expensify” and “QB” are integrated.
How to Integrate Expensify with QuickBooks Desktop Using Expensify Sync Manager?
Expensify Sync Manager has the Connections option. This option is useful for Expensify QuickBooks Desktop integration. To find the option, you can open the platform’s Settings. Then from Connections, you can download the sync manager. A User Token will be required to effectively do this process.
- In Step 1, you can launch the “QuickBooks Desktop” app or software.
- Pick one company file in “QuickBooks Desktop”.
- You have to run the picked file.
- Opt for “Mail Email”.
- Now, you can map your emails.
- While mapping the emails, set up your submitters as “Vendors”.
- Open the “Expensify” platform.
- Find “Settings”.
- Head to the “Connections” option.
- From here, “QuickBooks Desktop” has to be chosen.
- “Expensify Sync Manager” will be downloaded in this step.
- Launch the manager along with “QBDT” on one server.
- The manager needs to be connected to your account on “QuickBooks Desktop”.
- Choose the “User Token” option. Then paste it in “QBDT”.
- When the manager’s status mentions “Connected”, you have to hit “Continue”.
- Prefer choosing “Yes, Always; Allow Access Even if QuickBooks is Not running”.
- The admin needs to be mentioned.
After this, the sync manager will ask you to set up the platform for integration. This will complete the procedure and your accounts will be synced.
Does Expensify Integrate with QuickBooks Online?
It is possible to integrate QuickBooks Online with your account on Expensify. You need the Expensify mobile app to do this. The app can be accessed from Apps in the QBO program. For Expensify QuickBooks Online integration, you can also use the settings of the expense management platform.
Method 1: Expensify App for Integration
It is convenient to use the Expensify application for syncing with QuickBooks Online. In QBO, you can run Apps. Then pick Find Apps. Here, you can find Expensify and get this application. With the help of the Connect option, you can integrate QBO and Expensify.
- You can begin by opening “QuickBooks Online”.
- Find “Apps” and choose this option.
- This option will provide you with a menu with “Find Apps” in it. Click on it.
- View “Search”.
- Input “Expensify” in this option.
- Look for the “Expensify” application.
- Use the “Get App” option to download this application.
- After you have downloaded it, you can opt for “Connect”.
Please Note: The “Expensify” mobile application asks you to choose a plan. The plan includes charges. By selecting “Collect”, you have to pay $5. With the other plan, that is, “Control”, $9 will be the charge.
- Wait for this option to execute Expensify integration with QuickBooks Online.
Please Note: During the integration process for “Expensify” and “QBO”, should you see any prompts, follow them.
Method 2: Sync via Expensify Settings
When you launch Expensify on your system, you can see its Settings. These include the Policies option. After selecting it, you can visit Group. From this option, you can prefer one policy and then perform the remaining steps for connecting Expensify to QuickBooks Online.
Please Note: While you perform this method, you will be asked to choose a company file in “QuickBooks Online”. Presently, you can pick just one file. The selection of multiple company files of the accounting software may not help in integrating with Expensify.
- Run “QuickBooks Online” and check that the employees are set up. You may use one of these options if the employees are not set up:
- “Employees”
- “Vendors”
- Enable “Automatically Create Vendor”.
Please Note: The option of “Automatically Create Vendor” is useful when you need to add the records relating to your vendors. Therefore, you will be suggested to use it.
- Ensure that the “QuickBooks Online Payroll” option has been enabled.
- Now, you will have to access “Expensify”.
- View “Settings” of your “Expensify” account.
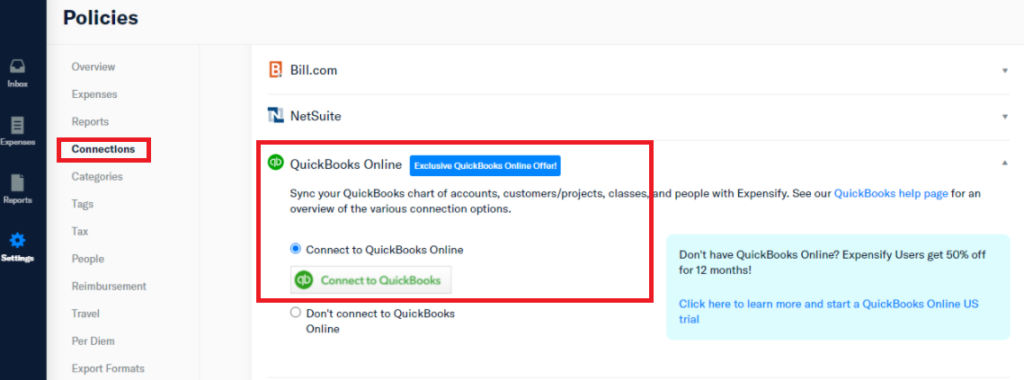
- Tap on “Policies”.
- Then choose the “Group” option.
- This is followed by picking your policy’s name.
- Opt for “Connections”.
- Pick the version of the accounting software you are using, that is, “QuickBooks Online”.
- Go to the following tab:
- “Connect to QuickBooks Online”
- Push the button that says “Connect to QuickBooks”.
- Type in the credentials of your “Intuit QuickBooks Online” account.
- Sign in to your account.
- Choose one company file that is associated with “QuickBooks Online”.
- Then connect this file with your “Expensify” account.
- Wait for the file to get linked to the expense management tool.
- Now, your reports can be exported. Choose “Reports”.
- You may choose to export all your reports or only specific ones.
Please Note: For exporting specific reports from “Expensify” to “QBO”, make use of the available checkboxes.
- Tap on the “Choose to” option.
- Now, opt for “QBO” or “QuickBooks Online” with the help of the dropdown.
- Ensure that the following option is picked when you are exporting only specific reports:
- “Mark as Manually Entered”
Features of Integrating Expensify and QuickBooks
These are the essential features promised to users after QuickBooks Expensify integration:
- You can access synchronization in real-time.
- Reporting gets automated with this process.
- Customizations can be made to codability post QB and Expensify’s integration.
Why should You Integrate Expensify with QuickBooks?
QuickBooks can be synced/integrated with Expensify to receive various benefits. Some of these have been given here:
- You can record your company’s receipts in the form of images. Then you can use them.
- Your regular work related to accounting can be organized.
- The credit cards of your company can be easily recognized.
You can get such benefits after integrating QB with your Expensify account. To know more benefits, you will be suggested to start Expensify integration with QuickBooks Online/Desktop.
Closure
With this post, we got to know that Expensify can be synced with the QuickBooks software. We helped you find at least 4 methods to sync the accounts. These methods supported both Expensify QuickBooks Desktop integration and QBO integration.
Let us know your feedback on these methods and share it with us below.
We recommend you to read QuickBooks Amazon Integration’s features and benefits. To read more, you can also check how to integrate WooCommerce with QuickBooks.