
Credit card charges are counted as fees that are applied when making payments via a processor. When paying with an invoiced credit card, a 2.9% fee is applied at the time of the payment. When you keep a track of this fee, credit card reconciliation becomes easier. Therefore, it is a good practice to enter these charges.
Having chosen QuickBooks for this task, you should fully understand the methods involved. How to enter credit card charges in QuickBooks is possible via the software’s features. Since every version can come with varying features, the methods are likely to be different. With all the directions followed, it will be simple to understand them.
- Reasons for Entering Credit Card Charges in QuickBooks
- How to Enter Credit Card Charges in QuickBooks?
- How to Enter Credit Card Charges in QuickBooks Desktop?
- Method 1: Through the Banking Button
- Method 2: Transferring the Record
- Method 3: In QuickBooks Desktop 2020 via Banking
- How to Enter a Credit Card Charge in QuickBooks Online?
- FAQs- How to Enter Credit Card Charges in QuickBooks
Reasons for Entering Credit Card Charges in QuickBooks
While making entries of multiple bills, you may wrongly add an amount or any other information. Identifying them may not be possible unless you manually check for errors. However, when entering credit card charges in QuickBooks, these billing errors can be easily caught. Once you find them, you can quickly correct these errors.
Making the entry of credit card charges can assist you in the following ways as well:
- Recording the credit card expenses or charges can make your work easier at the time of tax filing.
- The finances can also be controlled better through a detailed examination of the amount spent.
- When you record the expenses or charges in QuickBooks, their reconciliation can become easier.
How to Enter Credit Card Charges in QuickBooks?
Multiple methods have been made available for recording credit charges in QuickBooks. You can carry out the process with the help of the Chart of Accounts tab. Another method that can be beneficial for adding the charges is via the Expenses button. Both features can help you automate the process to quickly enter the fees.
How to enter credit card charges and payments in QuickBooks through these methods is explained in detail below.
Method 1: Using Chart of Accounts
The Chart of Accounts button stores each of the accounts registered in the program that can be used for tracking the financial details. Through this button, you can also have a look at the timings when the transactions were made and the amount. Entering credit card fees through this option is suggested when you want the software to record every essential detail. You need to pick the Lists button to reach this option.
Go through the following procedure to learn how to enter credit card charges in QuickBooks:
- Visit the home screen of “QuickBooks”.
- Then press the “Lists” option in the menu.
- Next, you are required to tap on the “Chart of Accounts” tab.
- Go to the drop-down menu of “Account” and opt for “New” over here.
- Head to the drop-down list of “Add Expense” and choose the suitable “Transaction Type”.
- Further, move to the “Continue” button.
- Mention the account’s name and the other required information. Save it once you are done.
The credit card charges will now be recorded in the QuickBooks software. You can review whether they have been correctly added.
Method 2: Opting for Expenses Feature
When trying to understand how to enter a credit card charge in QuickBooks, using the Expenses option can be beneficial. This feature helps in viewing the entire list of the expenses made in your business. To visit this button, the + icon has to be tapped at first. After doing so, the Vendors section has to be pressed for locating the Expense tab.
- Head to the “+” sign located on the “QuickBooks” window.
- Then visit the section “Vendors”.
- Here, pick the “Expense” tab.
- You need to opt for a “Payee” in this step.
- Following this, head to the field of “Bank/Credit Card” and select the appropriate credit card.
- Now, you will have to enter each of the required information on the screen.
- Lastly, the “Save and Close” tab is to be clicked.
It will be helpful to learn that the Expense feature can not only record but also help in processing the credit card fee. Thus, aside from recording the fees, when you need a reliable approach to processing it, you can depend on the same feature.
How to Enter Credit Card Charges in QuickBooks Desktop?
Users can utilize the Banking feature for entering credit card charges in QuickBooks Desktop. Locating this button is quite easy as it can be seen on the menu of the program. For the users of QuickBooks Desktop 2020 as well, this feature can come in handy. Aside from that, the expenses, fees, or payments can be entered by shifting the records. When doing so, a bank transfer has to be made, and, further, the payment has to be shown as settled.
Method 1: Through the Banking Button
The Banking button or feature in QuickBooks Desktop allows users to manage the entries downloaded from their credit cards and bank accounts. When utilized properly, this feature can benefit the users while recording the credit card fees. To make use of it, the option has to be found in the menu section. Afterward, you need to opt for the Use Register button to proceed further.
Navigate via the given steps for learning how to enter credit card charges in QuickBooks Desktop:
- Click on the “Banking” menu on the “QuickBooks Desktop” homepage.
- Then move to the “Use Register” option.
- When the dialog box of “Use Register” appears, you need to opt for the credit card account that you have been using.
- Next, hit “Ok”.
- The “QuickBooks Credit Card” page will then come up. Here, the charge of the credit card can be seen.
- Move to the entry present at the bottom of the page and opt for the apt account.
- Other details such as the “Amount” and “Memo” have to be filled in for entering credit card charges in QuickBooks Desktop.
- After you enter all the required details, tap on the “Record” button.
Method 2: Transferring the Record
While attempting to add credit card expenses in the QuickBooks Desktop software, users need to transfer the record of these. This can be initiated through the Transfer Funds option. Your record will be securely moved. In doing so, you will be able to identify how to enter credit card charges in QuickBooks Desktop.
- Launch “QuickBooks Desktop” and navigate to the section named “Banking”.
- After doing so, click on the “Transfer Funds” button.
- The account from which the credit card cost has to be transferred needs to be picked in the field given “Transfer Funds From”.
- Move to the “Transfer Funds To” panel and opt for “Credit Card” among the other options provided in the drop-down menu.
- In case you want to make an online transfer, choose the “Online Funds Transfer” checkbox.
- Enter the details in the following fields if required:
- “Transfer Amount”
- “Memo”
- Finally, hit the “Save & Close” tab. The credit card charges should be recorded by now. With this, you will know how to enter credit card charges in QuickBooks Desktop.
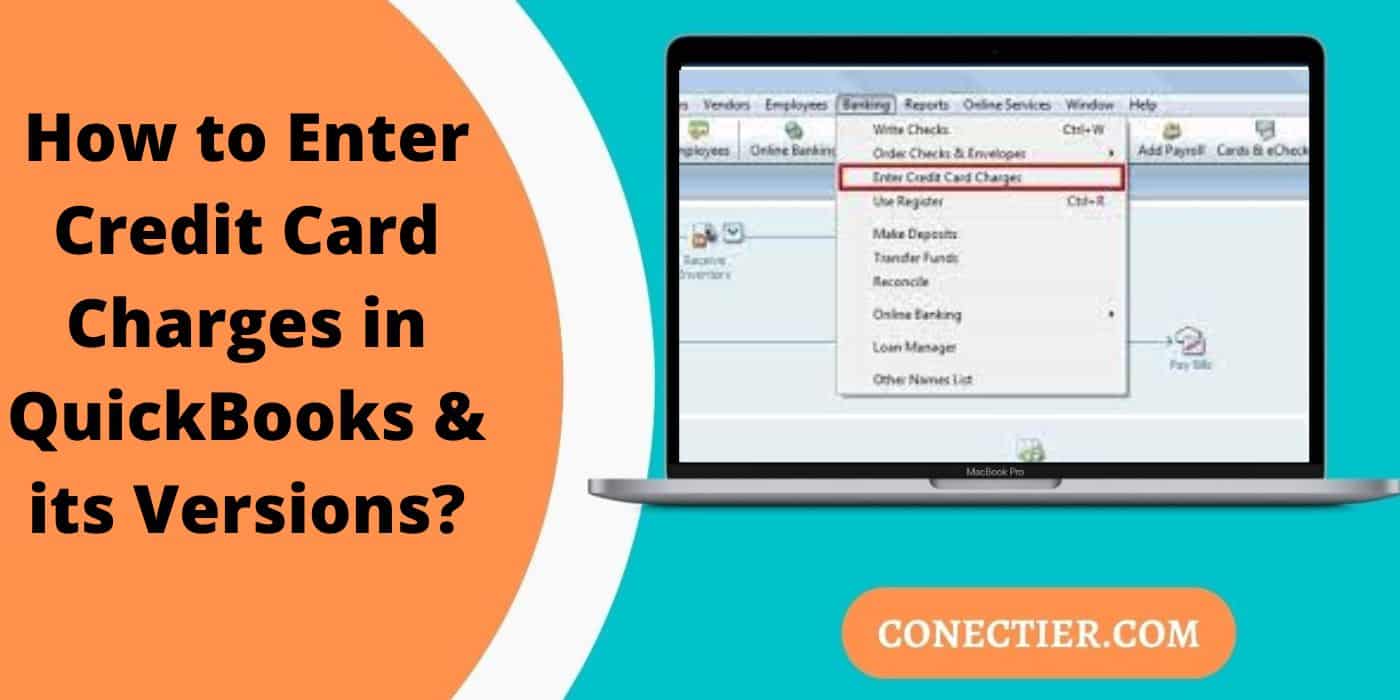
Method 3: In QuickBooks Desktop 2020 via Banking
QuickBooks Desktop 2020 allows users to record credit card expenses in their software. This can be easily executed through the Banking option available on the menu panel. Then you will have to look for the tab named Enter Credit Card Charges and press it. Next, you simply need to opt for the credit card you are using and follow the rest of the directions.
- Open the “QuickBooks Desktop 2020” software.
- Go to the “Banking” button present at the top panel.
- Here, the “Enter Credit Card Charges” tab has to be chosen.
- On the page “Enter Credit Card Charges”, move to the “Credit Card” field.
- Select your card.
- Following this, head to the section of “Purchased From” for entering the vendor who is related to that credit card cost.
- Now, the date on which the selected card was charged has to be entered.
- Further, you will have to fill in the “Reference Number” for the transaction.
- Continue learning how to enter credit card charges in QuickBooks Desktop 2020 by mentioning the total cost in the field of “Amount”.
- In the drop-down menu of “Account”, opt for the relevant expense account as per the cost.
- Then fill in the following fields to record the expenses:
- “Amount”
- “Memo”
- “Customer Job”
- “Class”
- In case you want to shift the expense to the vendor on a future receipt, the expense account has to be marked as billable.
- Verify the details that you have filled and when everything looks accurate, choose “Save and Close”.
How to Enter a Credit Card Charge in QuickBooks Online?
To enter credit card charges in QuickBooks Online, you are recommended to move via the Accounting feature. This is a manual process and can require more information. Recording credit card expenses can also be executed through another manual procedure but with less information. As a part of this, the +New option has to be used.
Method 1: Make Use of the Accounting Option
The Accounting tab can be one of the best options when trying to enter credit card fees in the QuickBooks Online program. It aids users in finding all the accounts-related work. You can move to this feature by tapping on the +New option. After you get it, the Chart of Accounts button has to be selected as well for moving ahead.
How to enter credit card charges in QuickBooks Online can be processed through the below-provided procedure:
- Run “QuickBooks Online” and click on the “+New” tab.
- Then hit the “Accounting” button.
- In this step, you will have to opt for the “Chart of Accounts” option.
- Press “New” here.
- The “Account Type” and the “Detail Type” have to be set as “Credit Card”.
- In the “Name” field, mention the account name as well as the ending 4 digits of your credit card’s number.
- You can even add a description if you want.
- Now, scroll down to the field named “When Do You Want to Start Tracking Your Finances From this Account in QuickBooks” and opt for the time from which the charges should be recorded.
- According to the time you had entered above, you will now be asked to type the balance that was available during the selected period.
- After you do so, pick “Save and Close” in this step. Thus, as you enter credit card charges in QuickBooks Online, they will get saved.
- Now, from the lists present in the “Chart of Accounts”, find the entry of the account that has been created.
- Once it is found, opt for the “View Register” option beside it.
- When the page of “Credit Card Register Opens”, move to the “Add CC Expense” drop-down and choose “CC Credit”.
- Then you need to type each of the details required concerning the card and its charge.
- Hit the “Save” button after you finish filling up the information to enter the charges or credit card expenses in QuickBooks Online.
Tip: In case you have entered any wrong information relating to the expenses, you can go to that field. Then opt for the “Edit” tab. Using this, you can then make changes as well as correct them. Also, press “Save” to record that information.
- Once the charges have been mentioned, hit “Reconcile” for ensuring that there has been no entry-related issue.
Method 2: Entering the Credit Card Cost Manually
There can be users who may not be aware of how to manually enter credit card charges in QuickBooks Online. In this software, through the +New option, you can manually record them without investing much time. Before you become aware of it, please make certain that you have all the information relating to the card’s account, payment dates, payee’s details, etc.
- Navigate to the “QuickBooks Online” program.
- Here, tap on the “+New” option.
- Then from the list of “Vendors”, opt for “Expenses”.
- The name of the payee has to be typed in the “Payee” field to learn how to enter credit card charges in QuickBooks Online.
- Next, you need to head toward the “Payment Account” drop-down and choose the credit that has been utilized for the transaction.
- In the field named “Payment Date”, the date on which the payment was made has to be mentioned.
- The suitable method for payment has to be selected from the pull-down menu.
- You may also type the reference number if you want.
- The following details have to be entered as well:
- “Category”
- “Description”
- “Amount”
- The receipt has to be added in the “Attachments” section.
- The “Save and Close” tab has to be pressed.
With this, you will finish manually entering the expenses or payments related to your card. See to it that every detail is correctly added. For future purposes like credit card reconciliation in the software, the accuracy of this information must be ensured.
Conclusion
When you already know how to enter credit card charges, fees, expenses, or payments in QuickBooks, keeping your accounts updated will never be a problem. In case you don’t, you would have understood the basics while reading this post. When you follow every procedure accurately, you will see accurate results. Thus, along with being updated, your accounts will also be accurate.
FAQs- How to Enter Credit Card Charges in QuickBooks
You can add credit card expenses in QuickBooks via the Chart of Accounts feature. Also known as COA, to reach this button, you need to opt for the “Lists” button present on the software’s menu. After you tap on “Chart of Accounts”, you will have to navigate to the pull-down list named “Account”. Further, choose “New” to start adding the expenses.
A credit card charge is a type of fee recorded in QuickBooks for making transactions. When customers of the software’s user make any payment through it, they are charged a fee of nearly 2.9% when using invoiced cards.
To understand how to enter a credit card charge in QuickBooks Online, you need to begin locating the “+New” tab on the screen. After clicking it, you are required to head to the “Accounting” feature. From here, you will be navigated to the “Chart of Accounts” button for recording the credit card charges or fees.
Users should record credit card charges in QuickBooks as this helps in examining whether any billing errors are present. This practice can also assist you in reconciling the credit card account quickly and comfortably. In addition to this, entering credit card charges in QuickBooks is important as the tax filing procedure can become easier.
When attempting to learn how to enter credit card charges in QuickBooks Desktop, moving through the “Banking” tab can be advantageous. Following this, the “User Register” option has to be selected. Once you see a dialog box opening, the appropriate card has to be chosen. Then you can start adding the fees.
QuickBooks directly deposits the credit card expenses/payments/fees in your registered bank account. You can also have a view of the details of the deposit through the “Account and Settings” button. You need to first navigate to the icon depicting “Gear”. The “Payments” and “Documents” buttons have to be clicked afterward to see the deposits.
You can manually enter credit card charges in QuickBooks Online. To do so, users need to visit the “+New” tab. This can be easily accessible via the accounting program’s menu. Once you tap on it, the section of “Vendors” has to be located. Further, hit the “Expense” option.
The “Banking” button has to be selected from the menu for entering credit card charges in QuickBooks Desktop 2020. Once you tap here, the “Enter Credit Card Charges” is required to be picked next. When its screen appears, go to the field named “Credit Card”. Here, you can opt for a card as per your requirement to record the fee.
You can try to use the Interest Expense feature of the software to understand how to enter credit card interest charges in QuickBooks Online. In the menu for “Vendors”, you will see “Expense”. In this, you will have to add information such as “Payment Method” and “Payment Date”. Soon after, you should get the “Interest Expense” account. You can try adding the credit card interest charges here.