
Users can take QuickBooks screenshots to store important things on their system. They can also do so to share certain errors, messages, information, or data with other people. Screenshots can be captured on QuickBooks and its Online software version. You can generate screenshots via the Snipping Tool or by using the Alt and Print Screen keys. The full-screen screenshot can be taken by using the PrtScn/Ctrl buttons on the keyboard. You can also take screenshots of the accounting software through Microsoft Edge.
For using these shortcuts and tools, you can require certain knowledge. Along with this, this post will also make you learn about the reasons for generating screenshots of QuickBooks.
What are the Reasons for Capturing QuickBooks Screenshots?
Users can capture screenshots of their QuickBooks pages for saving things that are important. You can also do this if you want to share something important with someone. There are several other reasons as well to use QuickBooks for screen printing. Let us look at the reasons below:
- You may not be able to explain something relating to QuickBooks to your accountant or any other professional. You can easily take a screenshot of a particular page or window and send it forward for clarity.
- Screenshots can help you in sharing some errors occurring in the QB software and then others can help you with the solution for it.
- Some of you may want to remember something concerning QuickBooks. By printing the screen, this can be made possible.
How to Print Screen in QuickBooks Online?
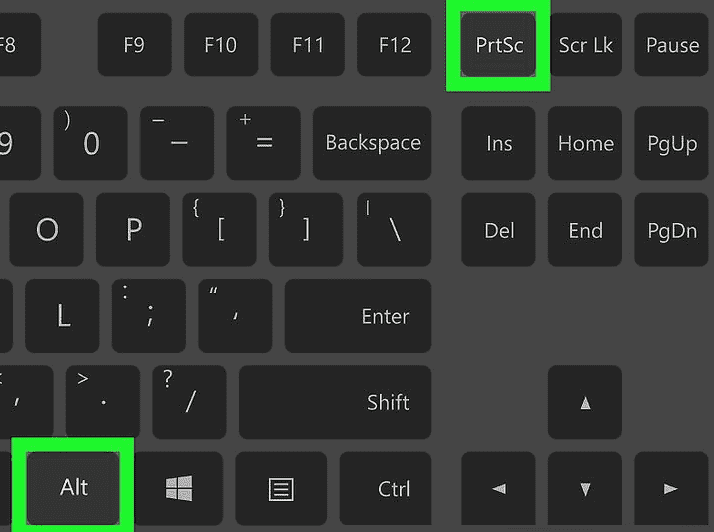
The clicking of the QuickBooks Online screenshots can be done through the combination of the Alt key and PrtScn key. You are required to head to your computer’s display and open the screen of QuickBooks to take the screenshot. After that, you will have to tap on the Alt key and PrtScn key together. You can also tap on the Alt and Sysrq keys as an alternative to the suggested combination.
- Go to the display on your computer.
- Run “QuickBooks”.
- Open the page of QB on which the screenshot will be taken.
- Then you need to press the following keys at the same instant:
- “Alt”
- “PrtScn” or “Sysrq”
- Now that the screenshot will have been taken. Save it in a folder or paste it somewhere.
Your screenshot will now be successfully saved. Following this, you can share it or store it for further use in the future
How Do I Take a Screenshot in QuickBooks?
To take a screenshot of your QB window, you can make use of the Snipping Tool. Some of you may try to use the Alt key along with the PrtScn key when you want to capture the screen. QuickBooks screenshots of the fullscreen can also be taken by choosing the Ctrl key and the Print Screen key. In addition, you can take the screenshot through Microsoft Edge, Snip and Sketch tool, etc.
The below-discussed methods will let you know the procedure for taking a screenshot through these ways/tools.
Note: Also for QB 2017, QuickBooks 2018, QuickBooks 2019, and QuickBooks 2016, screenshots can be taken with the use of the following methods.
1: Through the Snipping Tool on Windows
The Snipping Tool can be available on Windows. It can make the process smooth for capturing a screenshot on the QuickBooks software. You can find the tool on your Windows PC and then tap on it. Next, you can visit the New tab. Now, you need to opt for the mode among the options present on the drop-down menu. Further, choose the shape that you want to snip. Then the screenshot will get captured in that shape.
- Look for “Snipping Tool” on your Windows system.
- Once you find the tool, select it.
- On the tool’s homepage, go to “New”.
- Then choose the mode among these drop-down options:
- “Free-Form”
- “Rectangular”
- “Fullscreen”
- “Window”
Note: The selected option will create a shape according to the area that is to be snipped.
- After the selection of the mode, you need to opt for the program to take a screenshot.
- Also, highlight the part that you want to snip by hovering over that area with the mouse. Then your screenshot will be successfully captured.
- In this step, you need to press the “Save” tab. Your QuickBooks screenshots will get saved on the computer.
Tip: The screenshot can also be saved if you copy it and then paste it on Notepad or any other location of your choice.
2: Using Alt and PrtScn Keys for Capturing Window
For taking a screenshot of QuickBooks, Print Screen and Alt keys can be used. Launch the Windows of QuickBooks that you want to capture. Together tap on the Alt key and the PrtScn key. After tapping on these two keys, a screenshot will be taken and then you have to save that in your desired location.
- Run the “QuickBooks” window.
- The following keys are required to be pressed together:
- “Alt”
- “PrtScn”
- Once pressed, a screenshot will be taken. Save it at the location where you want it to be.
Read more: Making an estimate can be useful for certain businesses. For making it you may visit our blog on how to create an estimate on QuickBooks.
3: Via the PrtScn or Ctrl & PrtScn Keys for Full Screen
The PrtScn key is very useful while performing the process to take a screenshot for the full screen of QuickBooks. To use this key, first, go to the screen that needs to be printed in the software. Now, push the PrtScn key. You can also choose the Ctrl key and PrtScn key together. This too can generate QuickBooks screenshots.
- Choose a page of “QuickBooks” for printing the screenshot.
- Then tap on the below-given keys at the same time:
- “PrtScn” or,
- “Ctrl” + “PrtScn”
- The screenshot will be captured. You may wait for a few seconds.
- For capturing the screenshot of the fullscreen of QB and saving it, select the given keys together:
- “Windows”
- “PrtScn”
- Your screenshot will get saved now. It can be shared if needed.
4: By Microsoft Edge
Generating screenshots of QuickBooks on Microsoft Edge requires the use of the Make a Web Note option. You may be opening QuickBooks through the Microsoft Edge browser. This will lead you to choose the Make a Web Note tab. Then reach the Clip option. Now, the area that you have to screenshot needs to be right-clicked.
Keep reading the remaining directions to understand how to screenshot on QuickBooks:
- Run “QB” via the “Microsoft Edge” browser on your computer.
- Select “Make a Web Note”.
- Press the “Clip” icon.
- Right-click on the area of which you want the screenshot.
- Now, you need to drag the selected part and keep scrolling downwards.
- A message will be displayed when you copy it on the page after dropping the cursor.
- The screenshot is to be pasted on the application named “Paint”.
- Tap on “Save”.
- Then opt for the “Share” button.
Tip: You may also perform this method for taking screenshots in QuickBooks Online.
5: Use Snip and Sketch on Windows 10
The Snip and Sketch tool can act as a very helpful option for carrying out the procedure of clicking screenshots in QuickBooks. You need to open Snip and Sketch on your Windows 10 desktop. Put an object for capturing the screenshot and then press New. This will turn the grey-colored tools into black. Further, go for the Rectangular snip option or select something else from the mentioned options to customize the QuickBooks screenshots.
- Open the “Snip and Sketch” tool on your “Windows 10” PC.
- Place the object of “QB” of which you want to take the screenshot.
- Ensure that no other program is running in the window.
- Click on “New”.
- Wait for the grey-colored tools to turn black.
- You can use the “Rectangular” snip. Or, you may choose among the options provided.
- The portion that is to be snipped needs to be highlighted with the help of the mouse.
- This will create a QuickBooks screenshot of the selected area.
Tip: QuickBooks 2016 screenshots can also be edited according to your wants. Even for other year versions of it such as 2014, 2017, or 2020, the same can be done.
- Hit the “Save” option.
Conclusion
Capturing screenshots is one the best ways for the users to share information or for keeping important things. The users of QuickBooks may also come across information that needs to be saved. In this software, taking a screenshot may be different than on any other software. The blog helped you in understanding the different processes for taking QuickBooks screenshots. Also, it mentioned the method for carrying out the process in QuickBooks Online.
To read about how to import Etsy into QuickBooks. You may have a look at our other blog as well to know how to write off bad debt in QuickBooks.