
While installing the newest updates, QuickBooks error 1920 may begin to cause interruptions in the software. Due to the existence of this error code, you may not be able to process the entire installation properly. A mismatch between the QuickBooks Database Server Manager and the software’s data file can trigger its emergence. Thus, when the problem comes up, the program suspends all running processes until the issue is solved.
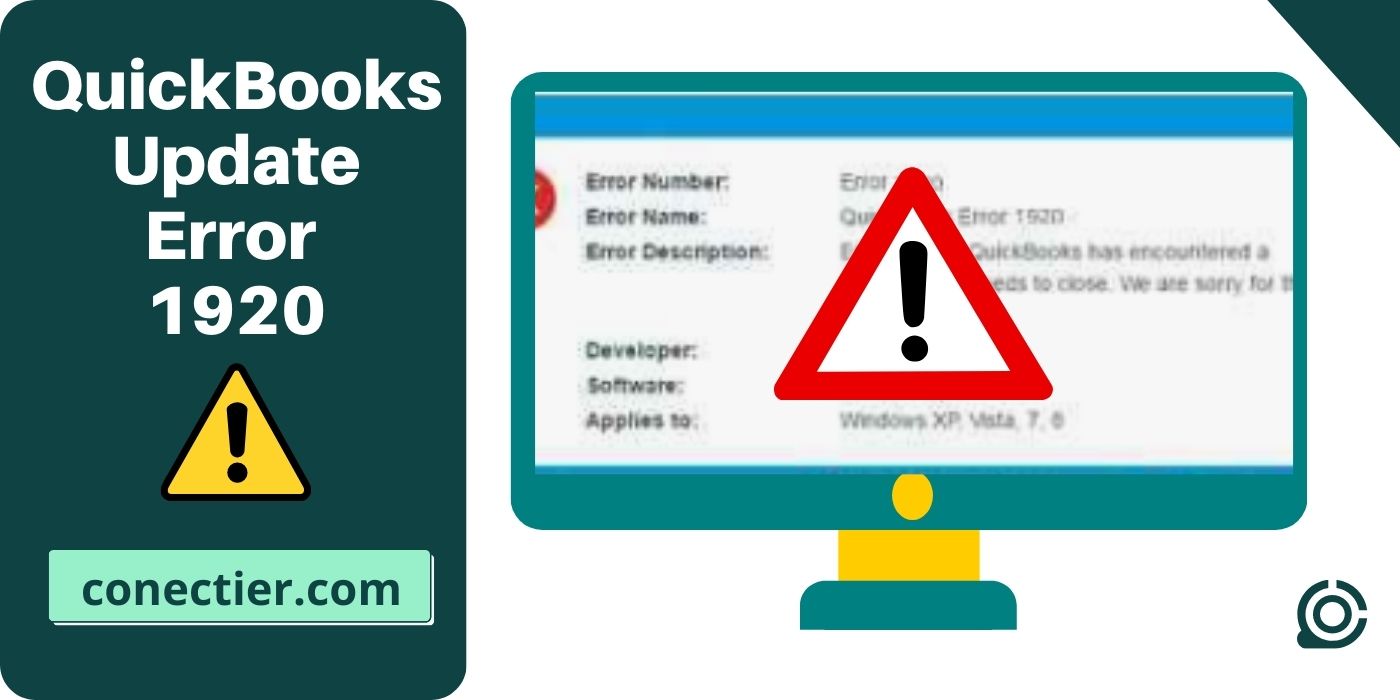
To make the issue clearer to you, a message mentioning “QuickBooks Error 1920: Service QuickBooks Database Manager (QBCFMonitorService) Failed to Start” can be read on the software’s screen. The error code 1920 may also prevail on QuickBooks Desktop. On either version, to make the issue disappear, changing the data file’s name can be recommended. When further help is needed, you can go with additional fixes to repair this error message.
- 1. How does the QuickBooks Error 1920 Originate?
- 2. What are the Ways to Delete QuickBooks Error Message 1920?
- 2.1) Fix 1: Upgrade the Windows OS
- 2.2) Fix 2: Renaming the QuickBooks Installation Folder
- 2.3) Fix 3: Grant Windows User Account Administrative Rights
- 3. How to Remove QuickBooks Desktop Installation Error 1920?
- 3.1) Fix 1: Reinstall QuickBooks Database Server Manager
- 3.2) Fix 2: Modify the Name of the Company File
- FAQs – QuickBooks Error 1920
1. How does the QuickBooks Error 1920 Originate?
While installing the updates of the accounting program, your PC needs to be signed in using the administrative credentials. When logged in through a different user account during the installation, the updates may pause. Consequently, your software may commence generating the QuickBooks installation error code 1920. This is one way how the error 1920 originates. In different scenarios, the origination can vary.
- Malware/Viruses may have damaged the QuickBooks company data file.
- A power failure may also result in the development of the 1920 error issue.
- You may not have correctly installed the QuickBooks Database Service Manager on the system.
- The Windows OS may be out of date.
- Invalid entries may have been made in the Windows Registry.
- The installation folders may have been corrupted.
- In case the Windows Registry or any other system file is deleted, the software may display the QuickBooks error message 1920.
- The QuickBooks Company File Monitor Service (QBCFMonitorService) may get misplaced from the installation folder.
2. What are the Ways to Delete QuickBooks Error Message 1920?
To get rid of the QuickBooks error 1920, users need to first evaluate whether their Windows systems require new upgrades. In case the latest updates are accessible, you have to download and install them right away. You may even try changing the name of the installation folders to make sure that the 1920 error is dissolved. In one more way, examining the Windows User Account and then logging in again with the admin credentials can assist you in clearing the trouble.
2.1) Fix 1: Upgrade the Windows OS
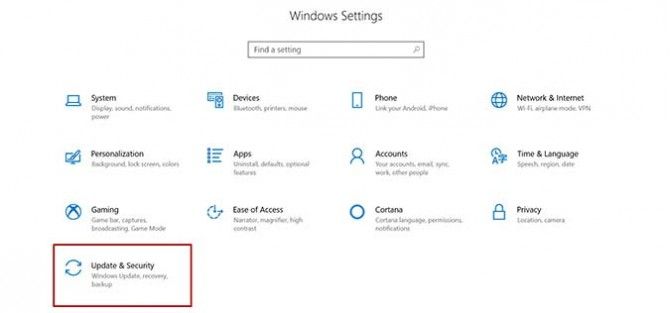
Sometimes, while updating the QuickBooks program, the updates may not get installed completely. They may halt in the middle and lead to the QuickBooks update error 1920. The error may come up in case you have been updating the accounting software on an outdated Windows system. Hence, upgrading the Windows computer becomes essential at this time. You can go ahead with this procedure with the help of the Update & Security tab present in the Settings of the system.
- Head to the “Start” tab.
- Then find “Gear” and click on it.

- Click on the “Update & Security” option.
- After this, the “Windows Update” section needs to be chosen.
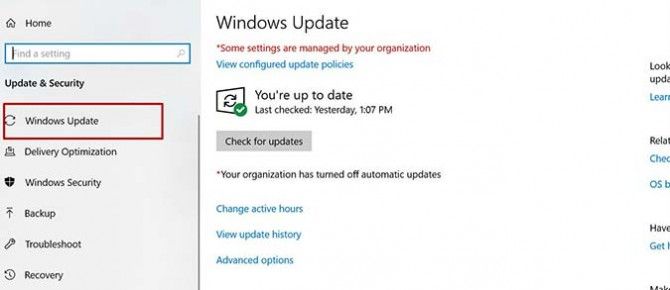
- Pick the “Check for Updates” tab in the current step.
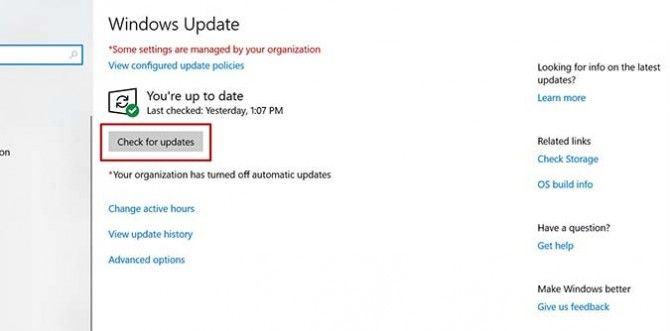
- In case new updates have been made available for the system, it will start downloading them automatically.
After the updates get downloaded, you have to restart the system so that they get installed. By upgrading the Windows system, the QuickBooks installation error 1920 can be seen as being disappeared. Hence, you may now be able to install the updates of the accounting software too.
2.2) Fix 2: Renaming the QuickBooks Installation Folder
Any problem in the installation folder of QuickBooks may restrict you from installing the accounting software on the Windows system. In this situation, when the QuickBooks error message 1920 occurs, try changing the name of the installation folders. This may initiate fixing the 1920 error code.
You are required to change the names of each of the installation folders by moving via the correct path as specified in the instructions below:
- The following list of installation folders needs to be renamed:
- “C:\ProgramData\Intuit”
- “C:\ProgramData\Common Files\Intuit”
- “C:\Users\[Username]\AppData\Local\Intuit”
- “C:\Program Files\Intuit”
- “C:\Program Files\Common Files\Intuit”
- Launch the “Run” panel.
- Mention one of the folder’s locations.
- Press the “Enter” button as a part of this step.
- Once you see the folder, right-click on it.
- Then opt for the “Rename” option.
- Add “.OLD” at the end of the folder’s name.
- Repeat the same steps from 2-7 to change all the names of the installation folder. Then you will be able to clear the QuickBooks installation error 1920.
2.3) Fix 3: Grant Windows User Account Administrative Rights
On certain occasions, you may find your system freezing at the time of updating the QuickBooks program. This situation may eventually result in the QuickBooks update error 1920. The 1920 error code can happen when you have been trying to install the updates on the system that is not running as an admin. Hence, you will have to switch the Windows account and sign in again as an admin.
- Move to the “Control Panel” via the “Start” tab or try to find it through the “Search” panel.
- Choose the “Accounts” option.
- Then proceed towards the “Family and Other Users” tab.
- Press “Change Account Type”.
- Below the section of “Account Type”, you are required to press the “Administrator” button.
- Select “Ok” and log in to the Windows account once more using the credentials of the “Administrator”.
Resume the updates that you were processing earlier. With this, you will find that the QuickBooks update error has been dissolved. To prevent the same situation from occurring again, you have to always check that the system has been running via the admin rights before updating the software.
3. How to Remove QuickBooks Desktop Installation Error 1920?
When a message stating “QuickBooks Error 1920: Service Failed to Start” pops up, it may hamper the installation or the update procedure going on. However, uninstalling the QuickBooks Database Service Manager can help in eliminating the 1920 error code in the Desktop version. It is also necessary to re-install the software so that the issue doesn’t create a problem again. Users may further attempt an alternate fix for solving the error 1920 by changing the name of the QuickBooks Desktop company file.
3.1) Fix 1: Reinstall QuickBooks Database Server Manager
QuickBooks Database Server Manager allows you to access company files across your network with other PCs. QBDBSM also aids in the monitoring of your multi-user network. However, when not installed in an accurate way, the service failed error code such as 1920 can be detected. Thus, uninstalling the QuickBooks Database Server Manager at first and then reinstalling it through a proper approach can, in turn, eliminate the error code. Once uninstalled, a new installation file for the application needs to be downloaded.
To remove the QuickBooks Desktop error 1920 service failed to start notification from the window, start following the steps given below:
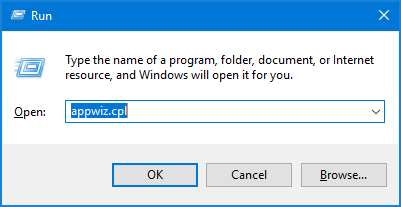
- Open “Run” by tapping on the “Windows” and “R” buttons together.
- Here, you should write “appwiz.cpl”.
- Hit “Ok” then.
- Opt for “QuickBooks Database Server Manager”.
- The “Uninstall/Change” option needs to be selected. By pressing it, QBDBSM will get uninstalled.
To reinstall the application, keep using the provided steps and get rid of the QuickBooks error 1920 in Desktop:
- You have to download “QuickBooks Database Server Manager” again from the internet.
- Now, shut down each of these programs that are running on the Windows “Desktop”.
- Launch the downloaded file and go through it as per the directions given on the screen.
- When the QuickBooks Desktop program asks you for choosing an option related to the installation process, you may pick among the ones given below:
- “Custom”
- “Network”
- Then press “Next”.
- Choose the most appropriate option for beginning the setup.
Important: Do not select the “Express” tab while picking the setup option.
- Opt for “Next” in this step.
- In case you want to have QuickBooks Desktop and QuickBooks Database Server Manager together on the server computer, click on the “I’ll be Using QuickBooks Desktop on this computer, and I’ll be Storing” option.
- If not, then go for the “I will not be using QuickBooks Desktop” option, for storing the QBDBSM on the server PC.
- Now, move through the provided instructions and then hit on “Install”.
When the Windows system asks you for permission, allow it. Once the Server Manager gets installed properly, the QuickBooks error 1920 in Desktop won’t appear. You may then comfortably carry out the updates in the software.
3.2) Fix 2: Modify the Name of the Company File
During the installation process of the accounting program, a connection issue may develop between the QuickBooks Desktop company file and QBDBSM. Due to this problem, you may not be able to complete the ongoing task and get stuck with the 1920 error. When such a scenario appears, modifying the name of the QuickBooks Desktop company data file can be thought of. By locating your company file folder, renaming it can become possible.
Execute the provided instructions accurately so that the QuickBooks Desktop installation error code 1920 is fixed:
- Visit the “QuickBooks Desktop”.
- Then you have to move to your company file.
- Hit either the “F2” tab or the “Ctrl” and “1” keys altogether for opening “Product Information”.
- From here, you can keep a note of the path where your company file is located.
- Close the window.
- Following the given path, head to your company file’s location.
- Once you get the file, it needs to be right-clicked.
- This step guides you to press “Rename”.
- After this, type a new name for this company file.
- Click on the “Enter” tab now.
- In case a confirmation dialog box appears, tap on “Yes” for getting rid of the QuickBooks Desktop error 1920.
In Closing
Often, while updating QuickBooks, the installation process may fail and eventually cease its functions. This event can take place during the generation of the QuickBooks error 1920. The repair procedure can be simplified by understanding the sources of the 1920 error code. As the post presented multiple fixes to you, make sure that you follow them accurately. When followed as mentioned, you will get to see significant results.
FAQs – QuickBooks Error 1920
The QuickBooks error 1920 is an update error. Sometimes, it can also indicate problems with QBDBSM. Thus, this error code can mean that something is problematic either in the update process or in the software’s server manager.
QuickBooks users may bump into the 1920 error in case there has been a connection issue. This issue can exist between the company file and the QuickBooks Database Server Manager. The 1920 error may also develop when the installation folders get corrupted or damaged.
When the software has been undergoing the QuickBooks 1920 error, it may halt the updates all of a sudden. It may even stop responding to the given commands. Aside from this, the program may automatically display a warning in regards to the error. The notification may state: “QuickBooks Error 1920: Service Failed to Start”. The presence of such signs can help you identify the error.
Fixing the QuickBooks error 1920 can be made an easy task by performing an update of your Windows PC. Besides, if your computer has not been signed in as an admin, then logging it again using the administrative credentials can assist in resolving the error within a limited time.
In case the accounting software freezes in the middle of the update installation procedure, the QuickBooks error 1920 may have come up. The program may also start crashing frequently during the occurrence of the 1920 error code.
Service failure, along with the 1920 error code, can be observed when the QuickBooks Database Server manager has not been properly installed on the system. In this scenario, you will not be able to share your company files on the server.
While experiencing the problem in the software’s update process, the QuickBooks error message 1920 can be visible on the screen. This notification shows that any of the system files or the Windows registry files have been deleted. Additionally, an incorrect Windows entry is also indicated by the error message.
When the company file of QuickBooks Desktop and its Database Server Manager doesn’t connect in the right way, the 1920 error code can be initiated. Renaming the company data file can turn out to be an effective fix during this situation. The installation of software updates can successfully occur afterward.
On seeing this code on Windows, you have to try changing the name of the folder in which QuickBooks has been stored after installation. Along with this, the QuickBooks update error 1920 can be fixed by upgrading Windows. Any bugs in the OS that are interfering with QuickBooks’ processes will be removed by doing so.