
A bank account of a user should exist in QuickBooks for making payments. It can also help in categorizing the transactions and let you download them. How to add a bank account to QuickBooks should be properly understood to avail of such features. A new bank account can be added to the software by utilizing the Connect an Account option. You can find this tab in the Bank Accounts menu. An account can be added to QBO via the Banking feature. You may manually add it with the help of the Chart of Accounts button as well.

How to Add a New Bank Account to QuickBooks?
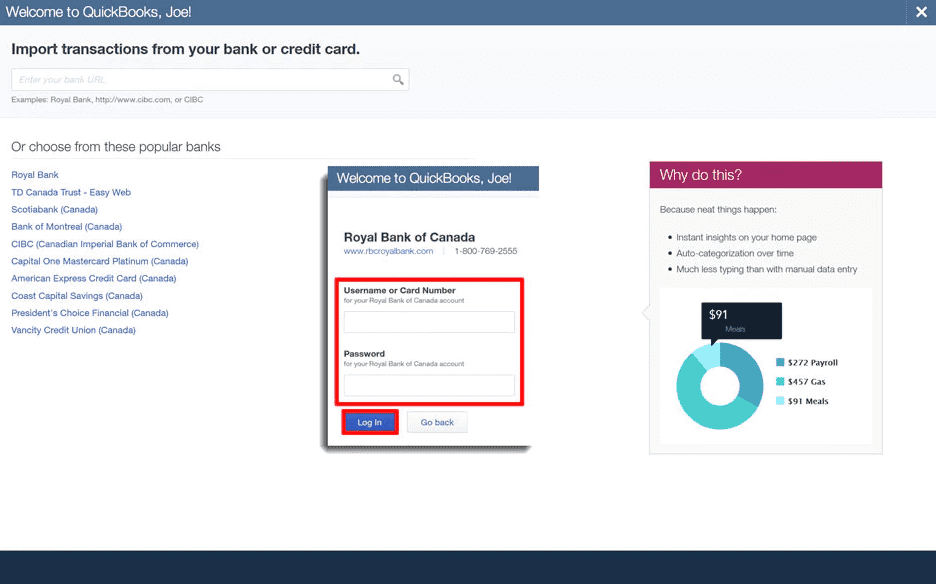
Due to the inactivity of the currently added bank account, users may go for adding a new bank account. The QuickBooks add bank account feature can be availed of for this purpose through the Connect an Account tab. You need to move to the Bank Accounts option on the QB homepage. The Connect an Account button is to be selected. Then you will have to mention the username and password in the provided fields eventually login.
For learning how to add a bank account to QuickBooks, scroll down the below steps:
- Run your “QuickBooks” account.
- Go to “Bank Accounts”.
- Select “Connect an Account”.

- The username and password are to be filled in.
- Then press the “Log in” tab.
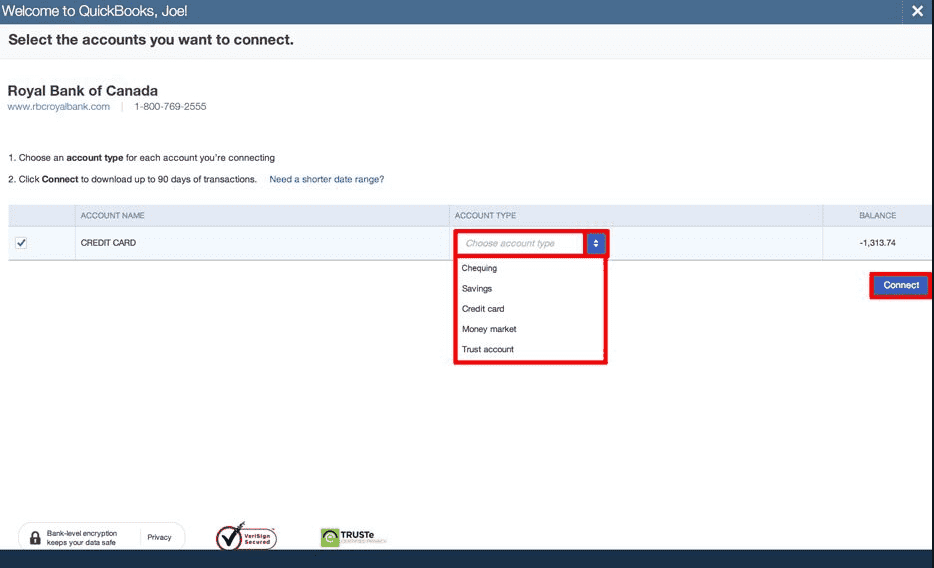
- Opt for the account that is used for the business.
- Also, pick its “Account Type” from the given drop-down menu.
- Tap on “Connect”.
- The “Bank and Credits” page will open.
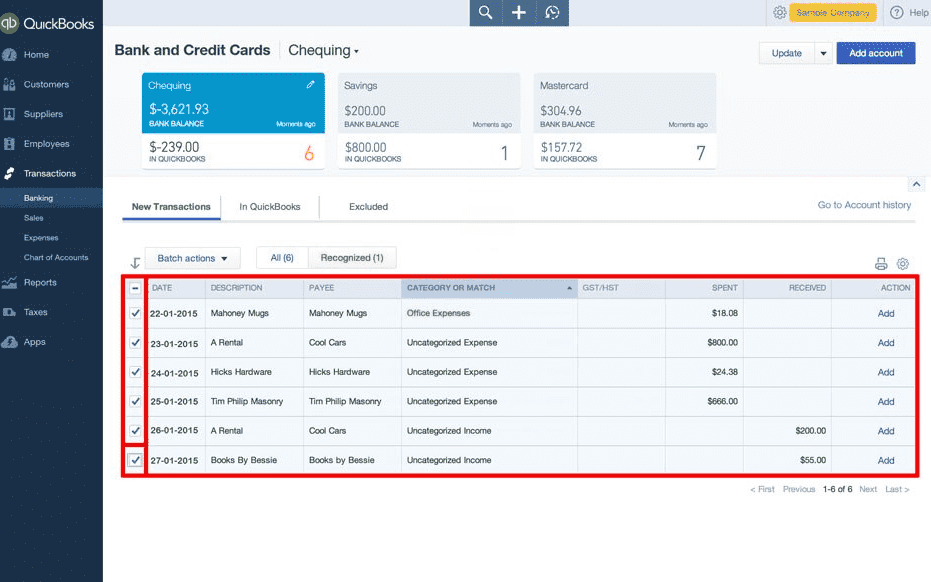
- Here, move to the column of “Category or Match” for sorting the transactions.
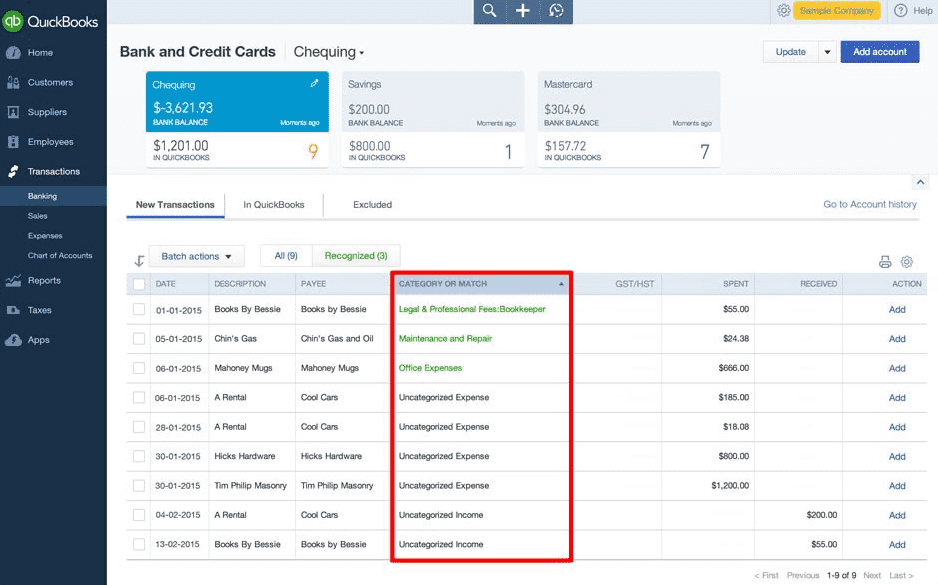
- Tap on the first transaction among the options in the list.
- The transaction details will start to appear.
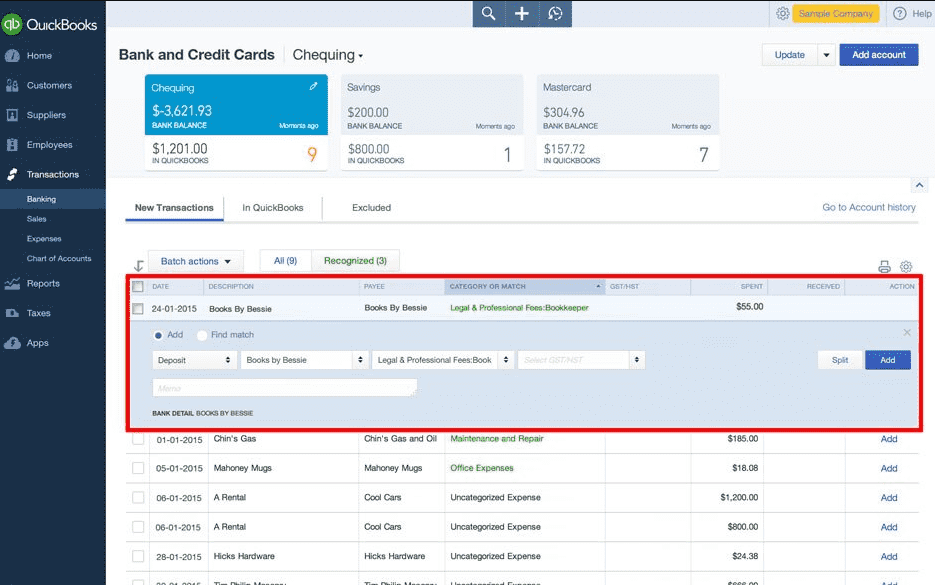
- For putting this transaction in another category, the transaction menu needs to be opened and from here, you can pick one.
- In case the transaction is new, push the “Add” button.

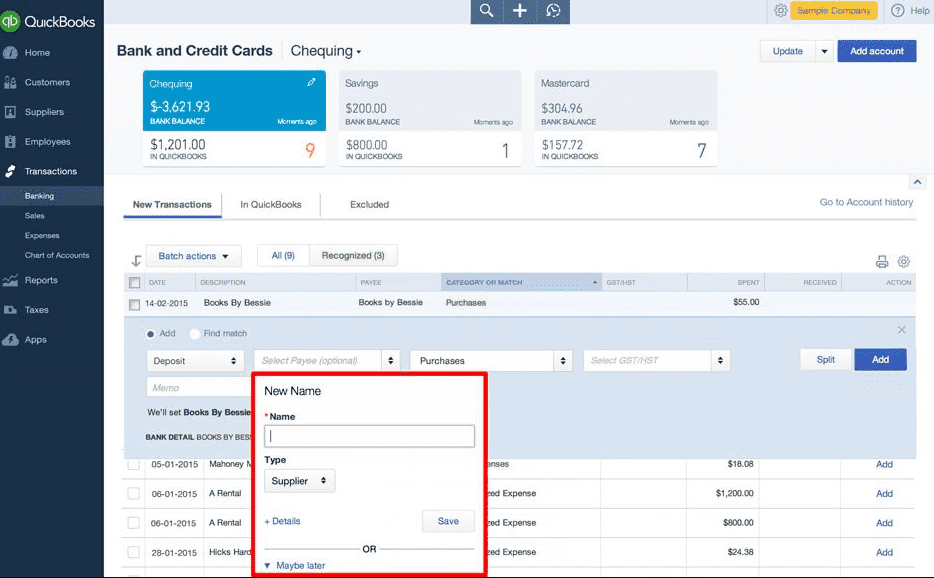
- Choose a payee.
- For adding a new payee, tap on “+Add New”.
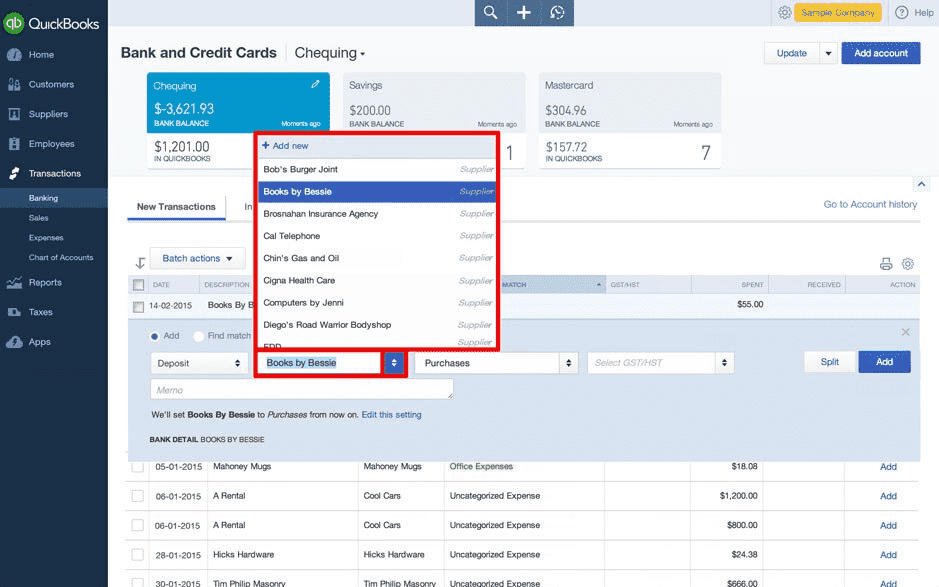
- The name of the new payee is to be entered.
- Hit “Save”.
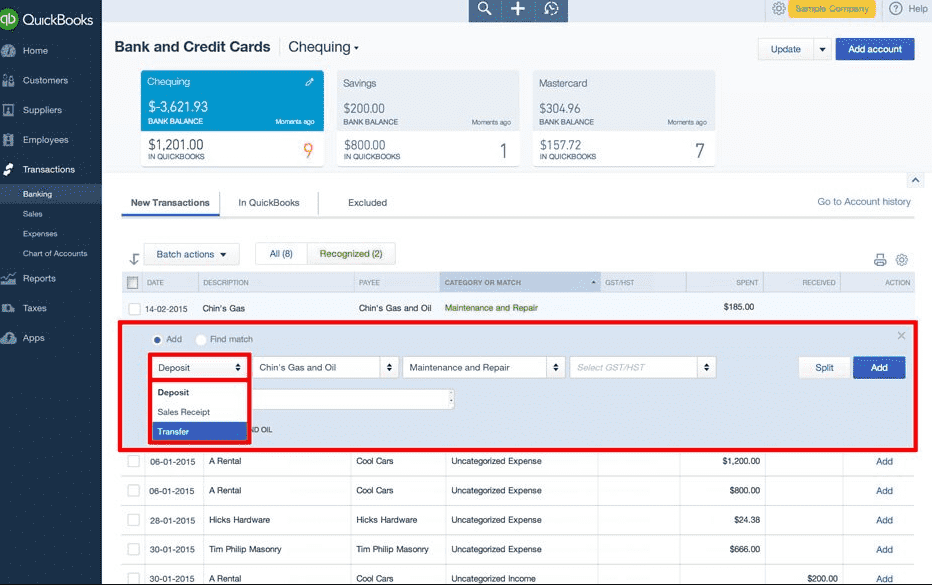
- Among the options in the “Deposit” drop-down bar, opt for “Transfer”.
Note: This option will be chosen if a loan payment or a bill payment for a business credit card has been made with a transaction.
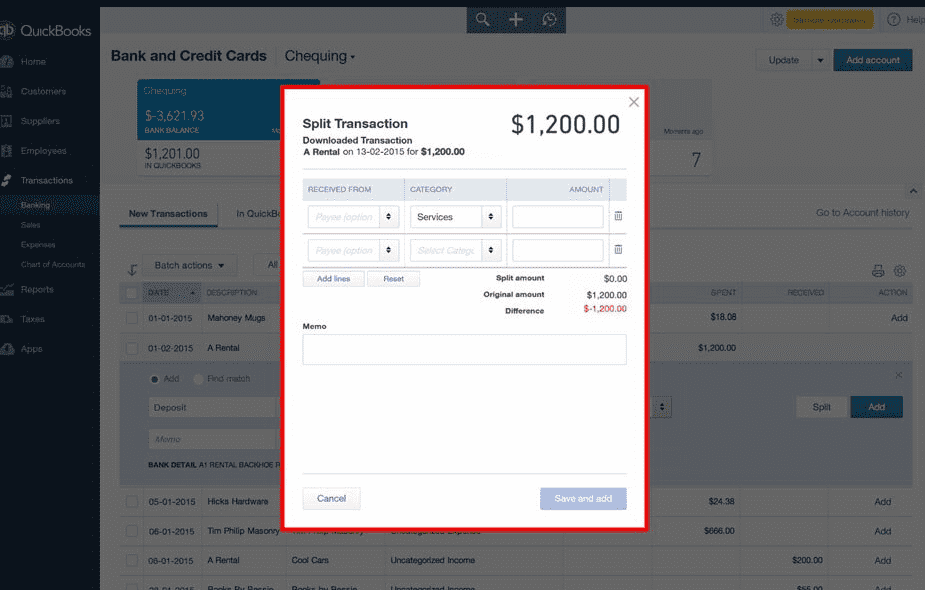
- Through a single product, when items are purchased from the other categories, select the “Split” option.
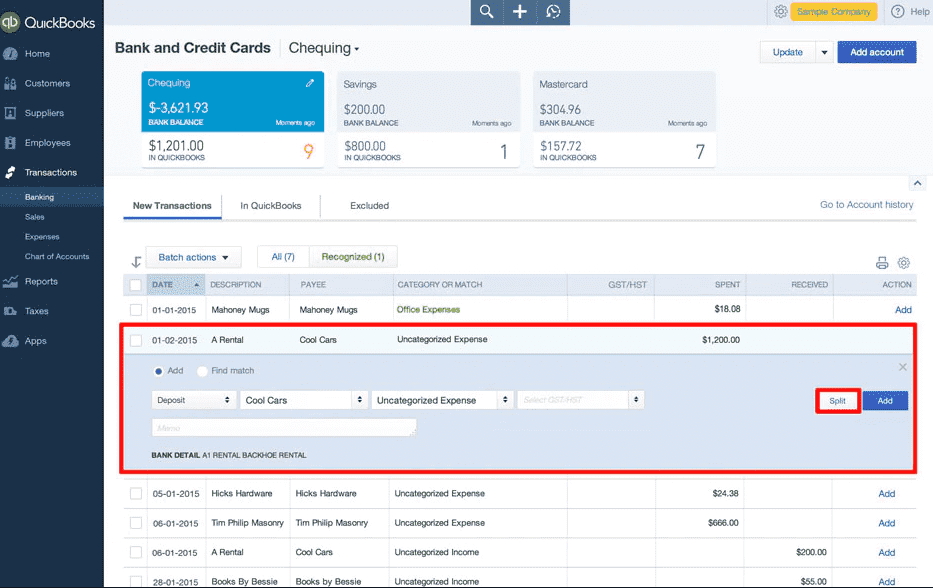
- In the “Category” drop-down, click on the specific category.
- Next, mention the amount that is spent in the “Amount” column.
- Press “Save and Add”.
- Put a tick beside the visible checkboxes of the transactions.
- You need to hold the “Shift” key and then opt for the final transaction in the given list.
- Head to the “Batch Actions” drop-down.
- Push the “Accept Selected” tab.
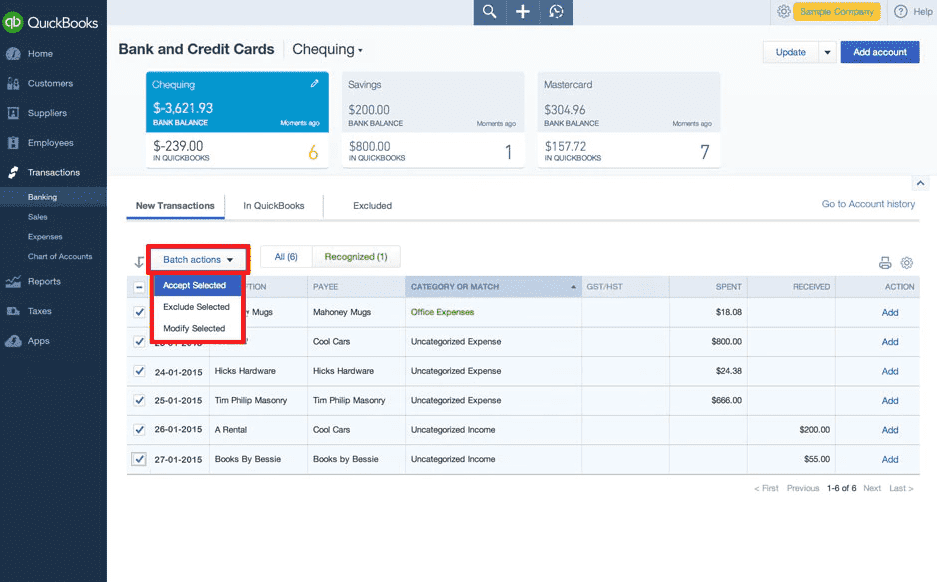
Tip: If you checked the transaction that you did not want to include, tap on the “In QuickBooks” option. Then pick the transaction and remove the tick. The mistake should get corrected. In case the mistake is not getting rectified, you may delete the bank account and add it again.
How Do I Add a Bank Account to QuickBooks Online?
You can add a new bank account to QuickBooks Online by using the Banking button. This is a short method that can automatically lead to the addition with only a few details being entered. The account can also be included in the software manually with the usage of the Chart of Account feature.
Below are the remaining details needed to do these methods.
Option 1: Through the Banking Tab
Towards the left in the accounting software, you can see Banking. This is an option that can be useful for purposes like automatically entering a new account in QBO. You need to opt for and then tap on the Add Account tab. After that, fill in the bank account details in the field provided.
Additionally, you may follow the below-given instructions on how to add a bank account in QuickBooks Online:
- Visit “QuickBooks Online”.
- Tap on “Banking”.
- Press “Add Account”.
- You need to type the bank account in the provided field to search.
- The credentials of bank login are to be entered.
- Press “Continue”.
The method, being automatic, can quickly add your account. After pressing the button, you need to wait for only a few seconds.
Option 2: Manually Via Chart of Accounts
Users can manually add a bank account in QuickBooks Online with the use of the Chart of Accounts tab. They are required to head to the Accounting option and then tap on this feature. Next, move to the New button. Now, you need to enter the Account Type, Detail Type, and Beginning Balance in the given box. With this information being entered, the account shall be entered in some time.
- Select the “Accounting” button in “QBO”.
- Press “Chart of Accounts”.
- Pick the “New” tab.
- Mention the following details:
- “Account Type”
- “Detail Type”
- “Beginning Balance”
- Hit the “Save and Close” option.
How to Add Another Bank Account to QuickBooks Desktop Pro?
You may want to know the method to add an account to QuickBooks Desktop Pro when an initial one has already been added. The Account option can turn out as a benefit when you want to add another account. First, the Company tab is to be selected. After that, you need to choose the Chart of Accounts option. Tap on the Account menu and push New. Visit the Account Type section. Then move to Bank and click on the Continue button.
More steps explaining how to add another bank account to QuickBooks Desktop Pro are highlighted below:
- Click on “Company” on the homepage of “QBDT Pro”.
- Select the “Chart of Accounts” button.
- Press “Account”.
- Tap on “New”.
- In the “Account Type” section, go to “Bank”.
- Pick “Continue”.
- The name of the account is to be entered in the “Account Name” field.
Tip: Since you are entering another bank account, ensure that its name is different from that of the existing one.
- Make sure to begin the account name with either “Savings” or “Checking”.
- In case you require help, you can opt for the “Select from Examples” option.
- You may also attach a sub-account by checking the “Subaccount Of” box.
- Fill up the account description in the “Description” field.
- Then a bank account number is to be added.
- In the “Routing Number” box, enter the routing number.
- Choose an option from the given drop-down for “Tax-Line Mapping”.
- Now, tap on “Enter Opening Balance: Bank Account”.
- In the “Statement Ending Balance”, type the opening balance.
- From the calendar provided in the “Statement Ending Date”, opt for the opening balance’s date.
- Press “Ok”.
- The reorder point of a check can also be set if you want.
- Then you may put a tick beside “Order Checks I can Print from QuickBooks” for printing the checks directly from QuickBooks.
- Push “Save & Close” in this step.
How to add a bank account to QuickBooks Desktop Pro should almost be complete. Some of you may want to introduce customizations for bank feeds. See below how these can be done.
- A dialog box will pop up on the screen to set up a bank feed. For enabling it, opt for “Yes”. If not, then select “No”.
- You will be navigated to “Chart of Accounts” for confirming the other bank account that you have just added.
Provide your confirmation to complete the method. Afterward, you can use the other bank account in QB Desktop Pro for the purposes for which it has been added.
Tip: Since you are adding an additional bank account, you may or may not require it later. In that case, merging the accounts can be suggested.
Conclusion
A new bank account or another one can be added to QuickBooks. For a range of professional purposes, doing so can be beneficial. With the various methods explaining how to add a bank account to QuickBooks and its versions, these purposes can be attained.