
At times, there can be a large number of transactions taking place via the accounting software, QuickBooks. They may have been done through a single vendor. Besides, it is also possible to have duplicate entries of the same transactions. At this point, it becomes vital to merge vendors in QuickBooks. By consolidating them, it becomes much easier for a user to keep a track of the transactions that have occurred. Additionally, you will also get to have the details of the same at a single location. Thus, users can save a significant amount of time and effort by doing so with the merge feature available.
- 1. How do I Merge Two Vendors in QuickBooks?
- 2. Can You Merge Vendors in QuickBooks 2018?
- 3. Can I Merge Two Vendors in QuickBooks Desktop?
- 4. How to Merge Vendors in QuickBooks Desktop 2019?
- 4.1) Option 1: In QuickBooks Desktop 2019 Enterprise
- 4.2) Option 2: For QuickBooks Desktop 2019 Accountant
- 5. How do You Merge Vendors in QuickBooks Online 2018/2017/2013?
- FAQs – Merge Vendors in QuickBooks
1. How do I Merge Two Vendors in QuickBooks?
QuickBooks users may want to merge two vendors’ accounts into one in case they found them to be similar to each other. Doing so can become an easy activity when carried out through the Expenses tab in the software. From here, when navigating to the Vendors button, you can find the names of each of the sellers listed in your accounting software.
To know how to merge vendors in QuickBooks, you need to follow each of the given steps correctly:
Note: Ensure to create the backup of the QuickBooks company file prior to going forward with the procedure. This can help you in preventing any data loss.
- Launch the “QuickBooks” program.
- Head to the “Expenses” option present in the menu.
- Then opt for “Vendors”.
- Tap on all the sellers’ names from the list that you do not want to merge.
- Find and click on the “Edit” feature.
- Make the necessary modifications below the given field along with the suffix to create the vendor entries similar:
- “Title”
- “First Name”
- “Middle Name”
- “Last Name”
- After the “Display” name becomes the same, you need to select the “Save” tab.
- For approving this merging procedure, hit the “Yes” option. Once pressed, the procedure to merge vendors in QuickBooks will be completed.
2. Can You Merge Vendors in QuickBooks 2018?
When discovering identical entries in the vendors’ list, users may want to combine them. With the 2018-year version of the software, it is possible to do so. To merge vendors in QuickBooks 2018, users need to locate the Vendors tab present in the software’s menu. It is also required to navigate to QuickBooks’ Vendors Center where you can get a detailed list of the vendors’ names. You can check the names of the vendors whom you would like to combine after carefully going through this list.
- On the “QuickBooks 2018” screen, choose the “Vendors” option.
- Then tap on “Vendors Center”.
- Right-tap on the vendor.
- Opt for “Edit Vendor”.
- The seller’s name that you have chosen needs to be copied in this step.
- Press the “Cancel” tab to move back to “Vendor Center”.
- Now, look for the vendor’s name with whom you have to sync the other selected ones.
- Pick “Edit Vendor” here.
- Paste the previous vendor’s name that you copied in the space provided.
- Choose “Ok”.
- Hit “Yes” so that the vendors can be combined.
Once the process to merge vendor names in QuickBooks 2018 is over, you will be able to save much of your time. Repeating the same steps whenever similar transaction entries are found can turn out to be helpful.
3. Can I Merge Two Vendors in QuickBooks Desktop?
It is attainable for a user to combine two vendors under a single name in the QuickBooks Desktop program. When attempting to merge 2 matching sellers, it is necessary to use the Edit feature. Using this, you can indicate to the software that 2 sellers are the same. Hence, you can edit their details to sync them together. This will remove the scope of duplicate entries as well.
You need to keep reading the below-mentioned steps for learning how to merge vendors in QuickBooks Desktop via editing:
- The “Vendor Center” option needs to be chosen from the “QuickBooks Desktop” window.
- Next, select “Vendors”.
- Have a look at and note the vendor’s name that needs to be combined.
- Then opt for the other vendor with whom the first one has to be synced and right-tap on its name.
- Press the “Edit” tab.
- Fill up the name of the first vendor that you noted earlier.
- Tap on the “Ok” option.
- Following this step, choose “Yes” for confirming the merge procedure. After the procedure has been finished, you would have now learned how to merge vendor accounts in QuickBooks Desktop.
4. How to Merge Vendors in QuickBooks Desktop 2019?
In the different versions of QuickBooks Desktop 2019, users can sync multiple vendors into one. These versions include Enterprise and Accountant. To merge vendor names in QuickBooks Desktop Enterprise 2019, locating and opting for the Accounting Tools feature can be advantageous. When trying to combine in the Accountant version, it is necessary to navigate to the Client Data Review tab.
4.1) Option 1: In QuickBooks Desktop 2019 Enterprise
At certain times, you may find that there have been entries made in QuickBooks Desktop Enterprise 2019 with similar vendor names. In this scenario, you can combine different vendors under a single name in the accounting software, allowing you to track the transactions in one place. In the said version, merging sellers is available in the form of a tool. It can quickly give rise to the task.
To further learn how to merge two vendors in QuickBooks Desktop Enterprise 2019, please move as per the instructions provided:
- Visit the “QuickBooks Desktop Enterprise” program.
- Go to the menu bar and tap on “Accounting Tools”.
- Click on “Merge Vendors”.
- Then choose each of the sellers that you are required to merge.
- Pick “Next”.
- Move on to the “Master Vendor” option.
- Opt for “Merge”.
- To give your confirmation, select the “Yes” tab.
- Press the “Ok” button when you get the notification regarding the completion of the merger.
4.2) Option 2: For QuickBooks Desktop 2019 Accountant
It may take you several hours to go through each of the entries made through the accounting program. While moving through them, you may come across numerous entries that may be similar to the others. To reduce time evaluating these redundant entries, it is essential that you merge vendors in QuickBooks Desktop Accountant 2019. Considering these vendors as clients, you can review their information. In the process, their details shall be amalgamated.
- Launch the accounting software.
- Next, press the “Accountant” tab.
- Select “Client Data Review”.
- Opt for the “Merge Vendors” option in QuickBooks Desktop 2019 Accountant.
- Choose which of the vendors are to be synced.
- Once chosen, click on “Next”.
- The vendor with whom you have to merge the selected choices needs to be picked.
- After this, tap on the “Merge” button.
- On seeing the confirmation box, press “Yes”.
- When you find a message on the screen that states: “Merge Complete”, head to the “Ok” tab.
With this, you will now be able to understand how to merge two vendor accounts in QuickBooks Desktop Accountant 2019. Further, you may verify whether the process was successful by going through the vendor’s details. When no redundant information is found, it will be a clear sign that the process has been completed.
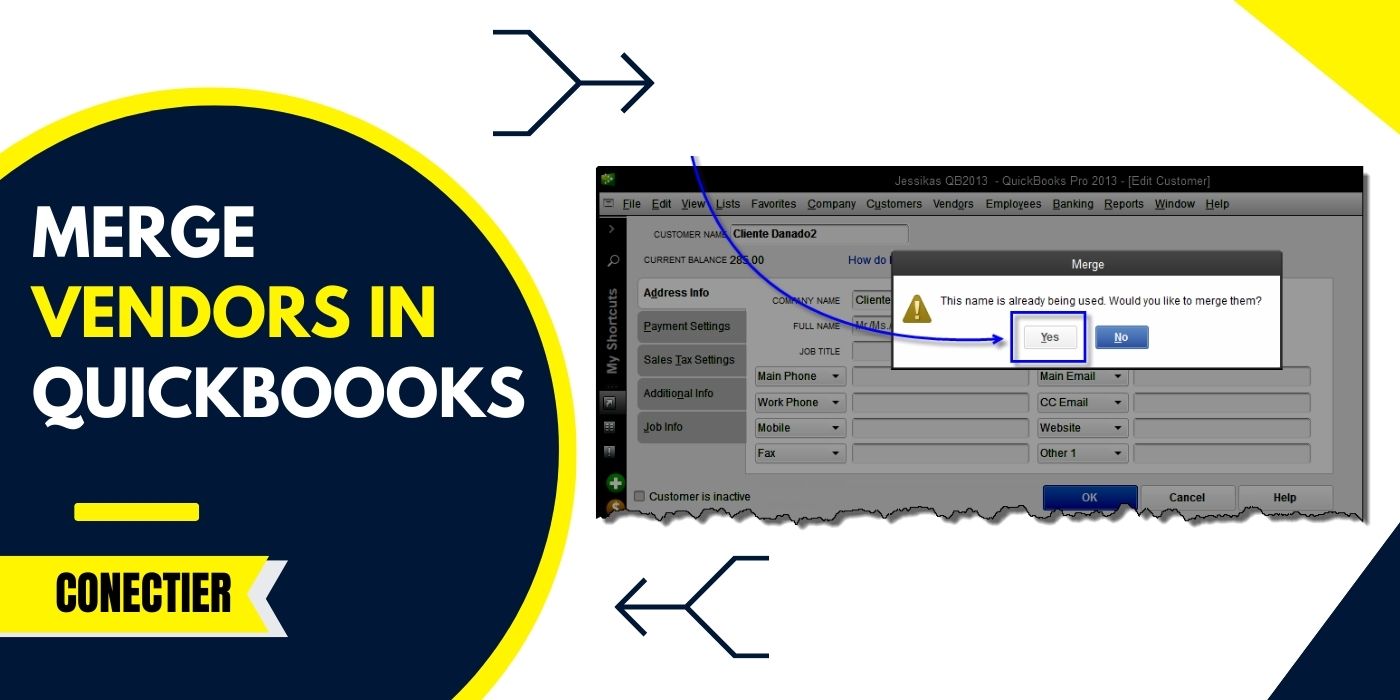
5. How do You Merge Vendors in QuickBooks Online 2018/2017/2013?
Multiple versions of Quickbooks Online such as 2018, 2017, and 2013 allow users to merge the names of vendors. This can be done by opting for the Vendors tab available on the main window of the accounting software. It enables you to exercise several features for sellers including their synchronization as required.
- The first step to merge vendors in QuickBooks Online is by clicking on the “Vendors” feature on the homepage.
- After this, tap on the “Vendor Center” button.
- Choose a vendor and right-tap on it.
- Opt for “Edit Vendor” then.
- Now, copy the name of the chosen vendor.
- Hit “Cancel” so that you can return to the “Vendor Center” section.
- Tap on that vendor’s name with whom you would like your first vendor’s name to get merged.
- Press “Edit Vendor” in this step.
- You’ll be able to modify the vendor name with the copied one. Opt for “Ok”.
- To finish off merging vendors, provide your approval by hitting the “Yes” option.
To Wrap it All up
There can be various reasons such as duplication, similarity, etc., why you may want to start merging vendors in QuickBooks Online and Desktop. While scrolling through this post, you were guided with numerous approaches to merge them. In the end, it is suggested to ensure that the correct sellers are synced together. Otherwise, when any seller gets combined mistakenly, you will have to manually add a fresh one.
FAQs – Merge Vendors in QuickBooks
Merging vendors in QuickBooks means combining or consolidating two or more seller accounts into one. When multiple duplicate entries are made and you sync them into a single entry, a merger between vendors takes place.
You can merge two vendor accounts in your QuickBooks program. This can be done by locating the “Expenses” option available in the menu section of the program. You can move further by clicking on the “Vendors” tab.
To merge vendors in QuickBooks Online, you will navigate toward the button called “Vendors”. From here, users need to tap on the tab “Vendor Center” which will take them to the list of names of all the sellers. Then you can start combining them
Consolidating or combining two vendor accounts in QuickBooks Desktop 2019 Enterprise versions requires access to the Vendor Center feature. It lets you perform several processes. One of these is their merger.
When you merge two sellers under a single name in QuickBooks 2018, it will transfer duplicate transactions. They will be transferred to the vendor with whom you are required to continue. This will help you to avoid similar/duplicate entries created in the software.
Once you completely merge sellers, you cannot undo or reverse the procedure. Thus, you ought to be very careful while choosing the vendor accounts that are to be consolidated together. Otherwise, as an alternative to undo merging vendors in QuickBooks, you can add new entries manually.
The QuickBooks Online merge vendors feature is useful when there are multiple entries with the same data. Or else, they can create trouble in accounting. Otherwise, when 2 sellers have partnered for real, you can sync their information in one place via this feature.