
A backup of the QuickBooks may be necessary for users in case they face data loss or damage in the future. A backup file can be created in QuickBooks, QuickBooks Desktop, and the QuickBooks Desktop Point of Sale versions to have access to data in such situations. You can also restore the backup file in these versions after it has been created.
A QuickBooks backup file can be created through the Backup Company tab You need to make sure that the mode has been switched to single-user while making the file. Similarly, a QB Backup in Flash Drive can be prepared via the File option. Creating it on a clean flash drive can be useful to save the backup for a long time. Also, by making further use of the flash drive, you can restore QuickBooks backup.
- Steps to Create a Backup File in QuickBooks
- How Do I Backup my QuickBooks to a Flash Drive?
- How Does QuickBooks Desktop Backup Automatically?
- How to Backup QuickBooks Desktop Manually?
- Method to Create QuickBooks Desktop POS Backup File
- Process to Restore QuickBooks Backup Via Flash Drive
- How Do I Restore a QuickBooks Desktop Point of Sale Backup File?
Steps to Create a Backup File in QuickBooks
A company needs to create a QuickBooks backup file that it might need in times of emergency. A backup file can be created in this accounting software using the Backup Company option. Tap on the File button after logging in to QB. The Single-user mode is to be turned on for this. Find the Backup Company tab below the File button. Then choose the Create Local Backup feature.
The below-shown directions will help you know how to backup a QuickBooks company file:
- Sign in to “QuickBooks”.
- Click on the “File” tab.
- Switch the mode to “Single-user” if it is not.
- Below the “File” option, choose “Backup Company”.
- Here, select the “Create Local Backup” button.
- Tap on “Local Backup”.
- Pick “Options”.
- Opt for the location on the computer where the backup is to be stored.
Tip: Try saving the backup file on the external hard drive. You may also save it online.
- Push “Ok”.
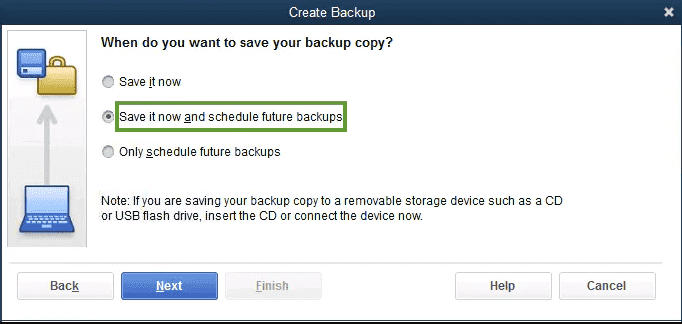
- Hit the “Next” tab.
- Next, press “Save it Now”.
- To start the backup process, head to “Finish”.
Give it some time to complete the backup and save it.
How Do I Backup my QuickBooks to a Flash Drive?
You can create a QuickBooks backup file to a flash drive through the File menu. Put the flash drive into the system and run QB. Then open up the company file. Choose the File option and tap on the Create Backup button. Go to the folder where you want the backup file to be stored. After selecting the location, opt for Ok. Now, you only need to save your backup in the connected flash drive.
- The flash drive needs to be put in the system.
- Go to “QB”.
- The company file is to be opened.
- Click on the option that mentions “File”.
- Press the “Create Backup” option.
- Move to the folder where the backup file is to be stored.
- Once you select the location, pick “Ok”.
- Opt for “Save the Backup Now”.
- Choose the “Save” button.
Tip: Make sure to keep the flash drive safe after you have prepared the QuickBooks backup. Since the backup may carry crucial data, you should prevent the flash drive from falling into unsafe hands.
How Does QuickBooks Desktop Backup Automatically?
Users can create a QuickBooks Desktop automatic backup via the Create Local Backup tab. You need to move to the File menu in QBDT and turn on the Single-user mode. Go to File again and press the Backup Company button. Hit the Create Local Backup option and tap on the Local Backup tab. Then head to the Local Backup Only button to do the needful.
Finish the remaining method to automatically create a QBDT backup:
- Head to “File” in “QuickBooks Desktop”.
- Hit “Switch to Single-User Mode”.
- Click again on the “File” tab.
- Now, tap on “Backup Company”.
- Pick “Create Local Backup”.
- Push the “Local Backup” button.
- From the section of “Local Backup Only”, opt for “Browse”.
- Choose the location for saving the company file’s backup.
- You may also enter the number of backups that are to be kept.
- Opt for the “Complete Verification” option from the section of “Local Backup Only”.
- A test run will take place to ensure that the backup file is accurate.
- Press “Ok”.
- Next, move to the “Save it Now and Schedule Future Backups” option.
- Select “Next”.
- In case you do not want the backup to be saved now, please click on “Only Schedule Future Backups”.
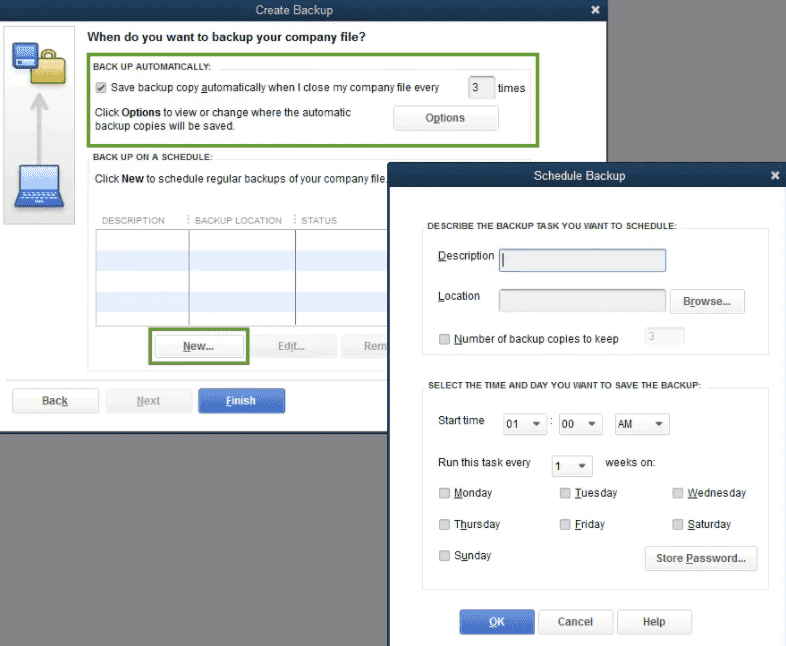
- Now, checkmark the box beside “Save Backup Copy Automatically When I Close My Company File”.
- Mention the period in between the backups.
- Press “New” for creating a schedule.
- Here, you need to enter the details required in the data field for creating a schedule of the backup.
- You may also choose a particular time for the backup.
- Then tap on “Ok”.
- Now, fill up the password to sign in to Windows. This will provide permission to QuickBooks Desktop for running the backup that you have scheduled.
- Visit the “Finish” button to start the backup.
Wait for the time being. Once the QuickBooks backup file has been created, a pop-up message will be displayed on the screen for the confirmation of the file’s backup.
How to Backup QuickBooks Desktop Manually?
QuickBooks Desktop can be manually backed up with the use of the Create Local Backup button. Run this software and visit the File option. Switch the mode to Single-user and then go to the File feature. Choose the Backup Company option and tap on the Create Local Backup button. Opt for the Local Backup tab and click on the Next option.
Complete this procedure to understand how to backup a QuickBooks file manually:
- Launch “QuickBooks Desktop”.
- Move to “File”.
- Click on “Switch to Single-User Mode”.
- Again visit the “File” feature.
- Select “Backup Company”.
- Press the “Create Local Backup” button.
- Pick the “Local Backup” option.
- Head to the “Next” tab.
- In this step, go to the section of “Local Backup Only”.
- Opt for “Browse”.
- Choose the location where the backup of the company file is to be saved.
- A test will run for verifying the backup file. After that, tap on “Ok”.
- Push the “Save it Now” button.
- Visit “Next”.
This procedure will easily create the backup of a single QBDT Company File. Also, you can see the confirmation message once the backup has been made.
Note: You can try the above method to create a backup of a company file in QuickBooks Payroll too.
Method to Create QuickBooks Desktop POS Backup File
The Backup Data option should be used when you want to create a backup in QuickBooks Desktop Point of Sale. In the starting, please visit the File menu and pick the Backup Data button. Opt for the Default Location in case you want to back up the folder in the Hard Drive. The Specify Alternate Location is to be selected when backing up the data in a removable media or a network drive.
- Head to the “File” feature in “QuickBooks Desktop Point of Sale”.
- Push the “Backup Data” option.
- Choose “Default Location” if you want the default folder to be backed up in the hard drive.
- Next, pick “Specify Alternate Location” in case the folder is to be backed up on any removable media or a network drive.
- Reach the location of the backup on the computer.
- Give any name to the file.
- Press the “Backup” option.
- Click on “Finish”.
Note: The above method to create a backup file in QBDT POS can also work on QuickBooks Point of Sale.
Process to Restore QuickBooks Backup Via Flash Drive
There might be a situation wherein the backup of your QB file may be lost or damaged. Users can take the help of the Open or Restore Company tab. To restore your backup, put the flash drive in the computer and open the accounting software. Choose File and tap on the Open or Restore Company option to restore a QuickBooks backup file in a flash drive. Now, opt for the Restore a Backup Copy button.
- The flash drive needs to be inserted into the computer.
- Open “QB”.
- Select “File” from the menu.
- For opening the restore wizard, choose “Open or Restore Company”.
- Tap on “Restore a Backup Copy”.
- Here, push “Next”.
- Pick “Local Backup”.
- Move to “Next”.
- The window of “Open Backup Copy” will be displayed.
- The drop-down of “Look In” will take you to the saved backup file’s location that will be having the “.QBB” file extension. Please ensure the same.
- Opt for the backup file of QB.
- Hit “Open”.
- Select the drop-down menu of “Save in” and choose the location where the restored backup file will be saved.
- Now, pick the file that has been backed up.
- Press the “Save” tab.
How Do I Restore a QuickBooks Desktop Point of Sale Backup File?
For restoring a backup file in QuickBooks Desktop Point of Sale, you can use the Company operations tab. Select File and tap on the Company Operations button. The window of Start Company will be displayed on the screen. Choose the Restore from the Backup feature and press the Next tab. Pick Restore from Default Backups for restoring the backup in the hard drive.
The following instructions can make you learn how to restore a backup copy in QuickBooks Desktop Point of Sale:
- Head to “File” in “QBDT POS”.
- Click on “Company Operations”.
- The “Start Company” window will open.
- Select the “Restore from Backup” option.
- Tap on “Next”.
- For restoring the backup file in the hard drive from the folder, choose “Restore from Default Backups”.
- Now, from the list that is being displayed, pick the backup file.
- Opt for “Browse to Alternate Backup File” for restoring the backup file from a removable media or your network drive.
- Then reach the backup file’s location in the computer.
- Visit “Next”.
- Press the “Close” button.
The backup will be restored now. You may now use it for your future requirements.
In Essence
Creating a QuickBooks backup or restoring it can be necessary for a company to avoid data loss and other such situations. This reading highlighted the process for creating a backup file on several versions of QuickBooks. Furthermore, we shared the methods to restore a backup file in QB and QBDT POS.