
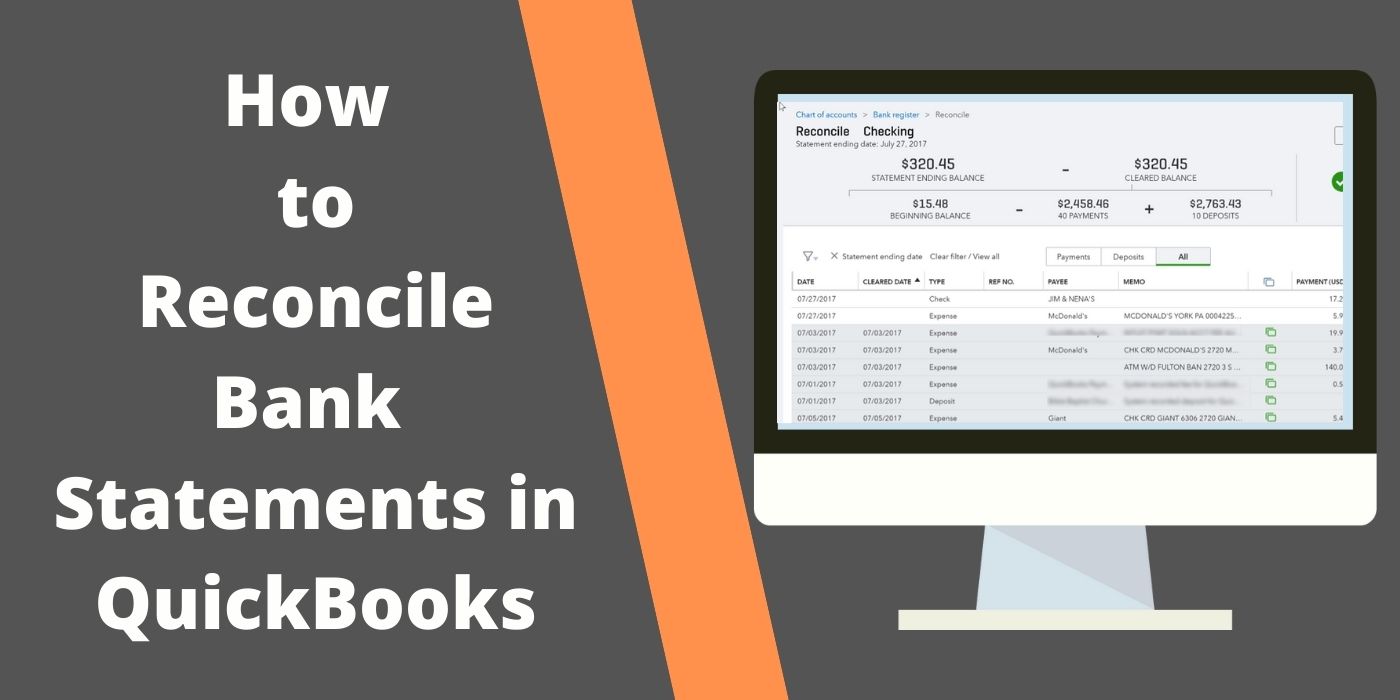
The QuickBooks bank statement reconciliation process involves comparing the transactions on the bank statement to those added to the software’s account. When you reconcile the accounts and the difference between them comes to $0.00, you can be ensured that the transactions have been recorded correctly. However, to reach this point you should be knowing the procedure of how to reconcile bank statement in QuickBooks and its other versions. Carrying out the reconciliation can also assist in extracting all the entries that have been uncleared. This can eventually provide financial accuracy in your accounting records. After reconciling the statements using the appropriate measures, you can also have a view of the reports formed out of it.
- 1. Advantages of Reconciling Bank Statement in QuickBooks
- 2. How Do You Reconcile a Bank Statement in QuickBooks?
- 3. How to Reconcile a Bank Statement in QuickBooks Online?
- 4. How to Do a Bank Reconciliation in QuickBooks Desktop?
- 5. How to Get Reconciliation Reports in QuickBooks Desktop?
- FAQs – How to Reconcile Bank Statements in QuickBooks?
1. Advantages of Reconciling Bank Statement in QuickBooks
When bank statements are reconciled, each of the entries listed in the bank account are put down in the accounting program, providing a direct benefit to you. This process can eliminate the chances of any duplicate or irrelevant transactions.
Reconciling the bank statements provides certain other advantages too such as these:
- In this process, certain transactions are ticked. By looking at the ticked ones, users can already know that they have been reconciled.
- When all the entries have been reconciled, the software will mark them as cleared, reducing your efforts to go through every transaction manually.
- After you reconcile bank statement in QuickBooks, you can know which of the transactions are uncleared. Then you can modify or remove them as required.
2. How Do You Reconcile a Bank Statement in QuickBooks?
Users attempting to reconcile their bank statements can easily execute the procedure using the Reconcile button. To access this option, you need to move via the icon of Gear and the Tools tab, respectively. After doing so, certain tasks have to be carried out such as bank account selection, adding the ending date of the statement, and mentioning its closing balance on the page called Reconcile.
The procedure highlighted below will guide you on how to reconcile bank statements in QuickBooks:
- You need to find where is the Gear icon in QuickBooks and click on it.
- Then click on the “Tools” option.
- Following this, press the “Reconcile” feature.
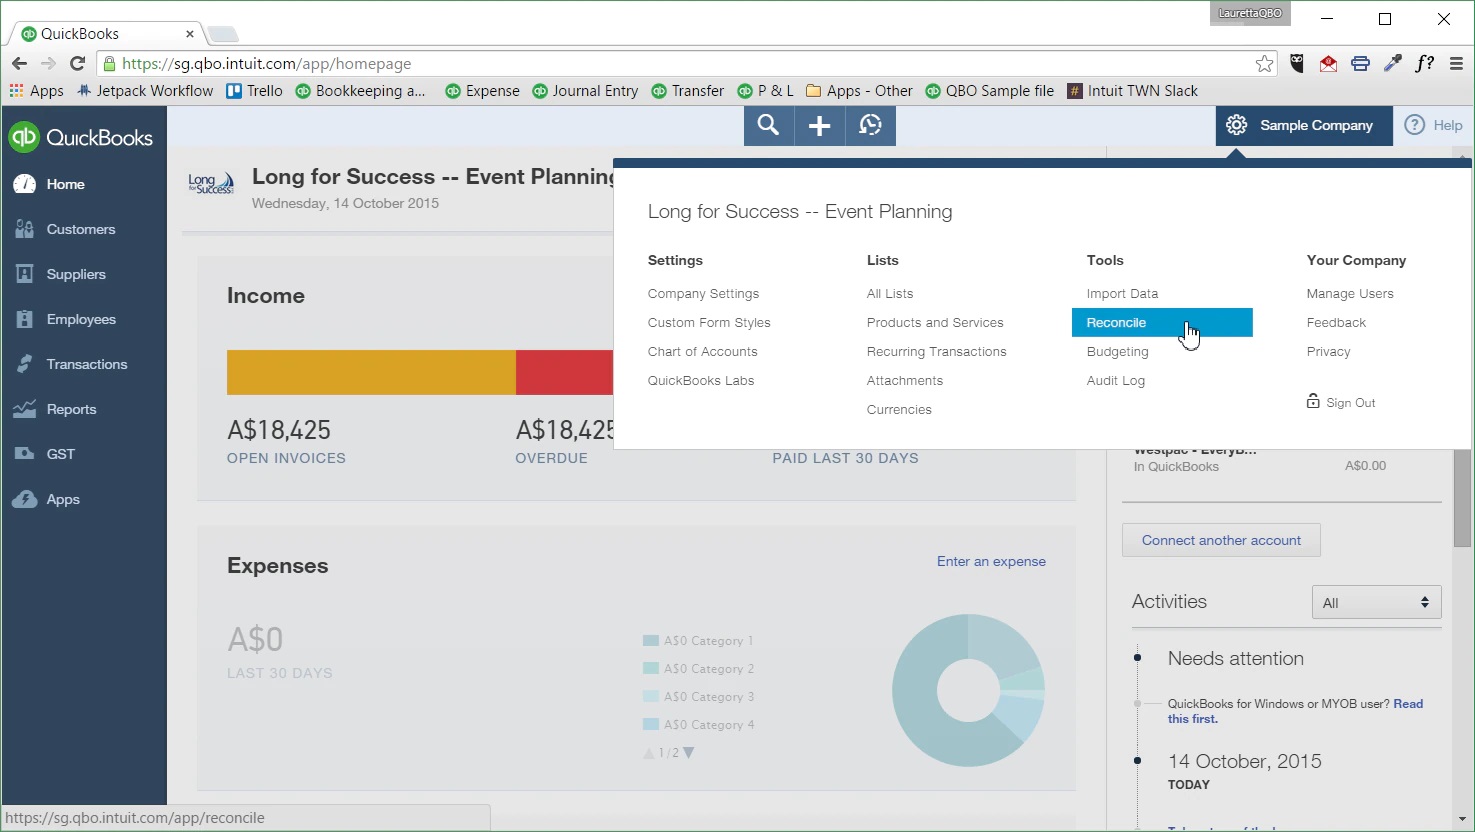
- On the window of “Reconcile”, look for the “Account” drop-down menu’s arrow and tap on it.
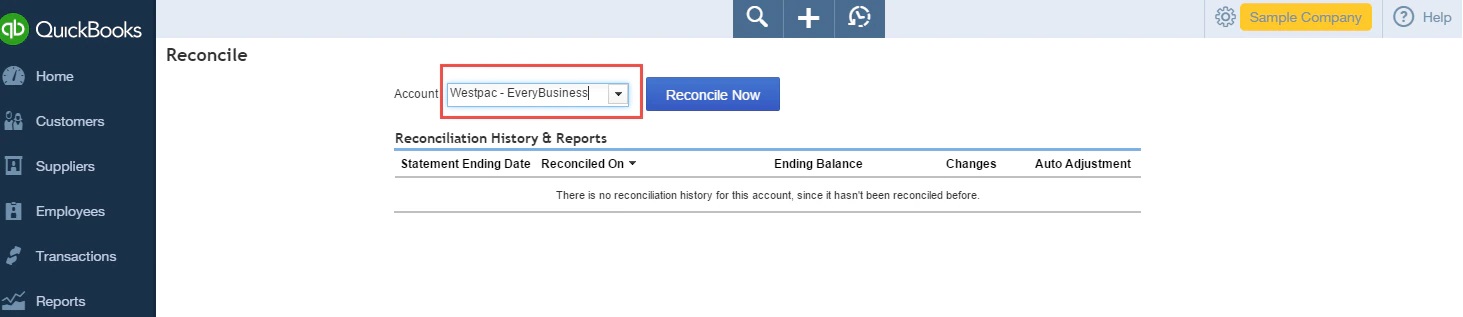
- Here, the bank that is going to be reconciled needs to be picked.
- Opt for “Reconcile Now” in this step.
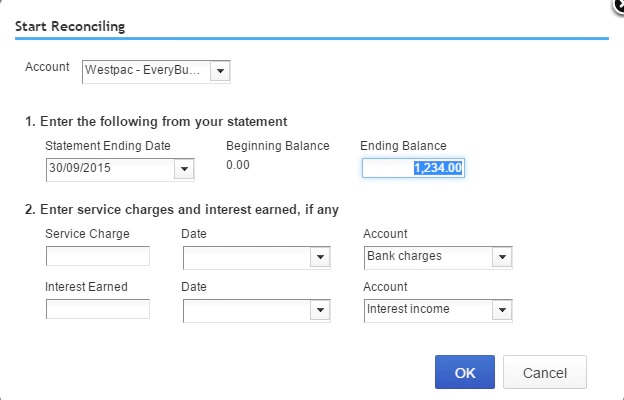
- Go to the “Statement Ending Date” field. Then mention the last date of the bank statement up to which it has to be reconciled.
- Further head to the field named “Ending Balance” and mention the closing amount over here.
- Press “Ok” then to further reconcile bank statement in QuickBooks.
- When another window opens, you can see that some of the transactions are already ticked. These are manual entries that have been extracted from the feed of your online banking.
- You need to go through them and check whether they are correct.
- Also, make sure to verify the “Beginning Balance” and the “Statement Ending Balance”.
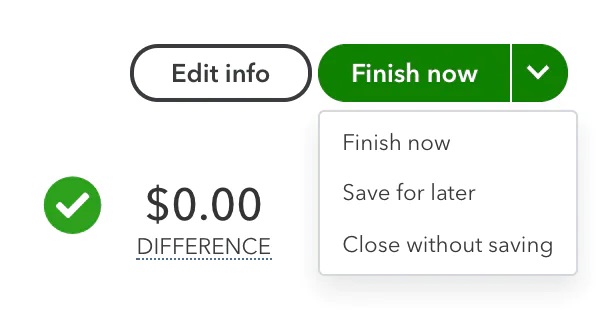
- When the “Difference” field mentions “$0.00”, it means that the chosen bank account has now been reconciled.
- You can also opt for “Edit Information from Statement” to change any of the given information if entered incorrectly.
- Tap on “Finish Now” to end the procedure.
Note: In case you do not want to complete the process now, you can simply tap on the “Finish Later” tab. You can be assured that the transactions won’t get lost.
3. How to Reconcile a Bank Statement in QuickBooks Online?
When you don’t have much clarity about how to reconcile a bank statement in QuickBooks Online, you can simply begin by going through the opening balances. You need to check for the balance shown on the bank statement and the amount specified in the accounting program. Furthermore, the Gear tab will lead you to the Reconcile option. Once the window opens, select the bank account that you want to reconcile.
- Through the main window of QuickBooks Online, the opening balance of the bank account and the account in the software have to be reviewed.
- To start the reconciliation process, tap on the “Gear” icon in QuickBooks Online.
- After doing so, click on the “Reconcile” button.
- In case you haven’t reconciled before, opt for “Get Started”.
- Then in the drop-down arrow given for “Account”, select the bank account to be reconciled.
- Have a look at the section of “Beginning Balance” and examine if it is accurate.
- Ensure that the balance shown here is matching with the one present on your bank statement.
- Next, you will have to mention the “Ending Balance” followed by the “Ending Date” in the fields provided.
- You can also take a glance at the “Last Statement Ending Date” section to check the closing date of the previous reconciliation.
- Once you are done with all this, tap on the “Start Reconciling” option.
- Now, each of the transactions present on the bank statement has to be verified one by one.
- Take the first entry mentioned on your bank statement. Then locate the same entry on the window of “Reconciliation”.
- When the transactions match each other, you need to put a tick mark beside the “Deposit” section. Once you mark it, the entry will be considered reconciled.

- Now, go through all the transactions and carry out the comparison.
- After the entries have been checked, scroll down to verify whether the difference between the balances is “$0.00”.
- Tap on “Finish Now” to reconcile bank statement in QuickBooks.
4. How to Do a Bank Reconciliation in QuickBooks Desktop?
QuickBooks Desktop users can initiate a bank reconciliation process by reviewing their opening balances at first. When everything seems good, you can opt for the Banking feature. Then the Reconcile button has to be chosen to check items such as the beginning balance, closing balance, service charge, and interest earned. A comparison between the transactions has to be done as well to reconcile the bank statement.
The given steps will assist you in learning how to reconcile bank statements in QuickBooks Desktop:
Note: Create a backup of your company file in QuickBooks Desktop before heading towards the reconciliation procedure. This will help you retain your data and prevent any loss.
- The opening balance mentioned in the bank statement has to be reviewed with the opening balance of your QuickBooks Desktop account.
- On the page of the software, tap on the “Banking” feature.
- Next, click on “Reconcile”.
- Then move to the section of “Account”.
- Now, you need to opt for the bank account which you have been wanting to reconcile.
- The “Beginning Balance” section will already be filled by the software. You simply need to move to the “Ending Balance” field and enter the closing amount mentioned in your bank statement in this panel.
- Mention the service charge and the interest earned on the basis of the bank statement. In case they have been entered already, do not type them again.
- Examine all the details provided on the page. When everything is accurate, tap on the “Ok” button or the “Continue” tab.
After you complete performing these steps, you then have to begin matching the transactions to complete the reconciliation. Keep moving through the instructions provided below for understanding how to reconcile bank statement in QuickBooks Desktop:
- Have a look at the first transaction mentioned on the bank statement and then compare it with the same transaction entered on the “Reconcile” page.
- After both the entries look the same, a tick mark has to be put in the checkbox provided beside the transaction. This will ensure that the transactions have been reconciled.
- Now, go through each of the transactions and follow the same procedure as mentioned above.
- Once all the entries have been reconciled, go to the field of “Difference” and check whether it mentions “$0.00”.
- When it does, tap on the “Reconcile Now” tab.
5. How to Get Reconciliation Reports in QuickBooks Desktop?
Sometimes, after reconciling the bank statements, you may want to go through their reports. The accounting program allows you to view the reports of only up to 120 reconciliations. However, by not knowing the exact procedure, you may get stuck in viewing these. To pull out the reconciliation reports in the QuickBooks Desktop program, moving through the Reports option can be beneficial. Once tapped, the Banking tab can be visible which needs to be pressed then.
How to get reconciliation reports in QuickBooks Desktop can be understood through the steps outlined below:
- Launch the “QuickBooks Desktop” homepage.
- Move to the “Reports” tab.
- Then click on the option named “Banking”.
- Next, you need to tap on “Previous Reconciliation”.
- Head to the drop-down menu of “Account”.
- Here, the bank account that you want to reconcile needs to be chosen.
- Navigate to the field of “Statement Ending Date” and enter the period of reconciliation that is to be viewed.
- In the “Type of Report” section, choose the type in which it should be displayed.
Tip: In case you want to review the report for the purpose of fixing any errors, go with the “Detail” option.
- Now, you will have to pick the transactions that are to be seen in the report. Between the two options provided below, opt for just one:
- “Transactions Cleared at the Time of Reconciliation”
- “Transactions Cleared Plus Any Changes Made to those Transactions”
- Finally, to have a view of the reconciliation report, press the “Display” button.

The previous reconciliation should now be displayed on the screen. As you now comprehend how to get reconciliation reports in QuickBooks Desktop, you can make use of this on the other versions also. QuickBooks Desktop Premier, Pro, Enterprise, and the Accountant versions are some of these.
On the Whole
Reconciling the bank statements in the accounting software is necessary when required to maintain accurate financial records. Therefore, to do so, you should always be aware of how to reconcile bank statement in QuickBooks. As the other versions of software also allow you to match the statements, you need to carry out the specified procedures to get the best results.
FAQs – How to Reconcile Bank Statements in QuickBooks?
To reconcile bank statements in QuickBooks, you need to move to the “Gear” icon. From here, you are required to navigate to the “Tools” tab. Following this, please find and click on the “Reconcile” button for reconciling the bank statements.
QuickBooks bank reconciliation means comparing two accounts through a process. The comparison is made between the account of QuickBooks and the account in the bank. When both of them are checked side by side, the difference between them needs to be $0.00. However, minor differences in the balance may come up due to processing payments. You can rectify them as you match the transactions properly.
To know how to reconcile a bank statement in QuickBooks Desktop, you will have to first go through the opening balance. After doing so, the preparations for the bank reconciliation have to be started. Here, each of the transactions has to be entered that occurred during a given time period.
It is advisable for the users to reconcile their bank statements in QuickBooks every month. Large businesses may regularly deal with numerous transactions. For them, it will be helpful to reconcile the entries on a monthly basis. Matching them can help you in maintaining the accuracy of the accounts. After you reconcile the bank statements, you can have a check on the transactions entered in both accounts.
The accounting program does allow the users to reconcile their bank statements. In case you don’t have knowledge of how to reconcile bank statements in QuickBooks Online, you can begin by simply examining the opening balance. Kindly do so for your bank account as well as the QuickBooks Online one.
Before you start reconciling a bank statement in your QuickBooks software, you need to make sure that the company file of the program has been backed up. It is also to be ensured that a duplicate bank statement has not been received. If such a thing happens, then the account reconciliation won’t be accurate. Possibly, you will have to do it again.
You need to reconcile a bank statement in QuickBooks for several purposes. Most importantly, to check whether the balance of both your QuickBooks account and the bank account is the same, this process will be suggested. This will help you avoid any discrepancies in the accounts. It will also make certain that the transactions are being entered accurately.
You can easily print the bank reconciliation statement in QuickBooks. To do so, head to the “Lists” button. Then go to the feature named “Chart of Accounts”. After this, the bank account statement that has already been reconciled has to be double-clicked. Tap on the “Print” symbol now to print the reconciliation report.
You can pull up the previous reconciliation report in QuickBooks through the “Reports” tab. It is likely to carry a record of the same. Choosing the “Banking” option after this will assist you in understanding how to get reconciliation reports in QuickBooks. Afterward, tap on the “Previous Reconciliation” button to proceed ahead.