
Recording a loan payment in QuickBooks is preferred by those who want to keep a note of it. Even for sharing a record of the same with your accountant, this practice can be helpful. You may have come across the Payment to Deposit feature in the accounting software. This is the suggested feature to be used for recording loan payments. By writing checks in versions like QuickBooks Desktop, these payments can be entered. It should be known that loan payments, whether in cash or as non-cash assets, can be posted in QuickBooks.

How to record a loan payment in QuickBooks, QuickBooks Online, or QuickBooks Desktop, using these ways, can be read further on this page. Even when the loan is of different types, you will be able to receive help here.
How Do I Record a Loan Payment in QuickBooks?
QuickBooks offers you different options according to your preference for entering a loan payment. To record a cash loan in it, you will have to use the Make Deposits option. If you want to enter a non-cash asset loan in the software, then you may head to the Chart of Accounts option.
To know further about how to record a loan payment in QuickBooks, continue reading the following options.
Option 1: Recording a Cash Loan
When a cash loan has to be entered in QuickBooks, you can show it as a deposit. Then this deposit can be recorded in the software. Move to the Banking bar available at the left of the QuickBooks menu. Then tap on Make Deposits. After this, you have to tap on Cancel if the Payment to Deposit page appears. Next, you will have to fill in the required details on the Make Deposit window.
Let us also look at the remaining steps:
- Visit “QuickBooks” and look for the “Banking” option in the menu.
- Select “Make Deposits”.
- In case a “Payment to Deposit” page opens, you have to click on the “Cancel” button.
- You then need to fill in the appropriate details on the “Make Deposit” page.
- To deposit the loan via “Deposit to Field”, please click on the “Account” tab.
- In a memo, choose the “Date” and “Type” options.
- Tap on the liability account that was created to track the loan payment from “For Account”.
- Within the “Amount Column”, fill in the amount of the loan.
- Tap on “Save and Close”.
Option 2: Entering a Non-cash Asset Loan
By using the Chart of Accounts option, you can smoothly record a non-cash asset loan in the QuickBooks program. Start the process by visiting the Lists menu in QuickBooks. Then, you need to tap on the Chart of Accounts option. Also, right-click on the blank space present on the screen. Press New and opt for the suitable Type of Account.
The below directions will help you to know how to record a Loan Payment in QuickBooks when it is in a non-cash asset form:
- Move to the “Lists” menu in your QuickBooks account.
- Click on “Chart of Accounts”.
- Then you have to right-click on any blank space that you can find on the screen.
- Tap on “New”.
- Choose the appropriate “Type” of account amongst the following:
- “Fixed Asset”
- “Other Current Assets”
- “Other Assets”
- Press on the option of “Continue”.
- Fill in the “Name” and “Number” fields for your selected type of account.
- Hit “Save and Close”.
Must Read : How to Record Stripe Fees/Payments in QuickBooks Online
How to Record a Loan Payment in QuickBooks Desktop?
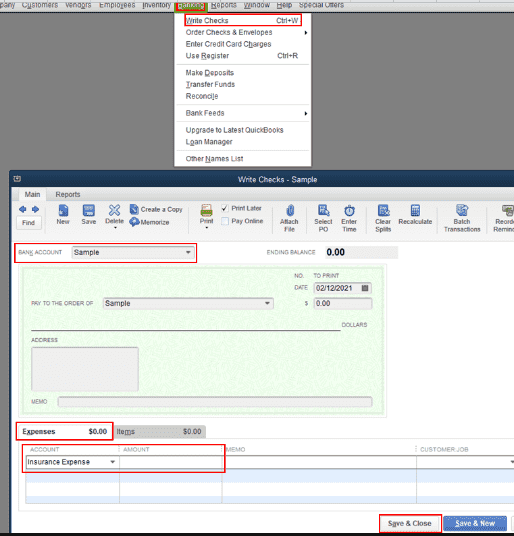
It is possible to write a check for the purpose of adding a loan payment record in QBDT. You can make a move to the Banking menu in QBDT. Next, click on Write Checks. You are required to choose the Bank account for paying the loan. Proceed to the Expenses bar. Among the drop-down options, tap on Expense Account. Keep reading the process to know about the rest of the steps.
To acquire knowledge about the directions explaining how to record a loan payment in QuickBooks Desktop, you may read ahead:
- Head towards the “Banking” option present on your QBDT account.
- Tap on “Write Checks”.
- Then you need to opt for the “Bank Account” to which the loan is to be paid.
- Go to the “Expenses” tab.
- From the options available in the drop-down menu, pick “Expense Account”.
- Fill up the “Payment” amount.
- Selecting “Save and Close” is the final step.
Entering a Loan Payment in QuickBooks Online
You can effortlessly record a loan payment in the QuickBooks Online software by picking up the Chart of Accounts option. You need to view the Gear menu to pick the said option. Then, you can select New. Among the Account Type drop-down options, click on Long Term Liabilities. How to record a Loan Payment in QuickBooks Online will now be done via this option.
- Open “QBO”
- Proceed towards the “Gear” symbol.
- Select the “Chart of Accounts” option.
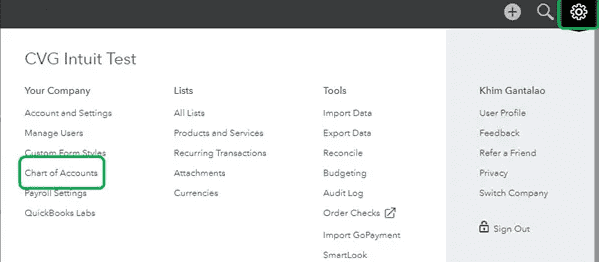
- Press “New”.
- In the “Account Type” drop-down, choose “Long Term Liabilities”.
- In case you want to pay the loan at the end of the fiscal year, opt for “Other Current Liabilities”.
- Go to the “Detail Type” drop-down.
- Click on “Notes Payable”.
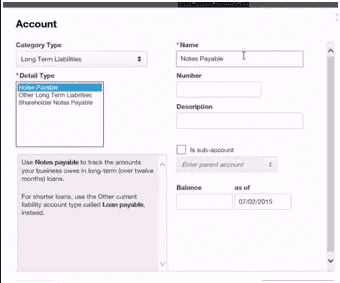
- To track the finances, opt for a date from the drop-down with the “Arrow” icon.
- Fill in the full loan amount in the “Amount” area.
Important: As payments are considered a liability for any business, you have to fill in the amount as negative.
- Pick the option of “Save and Close”.
Conclusion
After following all the steps mentioned above, you can now comfortably record a Loan Payment in QuickBooks as well as its other versions. The blog helped you to get knowledge about the various options available while recording a loan payment in the Intuit program. Considering what version of the program you are using, the correct option must be utilized.
To know about how to use undeposited funds in QuickBooks, you may read our other blog.
Also, click to understand more about the QuickBooks delete company files methods should you need to remove them in the future.