
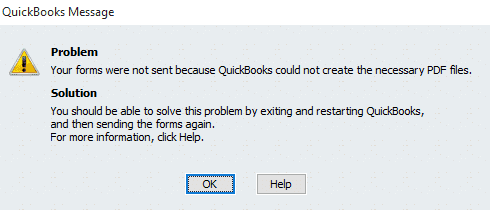
Sometimes, while using the software, users may undergo issues when QuickBooks will not create the necessary PDF files. This error can take place if there is a fault in the printing procedure. Users may solve the error by applying different methods. This issue can be fixed through the adjustment of Windows User Permissions in the XPS Document Writer. The adjustment needs to take place via the Control Panel in the computer. Likewise, you may bypass the Print Spooler to troubleshoot the QuickBooks error. There can be more reasons and fixes why QuickBooks could not create the necessary PDF files. By understanding both, troubleshooting the problem can be easier.
Why is QuickBooks Not Creating PDFs?
QuickBooks will not create a PDF file when the software may not be capable of printing through the QB PDF converter. QuickBooks may not be able to create a PDF due to many other reasons as well. More reasons/causes of the software not creating a PDF are as follows:
- In case an unrecoverable error occurs, QB may not be able to create a PDF.
- Any error in the XPS Document Writer may not let QB create a PDF.
- It can also happen that the accounting software does not respond.
- Printing issues can stop QB from creating a PDF.
- When the TEMP folder cannot be accessed by QuickBooks, there may be difficulties in creating a PDF.
How to Fix QuickBooks Not Creating PDF Error?
QuickBooks not creating a PDF error can be resolved by adjusting Windows User Permissions on the XPS Document Writer. You may also troubleshoot it by bypassing the Print Spooler. As another fix, you can run the QuickBooks PDF & Print Repair Tool. For fixing the issue, you may repair the MSXML 6.0 by running the file checker on your desktop.
1: Adjusting Windows User Permissions on the XPS Document Writer
The User Permissions are to be adjusted in Windows on the XPS Document Writer as a fix when QuickBooks could not create a PDF. Reach the Control Panel and move to Printers. Right-click on the Microsoft XPS Document Writer button. Then tap on Printer Properties. Press the Security tab. After that, from the list opt for Everyone and then pick Print.
- In the “Control Panel” of the Windows system, go to “Printers”.
- The “Microsoft XPS Document Writer” option is to be right-clicked.
- Press “Printer Properties”.
- Tap on “Security”.
- Choose “Everyone” from the list.
- In case you do not find “Everyone” in the list:
- Go to “Add Button”.
- Press “Check Names”.
- Tap on “Ok”.
- In the column of “Allow”, click on “Print”.
- Pick “Ok”.
- Go to “C:\Windows\System32\spool” via “Windows Explorer”.
- Right-click on the “Printers” button.
- Opt for “Properties”.
- Move to “Security”.
- Select the “Edit” option.
- Then tap on the “Add” tab.
- Here, you need to pick the “Local Service” option.
- In this step, you will have to hit “Enter”.
- The “Full Control” option is to be activated in “Local Service”.
- Push “Ok”.
- Visit “QuickBooks”.
- Now, try creating a PDF file.
The inability to make a PDF may not be the only error in QuickBooks. You may also experience an error due to which the QuickBooks may stop working. Fixing such an error is also suggested to properly use the software.
2: Through Bypassing Print Spooler
The error of the creation of a PDF in the QuickBooks software can be fixed when you need to bypass the Print Spooler. The Control Panel needs to be opened for the Printers option. Then right-click on the Microsoft XPS Document Writer tab. Pick the Printer Properties option. Select the Advanced button. Hit the Print Directly to Printer feature.
Complete the below-highlighted method in case QuickBooks could not create the necessary PDF files:
- Open “Control Panel” for the “Printers” in the system.
- “Microsoft XPS Document Writer” is to be right-clicked.
- Opt for the “Printer Properties” if you have “Windows 8” and above.
- In the case of “Windows 7”, choose “Properties”.
- Tap on “Advanced”.
- Select “Print Directly to Printer”.
- Push “Ok” to save it.
- Then close the window.
- Check whether the QuickBooks could not create a PDF error has been fixed.
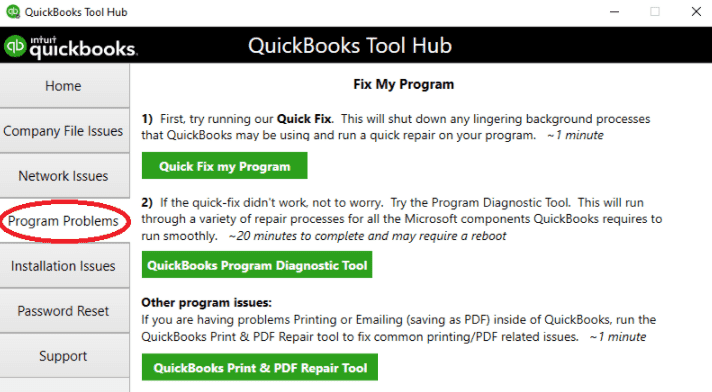
3: By Running QuickBooks PDF & Print Repair Tool
Sometimes there may be a fault in QuickBooks which can make it unable to create a PDF. Through the QB PDF & Print Repair Tool, you can get rid of the problem. Visit QuickBooks Tool Hub and tap on the Program Problems option. Then for the utility run, opt for QuickBooks PDF & Print Repair Tool if QuickBooks could not create a PDF. It will start to scan the issue and also resolve it.
- Launch “QuickBooks Tool Hub”.
- Press “Program Problems”.
- For running the utility, select “QuickBooks PDF & Print Repair Tool”.
- The tool will start scanning the error and fix it.
Important: Do not manually close the window or else this fix may not work.
- After the file is automatically closed, save the file as a PDF again for checking the error.
4: Running the File Checker in System for Repairing the MSXML 6.0 in Windows 8
Running the file checker or SFC repairs the MSXML 6.0 on Windows 8 which further helps for fixing the QuickBooks not creating PDF error. Tap on the Windows Start icon. Next, mention Command in the box provided and right-click on it. Opt for the Run as an Admin button. Provide the password in the field you can see and then proceed.
- Select the “Windows” icon on the keyboard.
- Enter “Command” in the search box.
- Right-click on it.
- Choose the “Run as an Admin” option.
- Mention the password in the “Enter the Admin Password” field provided.
- Pick “Ok”.
- Fill up “SFC/Scan”.
- Wait for some time to let the issue solve.
5: Changing the Permissions of the TEMP Folder
There can be conditions when QuickBooks will not create a PDF file. At that time, you are required to change the permissions of the TEMP folder for removing the PDF creation error. Close down the QB software and tap on the Window key and the R key at once to launch the Run dialog box. Now, fill in %TEMP% in the field mentioned. Further, pick the Ok option to do the needful.
Go through the below method to change the permissions of the TEMP folder.
- Shut down “QB”.
- Click on the “Window” and “R” keys together to visit “Run”.
- Type “%TEMP%”.
- Hit “Ok”.
- Right-click anywhere on the empty space on the “TEMP” screen.
- Next, press “Properties”.
- Select “Security”.
- Ensure to provide “Full Control”.
- Tap on “Save”.
- Pick “Ok”.
- Save a new PDF in QB to verify the fix.
In a Brief
Users may go through issues while creating a PDF in QuickBooks. The blog highlighted the reasons accountable for the QuickBooks could not create the necessary PDF files error. We also shared some of the methods that may help you to fix the problem on Windows 8. Hoping that the error may have been repaired, you should now be able to use QuickBooks like you always do.
It might be happened due to QuickBooks files issues. So, make sure to find out the newest release and update QuickBooks with it. After finishing, check out the issue.
f you cannot access your QuickBooks software then make sure to fill up other credentials. Moreover, don’t forget to clear the cache and cookies. If the issue still keeps on coming then disable the extension and update the browser also